
If you have been looking for a creative, fun, and practical project, this Crochet money bag keychain pattern- Step by Step Tutorial is the perfect choice. Crocheting small accessories like keychains not only improves your crochet skills but also gives you a chance to create unique handmade items for personal use or gifting. This tutorial will guide you through each step, making sure even beginners can follow along easily. The term Crochet money bag keychain pattern- Step by Step Tutorial will be explained clearly throughout this article so you can fully understand the process and enjoy crafting this adorable mini bag.
Crochet has always been a popular craft because it is both relaxing and rewarding. Making small projects like this Crochet money bag keychain pattern- Step by Step Tutorial helps beginners learn essential techniques without feeling overwhelmed. You will explore how to make the stitches, assemble the parts, and finish with a beautiful, functional keychain. Plus, this project does not require much yarn, making it affordable and eco-friendly since you can use leftover materials from other projects.
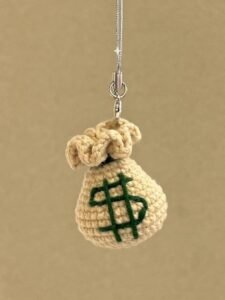
By the end of this Crochet money bag keychain pattern- Step by Step Tutorial, you will have a cute and practical keychain that can hold coins, tiny notes, or even small accessories. Whether you want to make it for yourself, as a gift, or to sell at craft fairs, this pattern is versatile and loved by many crochet enthusiasts. Now, let’s dive into the step-by-step instructions to create your very own crochet money bag keychain.
Materials Needed for the Crochet Money Bag Keychain Pattern
To start your Crochet money bag keychain pattern- Step by Step Tutorial, you will need only a few basic materials. Most of these items are easy to find in any craft store, and you might already have them at home if you’ve done crochet before.
First, you will need some yarn. Cotton yarn works best because it is durable and gives a neat finish. Pick your favorite colors, or even mix different shades for a unique look. This small project doesn’t use much yarn, so leftover pieces from other projects are perfect for it.
Second, you need a crochet hook. The size depends on the yarn weight you choose, but for a small keychain, a 2.5mm or 3mm hook is ideal. This size creates tight stitches so your mini bag holds its shape well and nothing falls out.
Third, you will need a keychain ring or lobster clasp to attach the mini money bag to your keys, bags, or even as a decorative charm. These can be found in craft stores or online at very affordable prices.
Other essential tools include a yarn needle for weaving in ends, scissors for trimming, and optionally a small button or drawstring cord to close the bag securely. A stitch marker might also be helpful to keep track of rounds if you are new to crocheting in the round.
Finally, make sure to have a comfortable workspace with good lighting. Crocheting small items like this Crochet money bag keychain pattern- Step by Step Tutorial requires attention to detail, so being comfortable makes the process more enjoyable.
With all your materials ready, you can move on to learning the basic stitches and techniques needed for this project. This ensures your final product looks neat and professional while staying beginner-friendly.
Step-by-Step Instructions for the Crochet Money Bag Keychain Pattern
Now that you have all your materials, let’s start the Crochet money bag keychain pattern- Step by Step Tutorial with clear and easy steps anyone can follow. Each step is simple, and by the end, you will have a functional mini bag to use as a keychain.
Begin with a magic ring. This is the foundation for many crochet projects worked in the round. If you are not familiar with it, think of it as an adjustable loop that allows you to close the starting circle tightly. Chain one and make six single crochets into the ring.
Next, pull the loop tight to close the circle. In the second round, increase in each stitch by making two single crochets in every stitch from the previous round. This gives you a total of twelve stitches and starts forming the base of the mini money bag.
For the third round, use the pattern of one single crochet in the first stitch, then two single crochets in the next stitch, and repeat around. This increases the stitch count gradually and ensures the bag has a flat base before building height.
Continue increasing similarly until the base is the size you want. Usually, three to four rounds are enough for a keychain-sized bag. Once the base is done, you stop increasing and simply crochet one single crochet in each stitch around to start forming the sides.
As you build the sides, you can switch colors if you want stripes or patterns. Crochet several rounds until the mini bag is the height you want. Remember, the Crochet money bag keychain pattern- Step by Step Tutorial is flexible, so you can adjust the size easily by adding or reducing rounds.
Finally, finish the top edge neatly. You can create small loops for a drawstring or sew on a tiny button for closure. Insert the drawstring cord or attach the button as preferred, and your mini money bag shape is complete.
Assembling and Adding the Keychain Ring
After finishing the mini bag, the next part of the Crochet money bag keychain pattern- Step by Step Tutorial is assembling and attaching the keychain ring or clasp. This step turns your crochet piece into a functional accessory.
Start by weaving in all loose yarn ends with a yarn needle. This step is essential to give your mini bag a neat finish and prevent it from unraveling with use. Make sure the inside looks tidy too since this is a small project.
Next, take the keychain ring or lobster clasp. You can attach it directly to the drawstring or use a small crocheted loop on the back of the mini bag for a stronger hold. Both methods work well, but using a crocheted loop keeps the bag hanging securely.
If you prefer the crocheted loop method, chain about eight to ten stitches and sew the loop securely onto the top corner of the mini bag. Slide the keyring through the loop, ensuring it moves smoothly without damaging the stitches.
Once the ring is attached, test the strength by gently pulling on it. The Crochet money bag keychain pattern- Step by Step Tutorial should result in a sturdy accessory that can handle regular use without falling apart.
At this point, your keychain is nearly ready. You can add decorative touches like tiny beads, buttons, or even small embroidered designs on the mini bag to personalize it further.
Adding these small details makes your project unique and gives it a professional look. Handmade accessories like this often make great gifts, so consider customizing colors or decorations based on the recipient’s preferences.
Tips, Tricks, and Care Instructions for Your Crochet Money Bag Keychain
Creating the Crochet money bag keychain pattern- Step by Step Tutorial is simple, but a few tips can make the process smoother and the final product better. These tricks are helpful whether you are a beginner or an experienced crocheter.
First, always keep your tension even. Uneven tension can make the mini bag look lopsided or create gaps in the fabric. Practice keeping your stitches consistent for a neat finish.
Second, choose durable yarn, especially if you plan to use the keychain daily. Cotton yarn is washable and holds up well over time, making it ideal for this project.
Third, if you want the mini bag to be slightly stiffer, you can lightly line it with fabric or use a fabric stiffener spray. This helps the bag keep its shape even when empty.
Fourth, when switching colors for stripes or patterns, always change the yarn at the start of a round for a cleaner look. Secure the ends well to prevent unraveling.
Fifth, to clean your crochet money bag keychain, gently hand wash it in mild soap and cold water. Lay it flat to dry so it keeps its shape.
Lastly, experiment with sizes and styles. The Crochet money bag keychain pattern- Step by Step Tutorial can be adapted into small pouches, gift bags, or even holiday ornaments using the same basic steps.
FAQ About Crochet Money Bag Keychain Pattern
Q1: Is this project beginner-friendly?
Yes, the Crochet money bag keychain pattern- Step by Step Tutorial is perfect for beginners. It uses basic stitches like single crochet and simple shaping techniques.
Q2: How long does it take to make one keychain?
Most people can complete one in about one to two hours, depending on skill level and size.
Q3: Can I use leftover yarn for this project?
Absolutely! This tutorial is great for using small yarn scraps, making it eco-friendly and cost-effective.
Q4: What other closures can I use instead of a drawstring?
You can use a small button, snap fastener, or even a tiny zipper if you prefer.
Q5: Is it washable?
Yes, just hand wash gently and air dry to maintain its shape and color.
Q6: Can I sell the finished keychains?
Of course! Handmade crochet keychains are popular at craft fairs and online shops.
Conclusion
In this article, we explored the Crochet money bag keychain pattern- Step by Step Tutorial from start to finish.
You learned about the materials needed, the basic stitches, how to assemble the bag, attach the keychain ring, and even personalize it with decorations. We also covered helpful tips and answered common questions to make the process easy for everyone.
Now it’s your turn to try this project and create a cute, practical accessory. Share your experience in the comments, give your honest opinion, and feel free to suggest new ideas for future tutorials. Your feedback helps keep the crafting community creative and inspiring!