
If you’re looking for a fun and creative project that’s both cute and functional, this Crochet Owl Coin Purse – Step by Step Tutorial is the perfect idea. Combining practicality and charm, this little coin purse shaped like an owl will make an adorable accessory for your bag or a thoughtful handmade gift for someone special. With its colorful design and expressive owl eyes, it’s not only useful for storing coins but also a delightful way to showcase your crochet skills.
Crochet coin purses are great for beginners and experienced crocheters alike. They don’t take much time, require only a small amount of yarn, and allow you to experiment with different colors and textures. In this Crochet Owl Coin Purse – Step by Step Tutorial, you’ll learn how to create the owl’s round body, add the eyes and beak, and finish with a simple clasp closure. Each part is broken down into easy steps so you can follow along comfortably.
Owls have long been a popular theme in crafts because of their wise and whimsical appearance. With this project, you can bring that charm into a functional design that keeps your spare change safe and organized. The Crochet Owl Coin Purse can also be customized with different colors, embellishments, or sizes to match your personality or gifting needs. So, grab your yarn, hook, and enthusiasm, and let’s dive into this creative and enjoyable Crochet Owl Coin Purse – Step by Step Tutorial!
Materials and Preparation
Before you begin this Crochet Owl Coin Purse – Step by Step Tutorial, it’s important to gather all the materials you’ll need. You’ll want to use a medium-weight yarn, such as cotton or acrylic, which holds its shape well and offers a nice texture for the owl’s body. Choose colors that make your owl stand out—commonly, bright or pastel shades for the body and white, black, and orange for the face details work beautifully.
You will also need a crochet hook appropriate for your yarn size—typically a 3.0mm or 3.5mm hook works perfectly. Don’t forget scissors, a yarn needle for weaving in ends, and a small zipper or metal clasp for closing the purse. Some crocheters like to add a felt lining inside the purse for extra durability, which is a nice optional touch.
Before starting, take a few minutes to test your tension. The stitches should be firm enough to hold the coin purse’s shape but not too tight, as that might make the crochet fabric stiff. Maintaining even tension throughout the project ensures your Crochet Owl Coin Purse turns out neat and professional-looking.
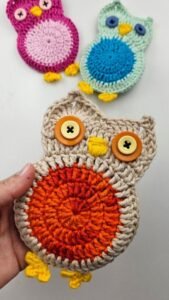
A fun part of this project is choosing the color combinations. You can create a realistic owl look with browns and creams or go for a playful vibe with pinks, blues, or yellows. Since the owl’s personality shines through its color scheme and facial expression, don’t be afraid to get creative!
Once you have all your materials ready and your colors chosen, it’s time to begin. Having everything on hand will make your crocheting experience smooth and enjoyable. Now, let’s move on to crafting the owl’s adorable body, which forms the base of your Crochet Owl Coin Purse.
Crocheting the Owl’s Body
To start your Crochet Owl Coin Purse – Step by Step Tutorial, begin by making the body, which forms the main pouch of the purse. Using your main color yarn, create a magic ring and work six single crochet stitches into the ring. Pull it tight and join with a slip stitch. In the next round, make two single crochet stitches in each stitch to increase to twelve stitches. Continue increasing evenly in each round until your circle measures about 9–10 cm in diameter.
Once the base circle is the desired size, stop increasing and continue crocheting single crochet stitches in each stitch around. This will start to form the sides of the coin purse. Keep crocheting in continuous rounds until you reach the height you want—usually around 8–10 cm tall works well.
Next, we’ll shape the top part where the zipper or clasp will go. Flatten your crochet piece to identify the front and back sides. You can choose to slightly curve the upper edges to mimic the owl’s head shape by adding short rows at the front. This creates a gentle slope that looks more natural once assembled.
If you want to add more structure to your Crochet Owl Coin Purse, you can insert a thin layer of felt inside the crochet fabric before finishing the top edge. This gives the purse extra stability and helps it hold its shape.
When you’re satisfied with the body’s size and shape, fasten off and weave in any loose ends. Your purse’s base is now ready, and it’s time to move on to the most exciting part—creating the owl’s face and giving it personality!
Making the Owl’s Face and Eyes
In this section of the Crochet Owl Coin Purse – Step by Step Tutorial, we’ll create the face that gives the owl its charm. Start with white yarn to make the eyes. Create two circles by working six single crochet stitches into a magic ring. In the next round, make two single crochets in each stitch for a total of twelve stitches. You can make the eyes larger by adding another round of single crochets if desired.
For the pupils, use black yarn and make two small circles using a magic ring with four single crochet stitches. Attach the pupils to the center of the white eye circles by sewing or gluing them carefully. You can even add a small white stitch in the corner of each pupil for a cute “sparkle” effect.
Next, crochet a small triangle for the beak using orange or yellow yarn. To do this, chain three, then work one single crochet in the second chain from the hook and a half double crochet in the next chain. Fasten off and leave a tail for sewing. The beak should be small and centered between the two eyes.
Position the eyes and beak on the front of your owl’s body, adjusting them until they look right. Once you’re satisfied, sew them securely using a yarn needle. Be sure to space the eyes evenly apart to maintain the owl’s symmetrical appearance.
Adding facial details gives your Crochet Owl Coin Purse its adorable character. Some crafters also like to add small stitched eyelashes or eyebrows for extra personality. You can personalize your owl however you like, making it cute, funny, or elegant depending on your style.
When the face is finished, your owl will already look lively and expressive. The next step in this Crochet Owl Coin Purse – Step by Step Tutorial is to give it wings and other final details.
Adding Wings, Ears, and Assembly
To make the wings, use the same or a contrasting color of yarn. Chain six stitches, then work single crochet, half double crochet, and double crochet stitches along the chain to create a curved shape. Repeat this on the opposite side of the chain to form an oval-like wing. Make two of these and sew them to each side of the owl’s body.
For the ears, you can make small triangular shapes similar to the beak. Chain four stitches, then work single crochets decreasing each row until one stitch remains. Make two ears and sew them to the top corners of your owl. These little touches really bring the design together.
Now that your owl has wings, ears, and a face, it’s time to attach the closure. If you’re using a zipper, align it carefully along the top edge and sew it in place using a backstitch for durability. If you prefer a metal clasp, attach it evenly, ensuring both sides are symmetrical. This will help your Crochet Owl Coin Purse open and close smoothly.
For an optional detail, you can line the inside of your purse with fabric or felt. Cut the lining slightly smaller than the crochet body and sew it inside. This not only adds strength but also prevents small items from snagging on the yarn.
Once assembled, weave in all loose ends neatly. Your Crochet Owl Coin Purse is now complete and ready to use! You’ll be amazed at how such a small project can bring so much joy and personality to your everyday accessories.
Customization and Creative Ideas
One of the best parts about this Crochet Owl Coin Purse – Step by Step Tutorial is how customizable it is. You can make a whole collection of owl purses in different colors for friends and family or to sell at craft fairs. Each one can have its own unique expression, color pattern, and size.
Try adding embellishments like tiny buttons, beads, or embroidered flowers. You can also make the purse slightly larger to use it as a small makeup pouch or a mini storage bag for jewelry. The possibilities are endless when it comes to personalization.
You can also experiment with different textures of yarn—metallic yarn for sparkle, velvet for a soft touch, or variegated yarn for a beautiful gradient effect. Each variation gives your Crochet Owl Coin Purse a fresh and distinct look.
For kids, try using bright, cheerful colors and maybe add a keychain ring so they can attach it to their backpacks. For adults, opt for neutral or earthy tones for a more elegant design. This makes the crochet owl coin purse both fun and functional for all ages.
The Crochet Owl Coin Purse – Step by Step Tutorial encourages you to explore creativity and enjoy the process of making something by hand. Whether it’s your first time or your tenth, each creation will feel rewarding.
Finally, don’t forget to label your handmade work if you sell or gift it—your beautiful crochet deserves recognition!
FAQ
1. Is this Crochet Owl Coin Purse suitable for beginners?
Yes! The pattern uses basic stitches such as single crochet and double crochet, making it perfect for beginners with some basic crochet knowledge.
2. How long does it take to make a crochet owl coin purse?
Typically, it takes around two to three hours, depending on your speed and experience level.
3. What type of yarn works best for this project?
Cotton or acrylic yarn works best because they hold their shape well and provide good stitch definition.
4. Can I use this pattern to make a larger bag?
Absolutely! You can increase the base size and height to create a larger pouch or mini handbag.
5. How do I clean my crochet owl coin purse?
Gently hand wash in cool water and air dry flat. Avoid wringing or machine washing to preserve its shape.
Conclusion
In this Crochet Owl Coin Purse – Step by Step Tutorial, you’ve learned how to make an adorable and practical accessory from start to finish.
From creating the owl’s body to adding its expressive face and wings, each step helps you build a unique piece that reflects your creativity. This project is quick, fun, and perfect for using leftover yarn while producing something functional and charming.
Now that you’ve completed your Crochet Owl Coin Purse, we’d love to hear your thoughts! Share your honest opinion and suggestions about this tutorial. Your feedback helps inspire more creative crochet ideas for future projects.