
Crochet owl tutorial for applique is a delightful and creative way to bring charm, texture, and personality into your handmade projects. Whether you are a beginner or an experienced crafter, learning a Crochet owl tutorial for applique opens up endless possibilities for decorating blankets, bags, clothing, and home décor items. This technique combines the beauty of crochet with the versatility of appliqué, allowing you to create adorable owl designs that can be easily sewn onto different surfaces.
One of the reasons why the Crochet owl tutorial for applique has become so popular is its simplicity and adaptability. You don’t need advanced skills to get started, and with just a few basic stitches, you can create intricate and eye-catching designs. Additionally, crochet owls are loved for their symbolic meaning, often associated with wisdom, warmth, and comfort, making them perfect for gifts and personalized handmade items.
As you explore this Crochet owl tutorial for applique, you will discover how to choose the right materials, understand essential stitches, and assemble your owl design step by step. This guide is carefully crafted to follow best practices for clarity, creativity, and usability, ensuring your crafting experience is both enjoyable and rewarding. Let’s dive into the process and bring your crochet owl to life.
Getting Started with Crochet Owl Tutorial for Applique
To begin your Crochet owl tutorial for applique, it’s important to gather the right materials. Typically, you will need yarn in different colors, a suitable crochet hook, scissors, and a yarn needle. Choosing soft yet durable yarn ensures your owl appliqué will maintain its shape and texture over time.
Selecting the correct yarn weight is another essential step in your Crochet owl tutorial for applique. Lightweight yarns are ideal for delicate designs, while medium-weight yarns provide more structure. Beginners often find medium-weight yarn easier to handle and more forgiving when learning new stitches.
Understanding basic crochet stitches is key when following a Crochet owl tutorial for applique. Common stitches include chain stitch, single crochet, double crochet, and slip stitch. Mastering these stitches will allow you to create clean and consistent shapes for your owl.
Color selection plays a significant role in your Crochet owl tutorial for applique. Traditional owls use earthy tones like brown, beige, and white, but you can experiment with bright and playful colors to create unique designs that stand out.
Before starting your project, it’s helpful to practice tension control. Maintaining even tension ensures your appliqué looks neat and professional. This is a fundamental skill emphasized in any Crochet owl tutorial for applique.
Finally, having a clear pattern or guide is essential. Whether you follow written instructions or visual references, a structured Crochet owl tutorial for applique helps you stay organized and confident throughout the process.
Step-by-Step Process of Crochet Owl Applique
The first step in your Crochet owl tutorial for applique is creating the base shape of the owl. This is usually done by crocheting a circular or oval piece that forms the body. Starting with a magic ring or chain loop is a common technique.
Once the base is complete, you can begin shaping the owl’s body by increasing stitches evenly. This technique ensures the shape remains flat and symmetrical, which is crucial in a well-executed Crochet owl tutorial for applique.
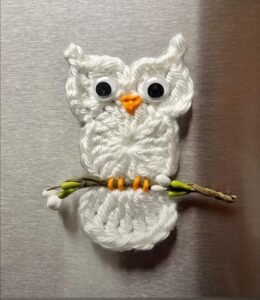
Next, you will create the eyes, which are one of the most defining features in a Crochet owl tutorial for applique. These are often made as small circles using contrasting yarn colors to give the owl a lively and expressive look.
The beak is another important detail in your Crochet owl tutorial for applique. It is typically made using a small triangle shape and sewn onto the center of the face. This adds character and completes the owl’s facial features.
Wings are optional but highly recommended in a Crochet owl tutorial for applique. They can be made separately and attached to the sides of the body, adding dimension and texture to your design.
Finally, assembling all the parts is the last step. Carefully sew each piece together, ensuring proper placement and alignment. This step brings your Crochet owl tutorial for applique project to life.
Creative Ideas for Using Crochet Owl Applique
One of the most popular uses of a Crochet owl tutorial for applique is decorating baby blankets. The soft and friendly design of owls makes them perfect for nursery items and thoughtful handmade gifts.
You can also use your Crochet owl tutorial for applique to embellish clothing items such as sweaters, hats, and scarves. Adding a small owl design instantly transforms simple garments into unique pieces.
Another creative idea is incorporating your Crochet owl tutorial for applique into home décor. Pillow covers, wall hangings, and table runners can all benefit from the charm of crochet owls.
Bags and accessories are also great canvases for your Crochet owl tutorial for applique. Whether it’s a tote bag or a purse, an owl appliqué adds a handmade and artistic touch.
For seasonal decorations, your Crochet owl tutorial for applique can be adapted with festive colors and themes. This makes it easy to create decorations for holidays or special occasions.
Lastly, these appliqués are perfect for crafting personalized gifts. Handmade items created with a Crochet owl tutorial for applique carry sentimental value and show thoughtful effort.
Tips to Improve Your Crochet Owl Applique Skills
Consistency is key when mastering a Crochet owl tutorial for applique. Practicing regularly helps improve your stitch quality and overall technique, leading to more polished results.
Pay attention to detail, especially when working on small elements like eyes and beak. Precision is essential in any Crochet owl tutorial for applique, as these details define the final appearance.
Experimenting with different yarn textures can enhance your Crochet owl tutorial for applique projects. Mixing soft and textured yarns adds depth and visual interest.
Blocking your finished appliqué is another useful tip. This process helps shape and set your design, making your Crochet owl tutorial for applique look more professional.
Learning from mistakes is part of the journey. If something doesn’t turn out as expected, use it as an opportunity to refine your approach to the Crochet owl tutorial for applique.
Finally, stay inspired by exploring new patterns and variations. Expanding your creativity ensures your Crochet owl tutorial for applique projects remain exciting and unique.
Crochet Owl Tutorial for Applique
What is a Crochet owl tutorial for applique?
A Crochet owl tutorial for applique is a step-by-step guide that teaches how to create small crochet owl designs intended to be sewn onto other items like clothing, blankets, or accessories.
Is a Crochet owl tutorial for applique suitable for beginners?
Yes, most Crochet owl tutorial for applique patterns are beginner-friendly, especially those that use basic stitches and simple shapes.
What materials are needed for a Crochet owl tutorial for applique?
You typically need yarn, a crochet hook, scissors, and a yarn needle. Optional materials include safety eyes or embroidery thread for details.
How long does it take to complete a Crochet owl tutorial for applique?
It can take anywhere from 30 minutes to a few hours, depending on your experience level and the complexity of the design.
Can I customize my Crochet owl tutorial for applique?
Absolutely. You can experiment with colors, sizes, and additional features to create a unique design.
Where can I use items made from a Crochet owl tutorial for applique?
They can be used on clothing, accessories, home décor, and gifts, making them versatile and practical.
Conclusion
In this article, we explored everything you need to know about the Crochet owl tutorial for applique, from selecting materials and learning basic stitches to assembling your owl and using it creatively. This technique offers a wonderful way to enhance your crochet projects with charming and personalized details.
By following this Crochet owl tutorial for applique, you can develop your skills, express your creativity, and create beautiful handmade pieces that stand out. Whether you are crafting for yourself or making gifts for others, this method is both enjoyable and rewarding.
Now it’s your turn to try this Crochet owl tutorial for applique and see what you can create. Feel free to share your honest opinion, experiences, and suggestions—your feedback is always valuable and helps inspire even more creative ideas.