
If you have been searching for a Crochet pattern for coasters and coaster holder- Step by Step Tutorial, you are in the right place. In this article, we will walk you through a detailed, beginner-friendly process to create beautiful crochet coasters along with a matching holder. These items are perfect for protecting your furniture while adding a cozy, handmade touch to your home. Following a Crochet pattern for coasters and coaster holder- Step by Step Tutorial will help you craft practical and stylish accessories, even if you are new to crocheting.
Crochet coasters are one of the easiest projects to start with, and the addition of a holder makes them even more useful. By learning this Crochet pattern for coasters and coaster holder- Step by Step Tutorial, you will be able to make sets for yourself or to give as thoughtful handmade gifts. With just a few materials and some practice, you can create a project that combines beauty, function, and a personal touch.
In this guide, we will explain everything clearly, using simple language to ensure that even beginners can follow along. Each step of the Crochet pattern for coasters and coaster holder- Step by Step Tutorial will be described in detail, so you can achieve great results. Let’s get started on this fun and creative journey into the world of crochet.
Materials and Preparation for the Crochet Pattern
Before diving into the Crochet pattern for coasters and coaster holder- Step by Step Tutorial, it is important to gather all the materials you will need. Having everything ready will make the process smoother and more enjoyable. The basic supplies include yarn, a crochet hook, scissors, and a yarn needle. For coasters, cotton yarn is recommended because it is durable, absorbent, and easy to clean.
When choosing your yarn colors, consider the style and theme of your home décor. Neutral shades work well for a minimalist look, while bright colors can make your coasters stand out. The Crochet pattern for coasters and coaster holder- Step by Step Tutorial allows for a lot of creativity, so feel free to experiment with different color combinations.
Next, make sure you have the right crochet hook size for your yarn. The yarn label usually suggests a hook size, which ensures that your stitches will be neat and even. Following this recommendation is especially important for beginners trying the Crochet pattern for coasters and coaster holder- Step by Step Tutorial for the first time.
Before starting the actual project, practice making a few basic crochet stitches such as chain, single crochet, and slip stitch. These are commonly used in the Crochet pattern for coasters and coaster holder- Step by Step Tutorial and will give you confidence as you work through the instructions.
Also, set aside a comfortable and well-lit space for your crafting session. Having a clean and organized area will help you concentrate better and enjoy the process of creating your crochet coasters and holder.
Finally, remember that patience is key. The Crochet pattern for coasters and coaster holder- Step by Step Tutorial might seem challenging at first, but with practice, you will soon find it relaxing and rewarding.
Step-by-Step Instructions for Crochet Coasters
Now that you have all the materials ready, let’s begin with the coaster part of the Crochet pattern for coasters and coaster holder- Step by Step Tutorial. Start by making a slip knot and creating a chain of about four to six stitches. Then, join the chain into a small loop using a slip stitch. This loop will form the center of your coaster.
In the next round, crochet several single crochet stitches into the center loop. The number of stitches will determine the size of your coaster, so add more if you want a bigger piece. For this Crochet pattern for coasters and coaster holder- Step by Step Tutorial, about 12 stitches in the first round work well for a standard size.
Once the center is complete, continue crocheting in rounds, adding extra stitches evenly in each round to keep the coaster flat. If you do not add enough stitches, the coaster may curl up, while adding too many might cause it to ruffle. The Crochet pattern for coasters and coaster holder- Step by Step Tutorial will guide you on how many stitches to increase per round for a perfect shape.
As you progress, you can change yarn colors to create stripes or patterns. Simply cut the yarn at the end of a round, tie in the new color, and continue crocheting. This step adds creativity and uniqueness to your project while following the Crochet pattern for coasters and coaster holder- Step by Step Tutorial.
Keep crocheting rounds until the coaster reaches your desired size. Typically, a diameter of 4 to 5 inches is ideal for most cups and glasses. Following the Crochet pattern for coasters and coaster holder- Step by Step Tutorial ensures that each coaster in your set will be uniform in size and appearance.
Finish off the coaster by cutting the yarn, pulling it through the last loop, and weaving in the ends with a yarn needle. Your first coaster is now complete, and you can repeat the process to make as many as you need for your set.
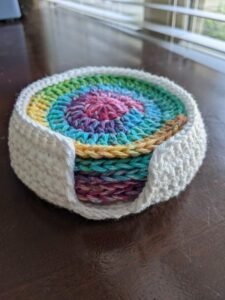
Creating the Coaster Holder
After making the coasters, it’s time to create the matching holder using the Crochet pattern for coasters and coaster holder- Step by Step Tutorial. Start by crocheting a base that is slightly larger than your coasters. This base will serve as the bottom of the holder and should be sturdy enough to support the stack of coasters.
To make the sides of the holder, crochet upward from the edge of the base in continuous rounds. The Crochet pattern for coasters and coaster holder- Step by Step Tutorial usually recommends single crochet stitches for a strong and durable structure. Continue crocheting until the sides are tall enough to hold all your coasters comfortably.
You can add handles or small decorative details to the holder if you wish. For example, a simple loop handle makes it easy to carry, while a scalloped edge adds a decorative touch. These creative elements make the Crochet pattern for coasters and coaster holder- Step by Step Tutorial even more enjoyable to follow.
If you want the holder to be firmer, consider using two strands of yarn held together or adding a piece of cardboard at the base for extra stability. This step is optional but recommended for a more professional finish when completing the Crochet pattern for coasters and coaster holder- Step by Step Tutorial.
Once you are happy with the height and structure of the holder, finish off the yarn and weave in any loose ends neatly. Your coaster holder is now ready to be paired with the coasters you made earlier using the Crochet pattern for coasters and coaster holder- Step by Step Tutorial.
Having a matching set of coasters and a holder creates a beautiful and organized look for your table or kitchen area. It also makes storage easy and keeps everything in one place.
Tips, Tricks, and Creative Ideas
When working on the Crochet pattern for coasters and coaster holder- Step by Step Tutorial, there are many ways to add personal touches to your project. For example, you can experiment with textured stitches like puff stitch or shell stitch to give your coasters a unique look.
Another fun idea is to use variegated yarn, which changes colors automatically as you crochet. This creates a beautiful, multicolored effect without having to switch yarns manually while following the Crochet pattern for coasters and coaster holder- Step by Step Tutorial.
Blocking your coasters after finishing them is another useful tip. Simply dampen the coasters, shape them perfectly, and let them dry flat. This step ensures that your work looks neat and professional after completing the Crochet pattern for coasters and coaster holder- Step by Step Tutorial.
You can also personalize your coasters by adding small appliqués like flowers, hearts, or initials. These decorative additions make your handmade coasters even more special and unique.
If you plan to give your coasters as gifts, consider making a set with different colors or seasonal themes. For example, red and green coasters for Christmas or pastel shades for spring will make your Crochet pattern for coasters and coaster holder- Step by Step Tutorial projects more festive.
Finally, always remember to enjoy the process. Crocheting is not only about the final product but also about the relaxation and creativity it brings.
FAQ – Crochet Pattern for Coasters and Coaster Holder
1. Can beginners follow this Crochet pattern for coasters and coaster holder- Step by Step Tutorial?
Yes, this tutorial is designed for beginners, with clear instructions for each step.
2. How long does it take to complete a set?
It depends on your speed, but typically a set of 6 coasters and one holder can be made in a few evenings.
3. What type of yarn is best for coasters?
Cotton yarn is recommended because it is absorbent, durable, and easy to wash.
4. Can I make the holder bigger or smaller?
Yes, simply adjust the size of the base and the height of the sides to fit your coasters.
5. Do I need special tools for this project?
No, just basic crochet supplies like a hook, yarn, scissors, and a yarn needle are enough.
6. How do I clean crochet coasters?
Most cotton coasters can be hand washed or machine washed on a gentle cycle and air-dried.
Conclusion
In this article, we covered a complete Crochet pattern for coasters and coaster holder- Step by Step Tutorial, from gathering materials to creating coasters and a matching holder. We also shared tips for customization and provided answers to common questions.
Now it’s your turn to try this fun and practical project. Follow the steps, enjoy the creative process, and soon you will have a beautiful set of handmade coasters and a holder.
We would love to hear your honest opinion and any suggestions you have, so please share your thoughts after completing your project!