
Learning how to make a crochet pattern for heart shaped coasters- step by step tutorial is a fun and rewarding project for crochet lovers of all levels. Handmade coasters are not only practical but also bring warmth and charm to any table setting. When you shape them like hearts, they become perfect for special occasions such as Valentine’s Day, anniversaries, or even as thoughtful handmade gifts for friends and family.
This crochet pattern for heart shaped coasters- step by step tutorial will guide you through every stage of the process, from selecting the right materials to the final finishing touches. Even if you are a beginner, you will find the instructions easy to follow. Crochet projects like this one are excellent for practicing stitches, learning how to shape pieces, and improving your overall crochet skills while creating something useful and beautiful.
Another reason this project is so popular is because of how customizable it is. With the same crochet pattern for heart shaped coasters- step by step tutorial, you can use different yarn colors, sizes, and stitches to create unique sets that reflect your personality or match your home décor. Whether you prefer classic red hearts or bright, fun colors, the choice is entirely yours.
Materials and Tools Needed for Heart Shaped Coasters
Before we dive into the actual crochet pattern for heart shaped coasters- step by step tutorial, it is essential to gather all the necessary materials and tools. Having everything ready in advance will make the process smoother and more enjoyable.
You will need yarn in your favorite colors. Cotton yarn is highly recommended for coasters because it absorbs moisture well and is easy to wash. Choose a medium-weight yarn for sturdy coasters that hold their shape but are not too bulky.
A crochet hook suitable for the yarn weight is also essential. The yarn label usually suggests a hook size, but you can go slightly smaller if you want tighter stitches for a firmer coaster.
Other useful tools include a pair of sharp scissors for cutting yarn ends, a yarn needle for weaving in loose threads, and stitch markers if you want to keep track of rounds or important points in the pattern.
A tape measure may also be handy to ensure all your coasters are the same size. Consistency is key when making sets, especially if they are intended as gifts.
Finally, prepare a flat surface for blocking your coasters after crocheting. Blocking helps give your coasters a neat, professional finish by shaping and flattening them properly.
Step by Step Instructions for Crocheting the Heart Shape
Now let’s move on to the main part of our crochet pattern for heart shaped coasters- step by step tutorial: creating the heart shape itself. This part may look complicated at first, but it is actually straightforward once you break it down into smaller steps.
Start with a magic ring or a small chain loop to form the center of the heart. The first round of stitches will build the foundation and give the heart its basic shape. Work single crochets, half double crochets, or double crochets depending on the pattern instructions you are following.
As you move to the next rounds, the key is to strategically increase and shape the stitches so the top curves of the heart form nicely while the bottom point remains sharp. Following the stitch counts carefully will ensure your heart comes out even and symmetrical.
Most patterns use a combination of stitches like single, half double, and double crochet stitches to create height differences and curves. These changes in stitch height are what give the heart its iconic shape.
After completing the main heart shape, many crocheters like to add a final round of single crochet stitches around the edge. This creates a neat border and helps define the heart outline clearly.
If you want your coaster to be thicker or reversible, you can crochet two identical hearts and sew or crochet them together around the edges, leaving no wrong side showing. This technique also makes the coaster more durable.
Adding Creative Touches to Your Heart Shaped Coasters
One of the best things about this crochet pattern for heart shaped coasters- step by step tutorial is how easy it is to personalize. Adding creative touches can make your coasters unique and special.
Consider using variegated yarns that automatically create colorful patterns as you crochet. These yarns can add a fun twist without any extra work on your part.
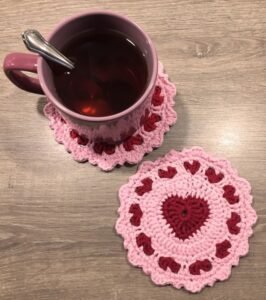
Another idea is to add a decorative edging. A scalloped or picot border around the heart can give your coasters a delicate, lacy look, perfect for romantic or festive settings.
You can also embroider small details on top of the finished heart, like initials, flowers, or even tiny faces, to make them playful and personalized. Use contrasting yarn colors so the embroidery stands out beautifully.
For holiday-themed coasters, experiment with colors and embellishments. For example, red and white for Valentine’s Day, green for St. Patrick’s Day, or even pastel shades for spring gatherings.
If you enjoy mixed crafts, you can sew small fabric appliqués onto the crocheted hearts or glue tiny beads along the edges for added sparkle and charm.
Finally, consider making a matching set with different sizes. Larger hearts can serve as potholders or table mats, while smaller ones work perfectly as coasters for cups and glasses.
Tips for Perfecting Your Crochet Heart Shaped Coasters
As with any project, this crochet pattern for heart shaped coasters- step by step tutorial comes with a few tips that can make your work easier and the results more professional.
First, always check your stitch tension. Even tension throughout the project ensures that all coasters in a set come out the same size and shape. If your stitches are too loose, try using a smaller hook; if too tight, use a larger one.
Blocking is another important step many beginners skip. After finishing the coasters, dampen them slightly, lay them flat on a towel, and pin them into the correct shape. Let them dry completely before use. This process smooths out any uneven edges.
If you are making coasters as gifts or for sale, choose yarn colors that match common home décor themes. Neutral colors like beige, gray, or soft pastels tend to be universally appreciated.
Practice the pattern with inexpensive yarn before using high-quality or specialty yarns. This way, you can perfect the technique without worrying about wasting materials.
Do not rush the shaping process. Take your time with each stitch, especially when forming the curves and point of the heart, as these details affect the final look significantly.
Lastly, store your finished coasters flat to maintain their shape. Stacking them neatly or tying them with a ribbon also makes them look attractive if you plan to give them as gifts.
FAQ About Crochet Pattern for Heart Shaped Coasters
1. Is this project suitable for beginners?
Yes, this crochet pattern for heart shaped coasters- step by step tutorial is beginner-friendly, using basic stitches like single and double crochet.
2. How long does it take to make one coaster?
Most people can finish one coaster in about 30–45 minutes, making it a quick and satisfying project.
3. What type of yarn works best?
Cotton yarn is ideal because it absorbs moisture well and is easy to wash, keeping your coasters practical as well as pretty.
4. Can I make these coasters in different sizes?
Absolutely! Adjusting the number of stitches or using thicker yarn can create larger coasters or even placemats.
5. Do I need special tools for this project?
No, just basic crochet supplies like yarn, a hook, scissors, and a yarn needle are enough to complete the project.
6. How do I keep the coasters from curling?
Proper blocking after crocheting helps flatten the coasters and keeps them from curling at the edges.
Conclusion
We have reached the end of our crochet pattern for heart shaped coasters- step by step tutorial, covering everything from gathering materials to adding creative touches and finishing techniques.
By following the instructions carefully, you can create beautiful, functional coasters that are perfect for everyday use or as thoughtful handmade gifts.
I hope this guide inspires you to try the project yourself. Please leave your honest opinion and share any suggestions for future tutorials—we love hearing your feedback and ideas for new crochet projects!