
If you are passionate about creative crafts, learning Crochet peacock keychain with tin seal- Step by Step Tutorial is a fun and rewarding project to try. Handmade keychains have become popular gifts and accessories because they combine practicality with a personal, artistic touch. By adding the detail of a tin seal, you create not only a decorative piece but also an eco-friendly craft that reuses small metal materials. Throughout this article, you will find a complete step by step tutorial that is simple enough for beginners but also satisfying for experienced crocheters.
The idea of making a crochet peacock keychain with tin seal may sound unique and slightly unusual, but it blends crochet art with upcycling in a way that feels fresh and modern. Peacocks symbolize beauty and elegance, which makes them the perfect subject for a colorful and stylish accessory. When combined with the durability of a tin seal, your crochet project gains both structure and longevity. This tutorial will show you how to transform simple yarn, a crochet hook, and a tin seal into a stunning accessory that can be used daily or given as a thoughtful handmade gift.
This guide is carefully designed to help you understand the process from start to finish. We will cover materials, stitches, assembly techniques, and finishing touches to achieve a professional look. The Crochet peacock keychain with tin seal- Step by Step Tutorial also includes tips on color selection, yarn types, and how to attach the finished piece to a keyring. Whether you want to create a keepsake for yourself or produce multiple pieces as gifts, this project is a versatile and enjoyable way to express your creativity.
Materials Needed for the Crochet Peacock Keychain with Tin Seal
To begin this Crochet peacock keychain with tin seal- Step by Step Tutorial, it is important to gather the right materials. Having everything prepared beforehand will make your crafting process smooth and enjoyable.
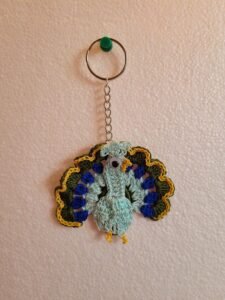
First, you will need yarn in different colors. Choosing peacock-inspired shades such as blue, green, turquoise, and a touch of gold or purple can highlight the design beautifully. Acrylic yarn is usually recommended for durability, while cotton yarn provides a neat and polished finish. Make sure your yarn weight matches the crochet hook size you plan to use.
Second, select the appropriate crochet hook. For keychains, smaller hooks such as 2.5 mm to 3.5 mm are ideal because they produce tighter stitches that create a firm structure. A firm stitch ensures the peacock design holds its shape, especially when attached to the tin seal.
The tin seal itself is a key part of this project. It will act as the base that gives stability to your peacock design. Wash and dry the seal carefully to remove any residue, and if needed, file down rough edges to make it safe for handling. This sustainable step adds originality and eco-consciousness to your crochet project.
Other essential supplies include scissors, a tapestry needle for weaving in ends, and a small keyring or lobster clasp. These items help transform your crocheted peacock into a fully functional accessory that can be used for keys, backpacks, or handbags.
Finally, consider adding optional decorative materials such as small beads, sequins, or embroidery thread. These embellishments can highlight the feathers of your peacock design and give your finished keychain a touch of sparkle and personality.
Once you have all these materials ready, you are set to start creating a unique and eco-friendly craft that blends beauty with functionality.
Step by Step Instructions for the Peacock Design
The next stage in this Crochet peacock keychain with tin seal- Step by Step Tutorial involves learning how to crochet the peacock body and feathers. Following step by step instructions will make the process easier, even if you are new to crochet.
Start by making a small magic ring for the peacock’s body. Work single crochet stitches into the ring, increasing gradually until you form a tight circle. This will be the core of your peacock design, giving you a strong center to build from.
Once the body is formed, crochet a small extension at the top for the head and neck. You can use a contrasting yarn color such as deep blue or turquoise to distinguish the head from the body. Add a few slip stitches or chain stitches to shape the neck elegantly.
The feathers are the highlight of this design. To create them, crochet small half-circle motifs in vibrant colors such as green, blue, and gold. Layer these motifs around the body in a fan shape to mimic the iconic peacock tail. Attach each feather securely so that the overall design looks neat and symmetrical.
Now, it’s time to incorporate the tin seal. Place the crocheted peacock body on top of the tin seal and stitch around the edges to secure it. The tin seal adds durability and keeps the design flat, making it perfect for daily use as a keychain.
Once the peacock is attached to the tin seal, sew on small decorative touches. You can use embroidery thread for details on the feathers or small beads to represent eyespots on the tail. These little touches bring your peacock to life.
Finally, weave in all yarn ends neatly with a tapestry needle and check that the entire piece feels secure and well-shaped. At this stage, your peacock is ready for the final step: transforming it into a keychain.
Assembling and Attaching the Keychain
After completing the crochet work, the next part of this Crochet peacock keychain with tin seal- Step by Step Tutorial is assembling the accessory. The goal here is to ensure your project becomes practical as well as decorative.
Start by attaching a small metal ring to the top of the peacock design. You can do this by crocheting a small loop at the top or sewing the ring directly to the crocheted body. Make sure this attachment is strong because it will hold the weight of keys or other items.
Next, connect the small ring to a larger keyring or lobster clasp. This allows the peacock to be used as a keychain, bag charm, or decorative accessory. The choice of hardware depends on personal preference, but a lobster clasp adds versatility since it can be clipped to different items.
Reinforce the connection by checking that all stitches are tight and the tin seal holds the crochet firmly. If needed, you can add a thin layer of fabric glue around the tin seal for extra durability, though this is optional if your stitching is secure.
At this point, take a moment to admire your creation. The crochet stitches, colorful feathers, and tin seal base combine to create a unique piece of art. You can experiment with different yarn colors or embellishments to personalize each peacock keychain you make.
If you plan to give the keychain as a gift, consider packaging it in a small handmade pouch or wrapping it with decorative paper. Handmade items always carry a special meaning, and a thoughtful presentation enhances that experience.
By the end of this stage, you will have transformed your crochet work into a functional, eco-friendly, and visually appealing accessory that is ready to be used or gifted.
Tips and Variations for Your Peacock Keychain
Now that you have completed the basic Crochet peacock keychain with tin seal- Step by Step Tutorial, you might want to explore variations and additional tips to make your projects even more enjoyable.
One variation is experimenting with feather designs. Instead of creating half-circle motifs, try crocheting teardrop shapes or elongated ovals for a more realistic peacock feather look. Mixing different designs can make your keychain truly unique.
Another idea is to use metallic or glitter yarn for parts of the feathers. This gives your peacock a shimmering effect that stands out beautifully under light. A small detail like this can transform the overall look of your project.
You can also personalize the project by adding initials, small charms, or even tiny bells alongside the peacock. These additions make the keychain not only decorative but also more meaningful if gifted to someone special.
If you prefer a minimalist design, create a smaller peacock with fewer feathers. This version is quicker to make and may suit people who enjoy subtle accessories. It is also a good option for beginners who want to practice before making a larger piece.
For those who love eco-friendly crafts, try combining the tin seal with other recycled materials such as fabric scraps or old jewelry pieces. This enhances the sustainable aspect of your project and adds a unique handmade charm.
Lastly, don’t be afraid to make multiple peacock keychains in different color schemes. They can be sold at craft fairs, used as party favors, or gifted to friends and family. Each keychain can tell a story through its design and color choices.
FAQ About Crochet Peacock Keychain with Tin Seal
1. Is the tin seal safe to use in this project?
Yes, as long as the tin seal is cleaned and any rough edges are smoothed out. Filing or sanding sharp areas makes it safe to handle and perfect for this craft.
2. Can beginners follow this tutorial?
Absolutely. This Crochet peacock keychain with tin seal- Step by Step Tutorial is designed to be simple enough for beginners while offering creative options for experienced crocheters.
3. What type of yarn works best for this project?
Cotton yarn gives a neat finish, while acrylic yarn provides durability. Both options work well, but cotton is often easier for beginners to control.
4. How long does it take to complete one keychain?
On average, it takes about two to three hours depending on your crochet speed and whether you add extra embellishments.
5. Can I wash the crochet peacock keychain?
Yes, but it is best to hand wash gently and let it air dry. Avoid soaking the tin seal for too long to maintain its condition.
6. Can I sell these crochet keychains?
Yes, they make excellent handmade products for small businesses or craft fairs. Just ensure your stitches are secure and the keychain hardware is of good quality.
Conclusion
In this article, we explored the Crochet peacock keychain with tin seal- Step by Step Tutorial, covering every detail from materials and stitches to assembly and creative variations.
By combining crochet with upcycled elements, you create an accessory that is both artistic and eco-friendly. The tutorial shows that with a little yarn, creativity, and patience, anyone can craft a unique keychain that carries personal meaning.
Now that you know how to make your own crochet peacock keychain, I would love to hear from you. Share your honest opinion about this tutorial and suggest new ideas or variations you would like to see in future guides. Your feedback is always valuable and helps inspire even more creative projects.