
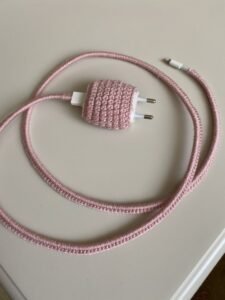
If you are constantly frustrated with frayed or broken charger cables, making a crochet protector for charger cable – Step by Step Tutorial is the perfect solution for you. Not only does it protect your cords from damage, but it also adds a personal and creative touch to something you use every day. Chargers are often expensive to replace, and wrapping them in a durable crochet cover is a fun and budget-friendly alternative. Plus, crochet enthusiasts will find this project quick, enjoyable, and beginner-friendly.
In this article, we will dive deep into how to create your own crochet protector, ensuring that your charger cables remain safe, stylish, and functional. With this crochet protector for charger cable-Step by Step Tutorial, you can combine practicality with creativity. This project is also a great way to practice your crochet skills while producing something useful. By the end, you will have a beautifully wrapped cable that not only looks good but also prevents it from bending and breaking at weak points.
Whether you are a beginner or an experienced crafter, this tutorial is designed to guide you through every step of the process. We will go over the tools and materials needed, the stitches you will use, and a full walkthrough that ensures you complete the project with confidence. With patience and creativity, you will turn your everyday charger into a colorful and durable accessory. Let’s begin the crochet protector for charger cable-Step by Step Tutorial and transform your plain cords into something both protective and beautiful.
Materials and Tools Needed
To start this crochet protector for charger cable-Step by Step Tutorial, you will first need to gather the right supplies. Having everything ready before you begin will make the process smoother and more enjoyable. The good news is that you don’t need anything fancy—just a few basic crochet tools.
First, you will need some yarn. It is recommended to choose cotton yarn because it is durable and not too stretchy, which makes it perfect for wrapping tightly around a charger cable. Cotton also feels soft and comfortable, making it ideal for daily use. Choose colors that you love or mix and match different shades for a fun and unique look.
Second, you will need a crochet hook. The size of the hook will depend on the thickness of your yarn, but generally, a smaller hook works best for this project. A size between 2.5 mm and 3.5 mm is usually ideal. Using the right hook will help keep the stitches tight so that the protector stays snug around the cable.
You will also need scissors to trim any excess yarn at the end, and a tapestry needle to weave in the loose ends. Having a stitch marker can also be helpful, especially for beginners, to keep track of your progress as you crochet along the cable.
Finally, the most important part is your charger cable itself. Make sure it is clean and untangled before you start wrapping it. This ensures that the crochet cover slides on smoothly and evenly. With these simple materials, you are ready to begin creating a protective and decorative cover for your charger.
This step of gathering your supplies may seem basic, but it sets the foundation for a smooth and enjoyable crocheting process. Now that you have everything prepared, you can move on to learning the simple stitches that will make up your crochet protector for charger cable.
Step by Step Tutorial: Starting Your Crochet Protector
Now let’s begin the crochet protector for charger cable-Step by Step Tutorial. The first step is to start your crochet work with a slip knot. Create a loop, pull the yarn through, and tighten it on your crochet hook. This simple start will set the base for your stitches.
Next, you will need to create a chain. Make a series of chain stitches long enough to wrap snugly around your charger cable. Once you have a chain of the correct length, you will join the ends together to form a circle. This loop will be the base foundation of your crochet protector.
After forming the circle, you will begin working in single crochet stitches. Insert your hook into the chain, pull the yarn through, and complete the stitch. Continue working single crochet stitches around the circle, keeping them tight and even. These stitches will gradually wrap around the cable as you move along.
To attach the crochet directly to your charger cable, simply place the cable inside the loop of stitches and continue crocheting. Each new stitch will hold the yarn securely around the cable, forming a neat protective covering. Work your way slowly along the length of the cable, adjusting the stitches as needed.
As you continue, remember to keep your tension consistent. Too loose and the protector may slip off; too tight and it might be difficult to move along the cable. Finding a balance is key to making sure your crochet protector is both functional and visually appealing.
With this steady rhythm, you will soon see your cable transforming. This method ensures that your charger is not only protected but also stylish, reflecting your personality and creativity. By following this step carefully, you have already completed a big part of your crochet protector for charger cable-Step by Step Tutorial.
Customizing Your Crochet Protector
One of the most exciting parts of this crochet protector for charger cable-Step by Step Tutorial is customization. Crochet allows endless possibilities for creativity, so you can make each protector unique. Whether you prefer simple, minimal designs or bold, colorful patterns, you can personalize your project to match your taste.
A popular option is to use multiple yarn colors. You can switch yarns every few rows to create stripes, or use variegated yarn for a naturally multicolored effect. This makes your cable not only stronger but also visually attractive. Colorful cables are easier to identify, especially if your household has many devices.
Another way to customize your protector is by experimenting with stitches. While single crochet is the most common for this project, you can try half double crochet or slip stitches for a different texture. Adding texture not only changes the look but can also give the protector extra thickness for more durability.
If you want to make your cable protector truly unique, consider adding small embellishments. You could crochet tiny flowers, hearts, or stars and attach them along the length of the cable. This adds a playful element and makes your cable stand out from the rest.
For those who prefer functionality over decoration, you can crochet a simple, sleek cover in a neutral color. This still offers the same protection but maintains a professional and minimalist look, perfect for office or study settings.
By customizing your crochet protector, you make it more than just a practical item. It becomes a personal accessory that reflects your creativity. The beauty of crochet is that there are no strict rules—only possibilities to explore. With this approach, your crochet protector for charger cable will not only serve its purpose but also showcase your unique style.
Tips, Care, and Maintenance
Once you have finished the main steps of the crochet protector for charger cable-Step by Step Tutorial, it’s important to know how to care for it. Proper maintenance will help your protector last longer and keep your cable in good condition.
The first tip is to keep your cable clean. Since crochet protectors are made of yarn, they can collect dust over time. A simple way to clean them is by gently wiping with a damp cloth. If necessary, you can remove the protector and wash it by hand in mild soap and cold water. Allow it to air dry completely before placing it back on your charger.
Avoid using very stretchy yarns for this project, as they may loosen too quickly with regular use. Cotton remains the best option because of its durability and resistance to wear. Choosing the right yarn ensures that your protector stays snug and protective.
When storing your charger, avoid bending it sharply even if it is covered with a crochet protector. The protector helps reduce strain but does not make the cable unbreakable. Treat your charger gently to extend its lifespan.
If you notice loose stitches or frayed yarn, take a few minutes to repair them. A quick fix with your crochet hook or tapestry needle will keep the protector strong and functional. Regular maintenance is simple but makes a big difference.
Lastly, don’t be afraid to make new protectors when you want a change. Crochet projects are quick and inexpensive, so you can switch designs whenever you like. This allows you to refresh your charger’s look while always keeping it protected. With proper care, your crochet protector for charger cable will last for months or even years.
FAQ – crochet protector for charger cable
1. Why should I make a crochet protector for my charger cable?
A crochet protector helps prevent fraying, bending, and breaking of charger cables. It adds durability while also making your cable look unique and stylish.
2. Can beginners follow this crochet protector for charger cable-Step by Step Tutorial?
Yes, this tutorial is perfect for beginners. The stitches used are very simple, and the project is small and easy to complete, making it great practice for new crocheters.
3. What type of yarn is best for making a crochet protector?
Cotton yarn is the best choice because it is durable, doesn’t stretch too much, and feels comfortable. Acrylic yarn can also be used but may wear out faster.
4. Will the crochet protector make my charger bulky?
Not at all. If you keep the stitches tight and use thin yarn, the protector will be slim and lightweight, providing protection without adding bulk.
5. Can I wash the crochet protector if it gets dirty?
Yes, you can hand wash it with mild soap and cold water. Just make sure it is completely dry before putting it back on your charger cable.
6. How long does it take to make a crochet protector for charger cable?
On average, it takes about one to two hours, depending on your crochet speed and the length of the cable. It is a quick project with rewarding results.
7. Can I remove the crochet protector once it is finished?
Yes, the protector can be slid off carefully if you ever want to replace or wash it. This makes it both functional and convenient.
Conclusion
Making a crochet protector for charger cable-Step by Step Tutorial is not only practical but also a fun and creative project. You have learned about the materials needed, the step-by-step process, customization ideas, and maintenance tips.
With this guide, you can protect your charger cables while also showcasing your creativity through crochet.
Now it’s your turn to try this tutorial and give your cables the protection they deserve. We would love to hear your honest opinions and suggestions—share your experiences and ideas, and let’s keep inspiring each other to make everyday objects more beautiful and long-lasting with crochet.
