
Crochet pumpkin coasters – Step by Step Tutorial projects are a charming and practical addition to your home décor, especially during autumn and Halloween seasons. These handmade pieces not only protect your tables from heat and moisture but also bring a festive, cozy touch to your living space. In this guide, we will walk you through every detail of the process so you can create beautiful, functional coasters that you’ll be proud to use or gift. Whether you are a beginner or an experienced crafter, this crochet pumpkin coasters – Step by Step Tutorial is designed to be easy to follow and highly rewarding.
One of the great things about a crochet pumpkin coasters – Step by Step Tutorial is that it’s versatile and beginner-friendly. The pattern involves basic stitches, making it an excellent practice project if you’re still learning crochet. At the same time, it’s easy to customize with different yarn colors, textures, and sizes. These coasters can be made in traditional orange or in creative shades like white, green, or even multicolor to match your personal style. You can make a single set for your own home or create multiple sets to give away during the holiday season.
Beyond their beauty, the crochet pumpkin coasters – Step by Step Tutorial offers a sustainable alternative to store-bought coasters. Handmade crochet items last longer when cared for properly, and they can be made using leftover yarn from other projects, helping you reduce waste. Plus, making them yourself adds a special personal touch that store-bought items simply can’t match. Before we dive into the actual steps, let’s take a look at the materials you’ll need to bring your pumpkin coasters to life.
Materials and Preparation for Crochet Pumpkin Coasters
The first step in our crochet pumpkin coasters – Step by Step Tutorial is gathering the right materials. You’ll need worsted weight cotton yarn for durability and absorbency. Cotton works best because it holds up well to heat and moisture, which is essential for coasters. Classic pumpkin orange is the most popular choice, but you can also experiment with cream, green, or variegated yarns for a unique look.
You’ll need a crochet hook that matches the yarn weight, typically a 4.0 mm (G-6) hook for worsted cotton yarn. Using the right hook size ensures that your stitches will be even and tight enough to form a sturdy coaster. Loose stitches might cause your coaster to lose its shape over time.
A yarn needle will be essential for weaving in ends and attaching any decorative pieces, like a little green stem or leaf at the top of your pumpkin. Scissors will also be needed for cutting your yarn cleanly.
If you want your coasters to have extra detail, consider using a small amount of green yarn for the pumpkin stem and leaves. This adds dimension and makes the design instantly recognizable.
Before starting, ensure you have a comfortable, well-lit workspace. Crocheting in a relaxed setting not only makes the process enjoyable but also helps you keep your stitches consistent.
With all your materials ready, you can now move on to the exciting part: crocheting your first pumpkin coaster.
Creating the Base of the Pumpkin Coaster
The base is the foundation of your crochet pumpkin coasters – Step by Step Tutorial, and getting it right is crucial for a polished final result. Begin with a slip knot and chain four stitches. Join the last chain to the first with a slip stitch to create a small ring.
For the first round, chain two (this counts as your first half double crochet), then work nine more half double crochets into the center of the ring. Join with a slip stitch to the top of the starting chain two. You should now have a small, round shape.
In the second round, chain two, then make two half double crochets in each stitch around. This will double your stitch count and start forming the pumpkin’s circular base.
Continue increasing in each round until your coaster reaches the desired size, typically around 4–5 inches in diameter. This ensures it will fit most mugs and glasses.
If you want a slightly textured surface, you can alternate between half double crochets and double crochets in the last round. This creates a subtle ribbed effect, making the coaster even more attractive.
Once the base is complete, fasten off your yarn if you plan to switch to a different color for the stem and leaf. Leave a long tail for weaving in ends neatly.
Adding the Pumpkin Stem and Leaf
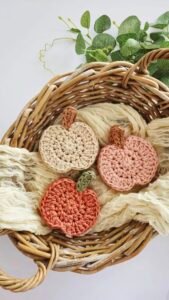
The stem and leaf are what make your crochet pumpkin coasters – Step by Step Tutorial truly look like pumpkins. To add the stem, join green yarn at the top center of your coaster. Chain six stitches, then slip stitch back down into the first chain. This creates a short, sturdy stem.
For the leaf, chain eight stitches from the base of the stem. In the second chain from the hook, make one single crochet, then half double crochet in the next, double crochet in the next two, half double crochet in the next, single crochet in the next, and slip stitch into the last chain. This forms a small, delicate leaf shape.
Attach the leaf to the side of the stem using a slip stitch. The combination of the stem and leaf adds charm and detail to your coaster.
If you prefer, you can crochet the stem and leaf separately and sew them on afterward using a yarn needle. This method allows for more precise placement.
Once both the stem and leaf are in place, weave in any loose ends on the back of the coaster to keep the front neat and tidy.
These little finishing touches make your crochet coasters stand out and give them a professional, handmade look.
Customizing and Finishing Your Crochet Pumpkin Coasters
One of the best aspects of the crochet pumpkin coasters – Step by Step Tutorial is how easily you can customize it. You can make your pumpkins larger or smaller by adjusting the number of increase rounds.
Experiment with different shades of orange for a set of coasters that each look slightly different, just like real pumpkins. You could even make a “pumpkin patch” set in varying sizes and colors for a fun table display.
If you want your coasters to have a rustic look, try using a blend of cotton and jute yarn. This will give the coaster a more textured, farmhouse style.
Consider adding embroidery details, such as small lines running from the stem to the bottom of the pumpkin, to mimic the natural ridges of a real pumpkin. This subtle touch can make your coasters even more eye-catching.
When finishing, always block your coasters if needed. Lightly wet them, shape them by hand, and let them dry flat to ensure they stay perfectly round.
Store your coasters in a cool, dry place when not in use to keep them looking fresh for years to come.
FAQ
Q: Is this project suitable for beginners?
A: Yes, the crochet pumpkin coasters – Step by Step Tutorial uses simple stitches that are perfect for beginners.
Q: How long does it take to make one coaster?
A: On average, it takes less than an hour to complete one coaster.
Q: Can I use acrylic yarn instead of cotton?
A: While you can use acrylic yarn, cotton is better for absorbency and durability.
Q: How do I make the coasters larger?
A: Simply add more increase rounds until the coaster reaches your desired size.
Q: Are these coasters washable?
A: Yes, they can be hand washed in cool water with mild soap and air dried.
Q: Can I sell the coasters I make from this tutorial?
A: Yes, handmade crochet coasters are popular at craft fairs and online shops.
Conclusion
In this crochet pumpkin coasters – Step by Step Tutorial, we explored everything from selecting the right materials to adding decorative stems and leaves, plus ideas for customization and care.
This project is quick, practical, and perfect for bringing a touch of seasonal charm to your home. Whether you make them for yourself, as gifts, or to sell, these coasters are a great way to enjoy the art of crochet while creating something useful.
We’d love to hear your honest feedback and suggestions about this tutorial so we can keep improving and inspiring your creative journey.