
Creating a crochet pumpkin pattern – Step by Step Tutorial is one of the most enjoyable and rewarding fall projects you can do. Pumpkins are symbols of warmth, harvest, and seasonal beauty, and making them with yarn allows you to bring this charm into your home in a personal and creative way. Whether you are decorating for autumn, Halloween, or Thanksgiving, a crochet pumpkin can add a handmade touch that feels both festive and cozy. In this article, we will dive into how to create a two-tone or classic design, focusing on tips and instructions for beginners and experienced crocheters alike.
The best part about following a crochet pumpkin pattern – Step by Step Tutorial is how customizable it is. You can make small pumpkins to decorate shelves, medium pumpkins to style your dining table, or large plush pumpkins to use as cushions. By changing the size of your hook, the thickness of your yarn, and even adding embellishments like leaves or vines, you can create a set of pumpkins that look both unique and professional. Handmade decorations like these also make thoughtful gifts that carry the personal touch of your craft.
Using this crochet pumpkin pattern – Step by Step Tutorial, you will not only practice fundamental crochet techniques but also learn how to shape, stuff, and finish a project with neat details. Many crafters love how quick this project is compared to larger ones like blankets or sweaters, yet it still delivers a satisfying final result. By the end of this tutorial, you will have the skills to make pumpkins in different styles and sizes, which will help you build confidence and versatility in your crochet journey.
Materials Needed for the Crochet Pumpkin Pattern
When starting a crochet pumpkin pattern – Step by Step Tutorial, having the right materials is crucial. Most patterns call for medium-weight yarn, which provides enough structure to hold the pumpkin’s shape without being too stiff. Acrylic or cotton yarn are both excellent choices, as they offer durability and color variety. Choosing autumn colors like orange, brown, green, or even cream can help your pumpkin look seasonal and authentic.
Another important material is the crochet hook. The size of the hook depends on the yarn you are using, but generally, a 4mm to 5.5mm hook works well. Using a smaller hook than recommended for your yarn will give your pumpkin tighter stitches, preventing the stuffing from peeking out. This ensures your finished piece looks polished and professional.
Stuffing is also essential for shaping the pumpkin. Polyester fiberfill is the most common choice because it is soft, light, and easy to work with. You’ll want to fill your pumpkin firmly enough to keep its shape, but not so tightly that the stitches stretch out. A yarn needle will help you close the top and bottom neatly and secure the yarn ends.
Optional materials include felt for leaves, twine or cinnamon sticks for stems, and embroidery floss for decorative details. Adding these elements gives your pumpkin more personality and style. For example, using a cinnamon stick as a stem not only looks charming but also adds a wonderful fall fragrance.
Scissors, stitch markers, and a measuring tape are other helpful tools to have on hand. Stitch markers are especially useful if you are working in rounds, as they help you keep track of where each new round begins. These small details make the process smoother and help ensure your finished pumpkin turns out exactly as planned.
By gathering all your materials before starting, you can follow this crochet pumpkin pattern – Step by Step Tutorial with ease and focus entirely on the creative process.
Step-by-Step Instructions for Crocheting the Pumpkin
The first step in a crochet pumpkin pattern – Step by Step Tutorial is to create a foundation chain or a magic ring, depending on the style of pumpkin you want. Many patterns use the magic ring method because it creates a tight, closed circle at the base, which is perfect for stuffing later. This ensures there are no gaps or holes at the bottom of your pumpkin.
Once the base is ready, you will typically work in continuous rounds, increasing stitches evenly to create a flat circle. This circle forms the bottom of the pumpkin. Using single crochet stitches is common because they create a tight, dense fabric that can hold stuffing without gaps. As you continue, you’ll gradually increase your stitch count to widen the shape.
After reaching the desired width, the next step is to crochet evenly around without increasing. This creates the body of the pumpkin, and the number of rows depends on how tall you want your pumpkin to be. The beauty of this project is that you can easily adjust the proportions—make it short and wide for a squat pumpkin, or taller for a more elongated look.
To close the top, you’ll begin decreasing stitches evenly, which draws the edges inward. Before the opening gets too small, insert your stuffing. This step is important because the stuffing defines the pumpkin’s plump, rounded shape. Be sure to distribute the filling evenly so the pumpkin doesn’t look lopsided.
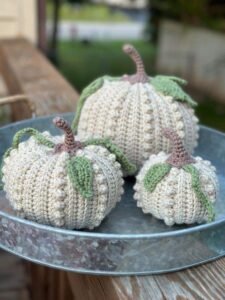
Once the stuffing is in place, continue decreasing until the opening is closed. Use your yarn needle to weave in the ends securely. At this point, you can add definition by wrapping yarn around the outside of the pumpkin, from top to bottom, pulling slightly to create the classic ridges of a pumpkin. Tie the yarn securely at the bottom, and you’ll see your pumpkin take on a realistic look.
Finally, add the stem and optional decorations. You can crochet a small tube for the stem, attach a cinnamon stick, or even sew on a felt leaf. These finishing touches complete the project and give your pumpkin character.
Tips for Customizing Your Crochet Pumpkin
One of the joys of using a crochet pumpkin pattern – Step by Step Tutorial is the ability to customize your work. A simple way to change the look is by experimenting with yarn types. Chunky yarn creates a soft, oversized pumpkin, while thinner yarn results in delicate, miniature versions. Both have their charm, and you can mix them to create a decorative set.
Colors play an important role in customization as well. While orange is the traditional pumpkin color, don’t be afraid to try neutrals like cream or gray for a modern farmhouse style. You can also use variegated yarn for a fun, multicolor effect that makes your pumpkin stand out.
Adding embellishments is another way to personalize your project. Leaves, vines, and embroidered details can transform a simple pumpkin into a work of art. For example, crocheting a few green spirals and attaching them near the stem makes the pumpkin look fresh and whimsical.
Size variation is also easy to achieve. By changing the hook size and yarn weight, you can make pumpkins in all different dimensions. A collection of three or more pumpkins in various sizes looks especially charming when displayed together.
If you enjoy experimenting, you can even try a two-tone pumpkin by using one color for the top half and another for the bottom. This adds visual interest and gives your project a playful twist. Pairing neutral tones with a pop of color creates balance and makes your handmade piece versatile for any decor style.
These small customizations make your pumpkin unique and help you develop your crochet creativity. Following the crochet pumpkin pattern – Step by Step Tutorial while adding personal touches ensures that no two pumpkins will look exactly the same.
Common Mistakes and How to Avoid Them
When working through a crochet pumpkin pattern – Step by Step Tutorial, beginners often encounter common mistakes. One of the most frequent issues is using the wrong hook size. If the hook is too large for the yarn, the stitches may be loose, and the stuffing can show through. Always check your gauge to avoid this problem.
Another mistake is uneven stuffing. Pumpkins should look plump and round, but overstuffing can distort the shape while understuffing makes the pumpkin floppy. The key is to add stuffing gradually and distribute it evenly as you go.
Some crocheters struggle with maintaining consistent stitch tension. Uneven stitches can make the pumpkin look bumpy or uneven. Practicing steady hand movements and checking your work regularly can help improve consistency.
Forgetting to use stitch markers is another error. Since pumpkins are usually worked in rounds, it’s easy to lose track of where one round ends and the next begins. This can throw off your stitch count and result in an uneven shape. Always mark the first stitch of each round to stay on track.
Not weaving in yarn ends securely is also a common oversight. If the ends are not fastened properly, the pumpkin may come apart with use. Using a yarn needle to weave the ends tightly into the stitches will prevent unraveling.
By being mindful of these potential mistakes, you can ensure that your crochet pumpkin pattern – Step by Step Tutorial turns out beautiful and sturdy.
FAQ About Crochet Pumpkin Pattern – Step by Step Tutorial
1. How long does it take to make a crochet pumpkin?
It depends on the size, but small pumpkins can be made in under an hour, while larger ones may take two to three hours.
2. What type of yarn works best for crochet pumpkins?
Medium-weight acrylic or cotton yarn is recommended because it provides structure while still being soft and easy to crochet.
3. Can I make a pumpkin without a magic ring?
Yes, you can start with a chain and slip stitch to form a ring, but the magic ring creates a tighter base that works better for stuffing.
4. How do I make the pumpkin ridges?
Wrap yarn around the finished pumpkin from top to bottom, pulling slightly to indent the sides. Repeat several times to create ridges.
5. Can I wash a crochet pumpkin?
Yes, but it’s best to spot-clean with mild soap and water, especially if it’s stuffed with fiberfill. Machine washing may distort the shape.
6. What can I use for the pumpkin stem?
You can crochet a stem, attach a cinnamon stick, or use felt or twine. Each option gives a unique look and finish.
7. How do I adjust the size of the pumpkin?
Use a larger hook and thicker yarn for bigger pumpkins, or a smaller hook and thinner yarn for mini versions.
8. Can beginners follow this pattern?
Yes, the crochet pumpkin pattern – Step by Step Tutorial is beginner-friendly, as it mostly uses basic stitches like single crochet.
Conclusion
In this article, we explored how to make a crochet pumpkin pattern – Step by Step Tutorial from start to finish. We covered the materials you need, the steps to crochet and shape the pumpkin, customization tips, and common mistakes to avoid.
With practice and creativity, you can make pumpkins of all sizes and styles that will brighten up your seasonal decorations.
Now that you know how to create your own crochet pumpkins, I’d love to hear your thoughts! Share your opinion and suggestions in the comments—your feedback helps make future tutorials even better. What kind of pumpkin will you make first?