
If you’re looking for a fun and creative project to get into the autumn spirit, this Crochet Scarecrow Hat-Step by Step Tutorial is exactly what you need. Handmade crochet hats have always been a symbol of warmth, love, and creativity. This adorable scarecrow-themed design takes that charm to the next level. Whether you want to make a unique fall accessory, a cute Halloween costume piece, or just something to brighten your wardrobe, this crochet scarecrow hat is a perfect choice for all skill levels.
The great thing about the Crochet Scarecrow Hat is how customizable it is. You can use leftover yarn from previous projects, mix colors to create a rustic look, and even add fun embellishments like patches, straw-like fringes, or cute crochet flowers. Each hat can tell its own story, making it one-of-a-kind. This tutorial is designed to help beginners follow along easily, with clear instructions and a structure that guides you through each part of the process.
Not only will you end up with a cozy, handmade hat, but you’ll also gain a valuable skill you can use to make gifts or even start your own line of fall accessories. So, grab your yarn, hook, and enthusiasm, and let’s begin this Crochet Scarecrow Hat-Step by Step Tutorial, turning a few skeins of yarn into something truly magical.
Choosing the Right Materials for Your Crochet Scarecrow Hat
Before diving into your Crochet Scarecrow Hat-Step by Step Tutorial, it’s essential to start with the right materials. The texture, weight, and color of your yarn will greatly influence the final look of your hat. For a classic scarecrow appearance, use shades of brown, tan, beige, or mustard yellow as your base. You can also incorporate orange, red, or green accents to add a playful touch.
Worsted weight yarn is usually the best choice for this type of project. It’s easy to handle, works up quickly, and provides the ideal thickness for a cozy fall hat. Cotton yarn can also be used if you prefer a lighter feel, while acrylic yarn offers warmth and durability—perfect for outdoor wear during cooler days.
When it comes to the crochet hook, check the yarn label for the recommended size, typically between 4 mm (G) and 5.5 mm (I). A slightly larger hook can give your stitches a looser, more rustic look, which suits the scarecrow theme nicely. Don’t forget to have a tapestry needle for sewing pieces together and scissors for trimming yarn ends.
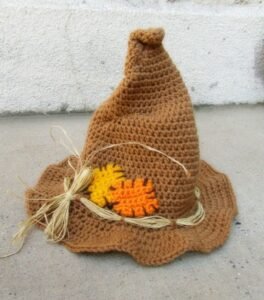
Another important material for your Crochet Scarecrow Hat is the straw-like fringe. You can achieve this look using strands of beige or yellow yarn. Once attached to the edges of the hat, they give that classic “straw hair” scarecrow effect that’s both charming and whimsical.
To make your hat extra unique, consider adding fun embellishments such as buttons for eyes, small fabric patches, or crochet flowers. These little details bring personality to your scarecrow and make it even more delightful. The best part? You can personalize your design for children, adults, or even as a pet accessory.
Finally, prepare all your materials before starting. Having everything ready—from yarn and hooks to optional decorations—will make your crafting experience smoother and more enjoyable. Once you’re set, it’s time to move on to the exciting part: creating the base of your Crochet Scarecrow Hat.
Making the Base of the Scarecrow Hat
The foundation of your Crochet Scarecrow Hat begins with creating a simple beanie shape. Start by making a magic ring and crocheting six single crochets into it. This will serve as the crown of your hat. Pull the ring tight to close the hole, then join with a slip stitch to complete the round.
In the next rounds, increase gradually by adding extra stitches. Typically, you’ll double your stitches every round until the circle measures about 6–7 inches in diameter for an adult-sized hat. This forms the top of your scarecrow hat. Be sure to keep your stitches even to maintain a smooth and round shape.
Once your base circle is large enough, stop increasing and begin crocheting in continuous rounds to build the sides of the hat. This is where your project will start to take shape. You can adjust the height according to the head size you’re making it for. A standard adult hat usually measures about 8 to 9 inches from crown to brim.
To add that rustic scarecrow texture, alternate between single crochet and half double crochet stitches in some rounds. This variation gives the hat more dimension and a handmade charm that fits perfectly with the scarecrow theme. Don’t worry about perfection—the slightly uneven texture adds to the rustic look!
When you’ve reached the desired length, it’s time to create the brim. The brim is essential to the Crochet Scarecrow Hat-Step by Step Tutorial, as it gives the hat its characteristic floppy appearance. Start by increasing every few stitches around the bottom edge. For example, make two stitches in every third stitch for a gentle flare. Continue this pattern until the brim is as wide as you like.
Finish the brim with a row of slip stitches or a decorative edge. This will help the brim hold its shape and prevent curling. At this point, you’ll have a fully functional hat base, but now it’s time to make it truly look like a scarecrow by adding creative embellishments and details.
Adding Details and Decorations
Now comes the fun part of the Crochet Scarecrow Hat-Step by Step Tutorial—decorating your creation! These extra touches are what transform your hat from a simple crochet beanie into an adorable scarecrow masterpiece.
Start with the signature straw fringe. Cut several pieces of yarn about 6 inches long in a light yellow or beige shade. Using your crochet hook, pull each strand halfway through the stitches near the brim and tie them in place with a simple knot. This gives the appearance of straw peeking out from under the hat. Trim the ends evenly or leave them slightly uneven for a more natural effect.
Next, add patches to your hat. You can crochet small squares or rectangles in contrasting colors such as red, blue, or green. Attach them using a tapestry needle and yarn, sewing them onto random spots on the hat. For a rustic vibe, stitch around the edges with visible “X” stitches to mimic hand-sewn patches.
If you want to give your scarecrow hat more character, crochet small flowers or leaves to attach near the brim. These make the hat look cheerful and festive, perfect for harvest season. A little sunflower or daisy pattern adds a wonderful finishing touch.
Another popular addition is a decorative band around the brim. You can crochet a separate strip in a contrasting color—such as brown or orange—and sew it around the hat just above the brim. It not only looks stylish but also gives the scarecrow hat more structure.
Don’t be afraid to get creative! Add buttons, fabric embellishments, or even a tiny bow for a cute look. If making the hat for kids, keep all attachments secure and child-friendly. Each Crochet Scarecrow Hat can be personalized to reflect your style or even themed for special occasions like Thanksgiving or Halloween.
When your decorations are complete, weave in any loose yarn ends carefully to ensure everything stays neat and secure. Your hat should now look vibrant, textured, and full of personality—just like a friendly scarecrow ready for the fall season.
Final Touches and Styling Your Scarecrow Hat
After completing your Crochet Scarecrow Hat, it’s time to give it some finishing touches and learn how to style it. Start by gently blocking your hat to shape it perfectly. Wet blocking or steam blocking can help smooth out the stitches and define the brim. Be gentle to avoid flattening the texture too much.
Try the hat on and make any adjustments if necessary. If it feels too loose, you can run a strand of elastic thread through the last row of stitches on the brim. This will give it a snug, comfortable fit without altering the look.
The Crochet Scarecrow Hat-Step by Step Tutorial allows for endless styling options. You can pair it with a matching crochet scarf or gloves for a full fall ensemble. For costume purposes, match it with denim overalls, a plaid shirt, and a bit of face paint to create the ultimate scarecrow look.
These hats also make wonderful handmade gifts. Their charming design makes them perfect for harvest festivals, Halloween parties, or even as cozy winter accessories. Everyone appreciates the time and love that goes into a handmade piece like this.
When it comes to care, always hand wash your scarecrow hat in cool water with mild detergent. Lay it flat to dry to maintain its shape and texture. Avoid wringing or twisting the hat, as that can distort the stitches or decorations.
Lastly, don’t forget to photograph your finished Crochet Scarecrow Hat! Sharing your creation with others can inspire new crafters to try their own projects. Each piece you make showcases your creativity and adds warmth to the handmade community.
FAQ
1. Can beginners make the Crochet Scarecrow Hat?
Yes! This project is beginner-friendly. The stitches used are simple, and the pattern is easy to follow with this step-by-step guide.
2. What is the best yarn for a scarecrow hat?
Worsted weight acrylic or cotton yarn is ideal because it provides structure while remaining comfortable to wear.
3. How long does it take to finish the hat?
Most crafters can complete it in about 3 to 5 hours, depending on their skill level and how many decorations they add.
4. Can I make the hat in different sizes?
Absolutely. You can adjust the size by changing the number of increase rounds or using a different hook size.
5. Is it suitable for children?
Yes, but if making it for kids, ensure all decorations are securely attached and there are no small parts that can be pulled off.
6. How can I make the hat more realistic?
Add straw-like fringes, fabric patches, and a colorful crochet band around the brim to create an authentic scarecrow look.
Conclusion
This Crochet Scarecrow Hat-Step by Step Tutorial has guided you through creating a fun, festive, and heartwarming accessory that’s perfect for the fall season. You’ve learned how to select the right materials, shape the hat, and add decorative elements that bring your scarecrow to life.
Whether you’re making it for yourself, as a gift, or for a seasonal event, this project is sure to bring smiles and compliments. Handmade creations like this remind us of the beauty of slow crafting and personal expression.
We hope you enjoyed this tutorial and feel inspired to create your own version of the Crochet Scarecrow Hat. Please leave your honest opinion and share any suggestions or experiences in the comments. Your feedback helps keep the creativity growing and inspires others to start their own handmade journeys!