
If you’ve ever wanted to make your own cozy and stylish footwear, this crochet shoe – Step by Step Tutorial will guide you through every detail, even if you are just starting out in the crochet world. Handmade crochet shoes combine comfort, personal style, and creativity into one beautiful project. They can be customized in any size, color, or design, making them a great option for personal use or as thoughtful gifts. With just a few materials and a bit of patience, you can transform yarn into a wearable piece of art.
Crocheting your own shoes offers endless possibilities. You can create summer slippers, warm winter shoes, or even fashionable outdoor sandals, all following the same basic principles. The satisfaction of completing your own crochet shoe is unmatched, and the process is not only creative but also very relaxing. Plus, crocheting footwear can be a sustainable alternative to buying mass-produced shoes, as you can choose eco-friendly yarns and make long-lasting pieces.
In this article, we will walk through the Step by Step Tutorial for making crochet shoes, explain all the techniques you need, and share tips for achieving professional results. We’ll also go over the best yarns, hook sizes, and sole materials to ensure your shoes are both comfortable and durable. By the end, you’ll have all the knowledge you need to start and finish your first pair successfully.
Materials and Tools Needed for Crochet Shoes
Before starting your crochet shoe – Step by Step Tutorial, gathering the right materials and tools is essential for achieving a neat and comfortable finish. The right choice of supplies will make the process smoother and ensure that your shoes last longer.
First, choose a yarn that matches the purpose of your shoes. Cotton yarn is a popular choice for summer shoes because it is breathable and holds its shape well. For winter shoes, a soft wool blend will provide warmth and coziness. Make sure your yarn is durable enough to withstand regular wear.
Next, pick the correct crochet hook size for your chosen yarn. Using the recommended hook size on the yarn label ensures proper tension, which is important for comfort and durability. If your stitches are too loose, the shoe may lose shape; too tight, and it may feel uncomfortable to wear.
You will also need a sole. Some people choose to crochet the sole entirely from yarn, but adding a pre-made rubber or leather sole will make your shoes more durable, especially for outdoor use. These can be bought in craft stores or online, and often come with pre-punched holes for easy attachment.
Don’t forget basic tools like scissors, stitch markers, and a yarn needle. Stitch markers are especially helpful in keeping track of rounds when working in a spiral pattern. The yarn needle will be essential for weaving in ends and attaching parts of the shoe securely.
Finally, consider decorative elements. Buttons, beads, or even small crochet flowers can add a personal touch to your finished shoes. Just make sure any decorations are securely attached to avoid discomfort during wear.
Having everything ready before you start will keep your project organized and enjoyable from beginning to end.
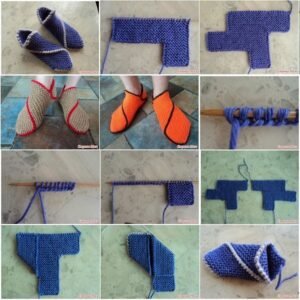
Step by Step Tutorial for Making Crochet Shoes
This crochet shoe – Step by Step Tutorial will break down the process into simple, manageable steps so you can follow along without confusion. The pattern can be adapted to fit any foot size by adjusting the number of stitches and rows.
Step one is creating the sole. Begin with a chain that matches the length of your foot, then work single crochet stitches along both sides of the chain, increasing at the ends to create an oval shape. Continue crocheting around the oval, adding stitches at the ends to keep it flat, until you reach the desired width.
The second step is shaping the upper part of the shoe. Start from the center front of the sole and work half double crochet stitches in rows to build the toe section. This section should curve naturally over the toes. You can adjust the height depending on the style you want—shorter for slipper styles or taller for full-coverage shoes.
Step three involves building the sides. Work in rounds from the toe section toward the back, connecting each row to the edges of the sole. Keep the stitches tight enough for a snug fit but not so tight that they pull the shape. This is also the stage where you can add decorative stitches or color changes.
Step four is making the heel section. You can either crochet it directly onto the back of the shoe or make it separately and sew it on. A reinforced stitch pattern here will add durability, especially if you plan to wear your shoes often.
Step five is attaching the sole if you are using a non-crocheted one. Use strong thread and a whip stitch or blanket stitch through the pre-punched holes to secure it. Make sure the sole is aligned properly before sewing to avoid twisting.
Finally, step six is finishing touches. Weave in all loose ends, block the shoes if necessary to give them the perfect shape, and add any embellishments you’ve chosen. Once complete, try them on to ensure they fit comfortably and make any adjustments if needed.
Tips for Perfecting Your Crochet Shoe
While this crochet shoe – Step by Step Tutorial gives you the basic structure, a few extra tips can help your shoes look professional and last longer. These suggestions come from experienced crocheters who have perfected the art of handmade footwear.
Always check your gauge before starting. A small difference in stitch size can result in shoes that are too tight or too loose. Take the time to make a small swatch and measure it against the pattern instructions.
Use sturdy yarn for the sole area. Even if you choose a soft yarn for the upper part, a more durable yarn for the bottom will prevent excessive wear. You can even double up the yarn in the sole for extra strength.
Consider adding a fabric lining to your crochet shoes. This not only increases comfort but also helps maintain the shape. Lightweight cotton fabric is perfect for lining.
When making shoes for children, always ensure the sole is non-slip. You can add non-slip fabric patches or apply a special liquid rubber to the bottom. This is especially important for safety.
For a cleaner look, try the invisible join method when finishing rounds. This prevents visible seams and gives a more polished appearance to your shoes.
Lastly, don’t rush the finishing stage. Taking the time to weave in ends neatly and block the shoes can make a big difference in the final presentation.
Customizing Your Crochet Shoes
One of the best parts of following this crochet shoe – Step by Step Tutorial is the ability to fully customize your footwear. You are not limited to the colors and styles available in stores—you can make something completely unique.
Color choice can dramatically change the look of your shoes. Neutral tones like beige, gray, and white create a minimalist style, while bright colors and bold patterns make a statement. Try combining two or more colors for stripes, ombre effects, or color blocking.
Adding embellishments is another way to personalize your shoes. Crochet flowers, bows, or appliqués can be sewn onto the upper part. Beads and buttons can add a decorative sparkle, though make sure they are securely fastened.
Experiment with different stitch patterns for texture. A simple double crochet gives a smooth finish, while a puff stitch or shell stitch adds dimension and visual interest. Mixing stitches in one design can create a beautiful contrast.
You can also adjust the height and coverage of your shoes. A low-cut design works well for summer slippers, while a mid-ankle or high-ankle design provides warmth for cooler months. Adding straps or laces can also enhance both style and fit.
If you want extra comfort, consider inserting a soft foam insole. This not only adds cushioning but also helps the shoes retain their shape after multiple wears.
Ultimately, your crochet shoes should reflect your personal style. With the flexibility of crochet, the possibilities are endless, so don’t be afraid to experiment.
FAQ – Crochet Shoe Step by Step Tutorial
Q: Can I make crochet shoes without a sewing machine?
A: Yes, absolutely. Crochet shoes are typically made entirely by hand. If you choose to attach a pre-made sole, you can do so with a yarn needle and strong thread.
Q: What is the best yarn for crochet shoes?
A: Cotton yarn is best for summer shoes, as it is breathable and holds shape well. For winter shoes, wool blends provide warmth and comfort.
Q: How do I make my crochet shoes non-slip?
A: You can use non-slip fabric on the bottom, apply liquid rubber, or attach a rubber sole to make them safer to wear indoors and outdoors.
Q: Can I wash crochet shoes?
A: Most crochet shoes can be hand-washed in cool water with mild detergent. Avoid machine washing if you have attached non-yarn soles or decorations that could be damaged.
Q: How do I adjust the size of crochet shoes?
A: You can adjust the starting chain length for the sole and add or remove rounds to fit your foot length and width. Always try on as you go for the best fit.
Q: Are crochet shoes comfortable for daily wear?
A: Yes, with the right yarn, sole, and fit, crochet shoes can be very comfortable for daily wear. Adding a padded insole can enhance comfort further.
Conclusion
This crochet shoe – Step by Step Tutorial has walked you through everything from choosing the right materials to customizing and perfecting your final pair. Whether you’re making them for yourself, as a gift, or even to sell, the skills you’ve learned here will help you create comfortable, durable, and stylish footwear. The joy of wearing something you’ve made with your own hands is truly special.
Now it’s your turn—grab your yarn, hook, and creativity, and start crafting your own unique crochet shoes.
Once you finish, share your experience, leave your honest opinion, and let us know your suggestions for future tutorials. Your feedback will help make the next project even better.