
If you love handmade crafts and are looking for a cute and beginner-friendly project, this Crochet Snail Amigurumi Tutorial-Step by Step Tutorial is perfect for you. Amigurumi, the Japanese art of crocheting small stuffed animals, is a fun and relaxing hobby that allows crafters to express creativity through yarn and imagination. This tutorial will guide you carefully through each step to create your very own adorable crochet snail, making it an excellent addition to your collection or a sweet handmade gift for someone special.
The best part about this Crochet Snail Amigurumi Tutorial-Step by Step Tutorial is that it’s suitable for all skill levels. Whether you’re just starting with amigurumi or you’ve been crocheting for years, this project offers simplicity, creativity, and a charming result. The snail’s soft shell and cheerful look make it a delightful project that can brighten up any room. You can even customize it by choosing your favorite yarn colors to give your snail its own personality.
Crocheting a snail is also a great way to learn and practice essential amigurumi techniques, such as working in the round, increasing, and decreasing stitches. With some patience and attention to detail, you’ll quickly see your snail come to life, one stitch at a time. Plus, this project requires only a small amount of yarn, making it ideal for using leftover materials from previous crochet creations. Let’s dive into the process and see how to make this adorable little friend.
Materials You’ll Need for the Crochet Snail
Before starting the Crochet Snail Amigurumi Tutorial-Step by Step Tutorial, make sure you have all the necessary materials ready. Having everything on hand will help you stay focused and enjoy the crocheting process without interruptions. The great thing about this project is that it requires minimal materials, most of which you probably already have in your craft collection.
You’ll need some yarn in two or three different colors — one for the snail’s body and another for the shell. You can choose natural tones for a realistic look or go for bright and playful shades for a more whimsical snail. Acrylic yarn works great because it holds shape well and is easy to work with, but cotton yarn is also a good choice for a softer texture.
Next, you’ll need a crochet hook that matches the thickness of your yarn. Most amigurumi projects work best with smaller hooks to create tight stitches that keep the stuffing from showing. Typically, a 2.5mm or 3mm hook works well for this type of project.
You’ll also need some polyester fiberfill for stuffing the snail’s body and shell. This gives it shape and makes it soft and squeezable. Be sure not to overstuff — you want your snail to stay plush and flexible. In addition, a yarn needle will help you sew the pieces together and weave in the ends neatly.
Safety eyes or small black beads can be used to bring your snail to life. If you prefer, you can also embroider the eyes with black yarn for a softer, handmade touch. Finally, have a pair of scissors nearby for trimming yarn ends, and optionally, a stitch marker to help you keep track of your rounds.
Once you’ve gathered all these materials, you’re ready to begin crafting your cute little crochet snail. Having a clear workspace and organized tools makes the entire process smoother and more enjoyable.
Step-by-Step Guide to Crocheting Your Snail
Now that your materials are ready, let’s start the Crochet Snail Amigurumi Tutorial-Step by Step Tutorial. This step-by-step guide will walk you through the process of creating each part of the snail and assembling it into an adorable finished toy.
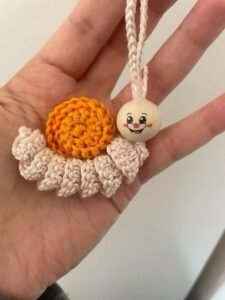
Start with the snail’s body. Using your main color yarn, make a magic ring and crochet six single crochets into it. Pull tight to close the ring, and continue working in the round to form a tube-like shape. As you go, increase stitches evenly to create the desired width of the body, then maintain that number of stitches until it reaches the length you want. The body should be long and slightly curved to give it a natural, snail-like appearance.
Once the body is complete, stuff it gently with fiberfill and close the end using a yarn needle. Set it aside and begin working on the snail’s shell. For the shell, use a contrasting color yarn. Again, start with a magic ring, crochet six single crochets, and increase each round until you have a flat circle large enough for your desired shell size.
After forming the base, stop increasing and continue crocheting around to build the shell’s height. This will give it a spiral, rounded shape. Once you’re satisfied with the shell’s size, stuff it lightly, then sew the end closed. To make the spiral effect, roll the shell tightly into a circle and stitch it together as you go to maintain the coiled look.
Attach the shell securely to the body using your yarn needle and matching thread. Be sure to position it toward the back of the body so the snail looks balanced. Finally, sew on or attach the safety eyes near the front, and if you like, use a small piece of yarn or embroidery thread to create a tiny smile.
And just like that, your crochet snail is complete! You now have a soft, charming amigurumi snail ready to display or gift to someone special. Each one you make can have its own personality — playful, colorful, and full of character.
Creative Ideas for Your Crochet Snail
One of the best things about the Crochet Snail Amigurumi Tutorial-Step by Step Tutorial is its versatility. Once you master the basic pattern, there are countless ways to personalize and use your crochet snails. These adorable creations make excellent decorations, gifts, and collectibles.
For example, you can make a collection of snails in different colors and sizes to create a cheerful display on a shelf or desk. Their whimsical appearance adds a touch of handmade charm to any space. You could even add small accessories, like tiny hats or flowers, to give each snail a unique personality.
Crochet snails also make wonderful gifts for children and adults alike. They’re soft, safe, and full of character, making them great companions for kids or sweet tokens of friendship for loved ones. You can package them beautifully in gift boxes or baskets, making them perfect for birthdays, holidays, or special occasions.
Another creative use is turning your snail into a keychain or bag charm. Simply attach a keyring or clip to the top of the snail’s shell, and you’ll have a portable, adorable accessory that shows off your crochet skills wherever you go.
If you enjoy home décor, consider making a snail-themed garland. String several small crochet snails together to create a cute and colorful decoration for nurseries, playrooms, or craft spaces. The cheerful shapes will bring joy and personality to your surroundings.
Lastly, if you sell handmade crafts, crochet snails are an excellent addition to your collection. They’re small, quick to make, and incredibly appealing to customers who love cute and unique handmade items. With different color combinations, you can create endless variations that attract attention and admiration.
Tips for Beginners and Finishing Touches
Even though the Crochet Snail Amigurumi Tutorial-Step by Step Tutorial is simple, beginners might find some steps tricky. Here are some helpful tips to ensure your snail turns out beautifully every time.
First, make sure to use tight and even stitches. Amigurumi looks best when the stuffing doesn’t show through, so maintaining consistent tension is key. Practice on small swatches if you’re new to crocheting in the round.
Second, always count your stitches carefully. Missing or adding stitches can distort the snail’s shape. Using a stitch marker at the start of each round helps keep track of your progress and prevents mistakes.
Third, when sewing the parts together, take your time to align them properly. The shell should sit securely on the back, and the eyes should be placed symmetrically for the best look.
Fourth, feel free to personalize your snail! You can embroider small details like spots, stripes, or tiny cheeks using different yarn colors. This adds a charming and playful touch to your creation.
Fifth, don’t overstuff your snail. The goal is to make it soft yet firm enough to hold its shape. Overstuffing can stretch the stitches and ruin the overall appearance.
Finally, take pride in your work. Every handmade project is unique, and even small imperfections make your snail special. The most important part is enjoying the process and celebrating your creativity.
Crochet Snail Amigurumi Tutorial
1. Is this project suitable for beginners?
Yes! The Crochet Snail Amigurumi Tutorial-Step by Step Tutorial is beginner-friendly and requires only basic crochet stitches like single crochet, increase, and decrease.
2. How long does it take to complete one snail?
On average, it takes about two to three hours, depending on your skill level and the size of the snail you’re making.
3. Can I use leftover yarn for this project?
Absolutely! This project is perfect for using small amounts of leftover yarn from other crochet creations.
4. What’s the best stuffing to use?
Polyester fiberfill is recommended because it’s soft, lightweight, and helps maintain the snail’s shape.
5. How can I clean my crochet snail?
Handwash it gently with mild soap and cold water, then let it air dry completely. Avoid machine washing to prevent damage.
6. Can I make the snail bigger or smaller?
Yes! You can adjust the size by using thicker yarn and a larger hook for a bigger snail, or thinner yarn and a smaller hook for a mini version.
Conclusion
This Crochet Snail Amigurumi Tutorial-Step by Step Tutorial has shown you how to create a delightful and charming snail from start to finish.
With just a few simple materials and some creativity, you can bring this adorable creature to life and enjoy the satisfaction of crafting something handmade. From choosing your colors to adding final details, each step allows you to express your personality and love for crochet.
Now that you’ve completed your project, take a moment to admire your work and maybe even start a whole snail family! Don’t forget to leave your sincere opinion about this tutorial and share your suggestions for future crochet guides. Your feedback helps inspire more creative ideas for everyone who loves amigurumi.