
Learning how to make crochet socks – Step by Step Tutorial is one of the most rewarding projects for crafters who enjoy combining comfort and creativity. Handmade socks are not only practical, but they also allow you to add your personal touch to something you use daily. Crocheting socks may sound intimidating for beginners, but with the right guide and patience, it becomes a fun and enjoyable process. This tutorial will walk you through every stage, from choosing yarn to finishing your cozy pair of socks.
One of the reasons why crochet socks have become so popular is because they give you control over size, design, and softness. Store-bought socks often don’t fit perfectly or may not have the colors and patterns you love. Crocheting your own pair allows you to design them exactly as you want. Plus, handmade socks are often warmer and more durable, especially if you select high-quality yarn. This makes them a thoughtful gift as well as a practical addition to your wardrobe.
Before we dive into this Step by Step Tutorial, it is important to understand that crocheting socks requires attention to detail, especially in sizing. Unlike scarves or blankets, socks must fit comfortably around your feet and ankles. But don’t worry—by following each stage carefully, you will be able to create socks that are not only stylish but also practical for everyday wear. Whether you want to make ankle socks, cozy winter socks, or colorful patterned pairs, this guide will give you the foundation you need.
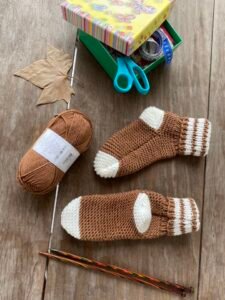
Materials and Preparation for Crochet Socks
To begin this crochet socks – Step by Step Tutorial, the first step is gathering the right materials. Choosing yarn is one of the most important parts of the process. For socks, it’s best to use a soft yet durable yarn that includes some elasticity, such as a wool blend with a bit of nylon or acrylic. This ensures that the socks are comfortable but also hold their shape after multiple uses and washes.
The crochet hook size is another key element. Generally, smaller hooks are used for socks because they help create a tighter stitch. This prevents holes and ensures that the fabric of the sock is firm and warm. Depending on the thickness of your yarn, you may need to adjust the hook size, but most sock patterns recommend sizes between 2.5 mm and 4 mm.
Measuring your feet is essential before starting. Use a tape measure to check the length of your foot and the circumference around the ball of your foot and ankle. This will guide you in creating socks that fit perfectly. Unlike scarves, socks must have a precise fit, so taking accurate measurements is not optional but a crucial part of preparation.
You will also need a pair of scissors, a yarn needle for weaving in ends, and stitch markers. Stitch markers are particularly helpful when working in the round because they help keep track of the beginning of each row. Since socks are often crocheted in a spiral or continuous rounds, markers prevent confusion and mistakes.
Before starting your first pair, it’s a good idea to practice stitches with scrap yarn. This way, you can test your tension and adjust accordingly. Loose stitches can make socks too large and floppy, while overly tight stitches can make them stiff and uncomfortable. Finding the right balance is key to success.
Finally, set aside a quiet and comfortable space for crocheting. Since socks are smaller projects with more detail, you will need good lighting and minimal distractions. Having all your tools nearby will help you focus and enjoy the process without interruptions.
Step by Step Guide to Crocheting the Socks
The foundation of this crochet socks – Step by Step Tutorial is starting with the toe. Many sock patterns begin with a magic ring, which creates a seamless and smooth circle for the toe area. From there, you gradually increase stitches in each round until the circle matches the width of your foot. This step requires patience, but it ensures that the socks will fit comfortably.
Once the toe is complete, the next stage is creating the foot section. This is usually done by crocheting in the round without increasing stitches. You continue this process until the length of the piece matches your foot up to the heel. This part is relatively simple, but it’s important to measure along the way to avoid making the socks too short or too long.
The heel is often considered the trickiest part of sock-making, but with step-by-step instructions, it becomes much easier. There are different heel techniques, including short-row heels and afterthought heels. Short-row heels are popular because they provide a smooth, snug fit. This method involves working partial rows to create a curved shape, then rejoining the stitches to continue crocheting in the round.
After the heel is finished, you will work on the leg section of the sock. This part can be as long or as short as you like. Some people prefer ankle socks, while others enjoy knee-high designs. You can also experiment with decorative stitches or color changes to make the socks unique. The leg section is a great place to get creative.
Once the leg is complete, it’s time to finish with the cuff. A ribbed cuff made with front post and back post double crochet stitches is a popular choice because it provides elasticity. This helps the socks stay up when worn. Make sure the cuff is tight enough to hold but not so tight that it cuts off circulation.
Finally, weave in all ends using your yarn needle. This not only secures the stitches but also ensures the inside of the sock feels smooth and comfortable against the skin. After finishing, try the socks on to make sure they fit well. If adjustments are needed, you can note them for your next pair.
Tips for Success and Common Mistakes to Avoid
One of the most important tips when following a crochet socks – Step by Step Tutorial is to maintain consistent tension. Uneven tension can make one sock larger than the other or create uncomfortable bumps in the fabric. Practicing with scrap yarn before starting your project helps reduce this problem.
Choosing the right yarn weight is another common issue. Thick yarn may create socks that feel bulky inside shoes, while very thin yarn may not provide enough warmth. Sock yarn, which is specially designed for this purpose, is often the best choice. It strikes a balance between softness, durability, and comfort.
Another common mistake is skipping the step of measuring your feet. Some crafters assume that following a general pattern size will be enough, but feet vary greatly in size and shape. Taking a few minutes to measure ensures that your socks fit perfectly.
It’s also essential to count stitches carefully, especially around the toe and heel areas. Losing track of stitches can result in uneven socks that do not match. Using stitch markers and double-checking your work can save time and frustration in the long run.
Blocking your socks after finishing is highly recommended. Blocking involves gently wetting the socks and shaping them to the correct size while they dry. This step improves the final look and feel, making the stitches even and the socks more comfortable.
Lastly, don’t rush the process. Socks may seem small, but they require detail and precision. Taking your time allows you to enjoy the process and create a high-quality finished product that you will be proud to wear or gift.
Creative Variations and Personalizing Your Crochet Socks
Once you master the basics of this crochet socks – Step by Step Tutorial, you can begin to explore creative variations. For example, you can add stripes by changing yarn colors every few rows. This simple technique creates fun and vibrant designs without making the pattern more difficult.
Another way to personalize your socks is by experimenting with textured stitches. Instead of using only single or double crochet, you can try shell stitches, puff stitches, or lace patterns. These add a decorative touch and make each pair unique.
Adding embellishments is another creative idea. Small crochet flowers, buttons, or embroidered details can make socks look more special, especially if you plan to give them as gifts. Just make sure that any decorations do not make the socks uncomfortable to wear inside shoes.
You can also play with length variations. Ankle socks are perfect for summer, while thigh-high socks can be cozy and stylish in colder months. Having the freedom to customize length means you can create socks for every season.
For those who want extra warmth, you can line your socks with fleece or use bulkier yarn to make slipper-style socks. These are great for wearing around the house during winter. They are practical, warm, and add a handmade charm to your home attire.
Finally, creating matching sets can be fun. You can crochet socks in colors that match scarves, hats, or mittens. Coordinated handmade accessories not only look beautiful but also showcase your skills as a crafter.
FAQ about Crochet Socks
1. Are crochet socks comfortable to wear with shoes?
Yes, if made with the right yarn and hook size, crochet socks can be very comfortable. Using sock yarn ensures that they are not too bulky inside shoes.
2. How long does it take to make a pair of crochet socks?
The time depends on your skill level and the complexity of the design. Beginners may take a few days, while experienced crocheters can finish in less time.
3. Do crochet socks stretch out over time?
Crochet socks can stretch slightly with wear, but using yarn with nylon or acrylic helps them maintain shape for longer.
4. Can I machine wash crochet socks?
That depends on the yarn. Many sock yarns are machine washable, but always check the yarn label for care instructions. Hand washing is safest for delicate designs.
5. What is the difference between knitted and crocheted socks?
Knitted socks are usually thinner and stretchier, while crocheted socks tend to be thicker and sturdier. Both have unique benefits depending on preference.
6. Can I make crochet socks without following a pattern?
Yes, once you understand the basic structure, you can freestyle socks. However, following a Step by Step Tutorial is recommended for beginners to ensure proper fit.
Conclusion
In this crochet socks – Step by Step Tutorial, we explored everything from choosing materials to finishing and personalizing your handmade socks. You learned how to start with the toe, create the heel, and finish with a neat cuff, along with tips to avoid common mistakes. We also discussed creative variations and answered the most frequently asked questions about crocheting socks.
Crocheting socks may take time and patience, but the results are worth it. Each pair is a reflection of your creativity and skill, offering both comfort and personal style.
If you found this guide helpful, please leave your honest opinion and suggestions—I’d love to know your thoughts and hear about your crochet journey.
