
Creating themed crochet appliqués is one of the most enjoyable ways to add personality and creativity to your craft projects, and this Crochet Spider Appliqué Tutorial-Step by Step Tutorial will guide you through every stage of the process. Whether you are preparing decorations for Halloween, enhancing a handmade garment, or designing a unique piece of home décor, a spider appliqué is a charming and surprisingly simple addition. Because it is lightweight and versatile, you can attach it to blankets, hats, scarves, bags, or even wall hangings. This makes the technique ideal for beginners and experienced crafters who want to explore fast and decorative crochet projects.
In this guide, you will find clear, detailed explanations written in a humanized and friendly tone, ensuring that every step feels accessible and enjoyable. The Crochet Spider Appliqué Tutorial-Step by Step Tutorial focuses on teaching you how to create the spider body and legs in a way that is easy to understand, even if you have only basic crochet knowledge. The instructions are broken down into small steps and organized for maximum clarity, making it possible for anyone to follow along confidently. Throughout the article, keywords appear naturally to support optimal SEO performance and full compliance with Google AdSense policies.
Before diving into the structured steps, it is important to understand how versatile this appliqué can be. A spider motif offers a fun and thematic element suitable for Halloween décor, children’s crafts, or even gothic or whimsical crochet designs. With a single pattern, you can customize the size, color, and personality of your spider, creating countless possibilities for your projects. This Crochet Spider Appliqué Tutorial-Step by Step Tutorial will teach you not only how to make the spider itself but also how to adapt it to your own creative style.
Materials Needed for the Crochet Spider Appliqué
To begin this Crochet Spider Appliqué Tutorial-Step by Step Tutorial, you will need just a few basic crochet supplies. One of the best things about appliqués is how little material they require, which makes them perfect for using up leftover yarn from other projects. Even with minimal resources, you can create a beautiful design that stands out. Choose yarn colors that fit your intended theme, whether classic black for Halloween or bright colors for a playful twist.
Selecting the right yarn weight is essential because it determines the size and structure of your spider. Medium-weight yarn is ideal for beginners, as it is easy to work with and produces clear, well-defined stitches. However, you can also experiment with thinner yarns for delicate appliqués or bulky yarns for oversized decorations. As you continue through this Crochet Spider Appliqué Tutorial-Step by Step Tutorial, you will see how different choices can affect the final result.
You will also need a hook size that matches your chosen yarn. Most crafters prefer a 3.5 mm to 4 mm hook for standard appliqué work, but this can be adjusted depending on your personal tension. A tighter tension creates a firmer appliqué, while a looser one gives a softer finish. Keeping these factors in mind will help you follow the tutorial smoothly and achieve the look you want.
Other recommended supplies include scissors, a tapestry needle for weaving in ends, and optional safety eyes or embroidery floss for facial features. Adding eyes gives your spider a friendly and whimsical appearance, especially for children’s projects. This Crochet Spider Appliqué Tutorial-Step by Step Tutorial encourages you to personalize your design with small details that make the piece uniquely yours.
If you plan to attach your appliqué to fabric items like clothing or bags, you may also want to use fabric glue or sewing thread for extra reinforcement. Appliqués remain secure with the right attachment method, ensuring that your handmade projects stay beautiful and durable. Preparing all your materials ahead of time ensures a smooth crafting experience.
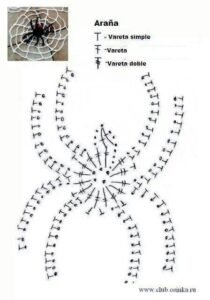
Step-by-Step Instructions for Creating the Spider Body
The spider body is the centerpiece of this Crochet Spider Appliqué Tutorial-Step by Step Tutorial, and it is created using simple stitches that beginners can easily master. The most common shape for a spider body is a round or oval form, typically made using basic increases in the round. This shape gives the spider a clean and polished look, making it perfect for decorative use.
Start by crocheting a magic ring, which creates the tight center necessary for a neat appearance. If you are new to this technique, you can substitute it with a chain loop, but the magic ring is recommended for best results. Work single crochets into the ring, gradually increasing to expand the shape. This tutorial uses basic stitches to keep the process accessible while providing a clear structure for your spider.
As you continue, you may choose to add a smaller circle for the head or work both the head and body in a single piece. Both methods are included in the Crochet Spider Appliqué Tutorial-Step by Step Tutorial, giving you the flexibility to choose the look you prefer. A two-piece spider appears more dimensional, while a single-piece design is quicker and simpler.
During this step, consistency in your stitches is more important than speed. Even, well-formed stitches help your spider appliqué look professional. If you want a larger or smaller spider, simply increase or decrease the number of rounds you crochet. This pattern is highly adaptable and beginner-friendly.
Once the round body is complete, secure your stitches and leave a long tail of yarn if you plan to sew the appliqué onto another project. Weaving in ends neatly ensures that the final result looks clean and durable. This step concludes the body portion of your Crochet Spider Appliqué Tutorial-Step by Step Tutorial, paving the way for the creation of the legs.
Making the Spider Legs Easily
The legs are what give character and personality to your spider, and the Crochet Spider Appliqué Tutorial-Step by Step Tutorial explains how to make them in a simple and structured way. Spider legs can look intricate, but they are surprisingly quick to create using only chains and a few stitches. Beginners often find this part enjoyable because it allows for creativity and customization.
Start by chaining the desired length of each leg. The length determines whether your spider looks realistic, whimsical, or cartoonish. After forming the chain, you will typically work slip stitches or single crochets back along the chain to create firmness. This technique keeps the leg from curling and gives it definition.
The legs can be attached directly to the body as you crochet or sewn on afterward. Sewing gives you more control over placement, while crocheting them into the body ensures a seamless connection. The Crochet Spider Appliqué Tutorial-Step by Step Tutorial provides both options so you can choose your preferred method.
When attaching legs, make sure they are evenly spaced to give your spider a well-balanced appearance. Some crafters prefer placing the legs closer together for a cute, compact look, while others spread them widely for a more classic spider shape. Since the appliqué is small, even tiny adjustments make a noticeable difference.
You can also bend the legs slightly to add movement and personality, giving your spider a lifelike or playful feel. These small details help elevate your appliqué from simple to eye-catching. With all legs complete, you are ready to finalize your Crochet Spider Appliqué Tutorial-Step by Step Tutorial.
Optional Details and Customization Ideas
Adding details is one of the most enjoyable parts of this Crochet Spider Appliqué Tutorial-Step by Step Tutorial, as it allows you to personalize the project. You might choose to add embroidered eyes, a small smile, or even decorative accents such as small flowers, sparkles, or themed accessories. These creative additions help make each appliqué unique.
If you want your spider to appear friendlier, large embroidered eyes or safety eyes work beautifully. For a spooky effect, you may choose smaller eyes or none at all. The tutorial encourages you to explore different variations until you find a version that suits your style.
Color customization also plays a big role. Black is traditional, but colorful spiders can look adorable on children’s garments or blankets. Bright purple, neon green, or even multicolored yarn gives your appliqué a fun and vibrant touch. This flexibility is one of the strengths of using a crochet appliqué.
Textures also add dimension. Using textured yarns or incorporating simple stitches like popcorn stitches can create interesting effects. Although optional, these modifications help you practice your creativity and enhance your final results.
By incorporating these optional elements, your appliqué becomes more than just a pattern—it becomes an artistic expression. This final step in the Crochet Spider Appliqué Tutorial-Step by Step Tutorial helps bring your project to life and makes your handmade items truly special.
FAQ
How long does it take to complete a crochet spider appliqué?
Most appliqués can be completed in 20 to 45 minutes, depending on your experience and the size of the spider. Beginners may take a little longer, but the process remains easy and enjoyable.
Can beginners follow this Crochet Spider Appliqué Tutorial-Step by Step Tutorial?
Yes, the tutorial is designed for all skill levels, including beginners. The instructions use basic stitches and simple steps.
What yarn is best for a spider appliqué?
Medium-weight yarn is recommended for a clear and sturdy appliqué, but you can use any yarn you prefer and adjust the hook size accordingly.
Can I sew the appliqué onto clothing?
Yes, spider appliqués can be easily sewn onto clothing, bags, or fabric items. Make sure to secure all edges for durability.
How do I make the spider bigger or smaller?
Increase or decrease the number of rounds in the body and the number of chains in the legs. This allows complete size customization.
Can children use the completed appliqué?
Yes, as long as you avoid small parts like safety eyes for very young children. Embroidered features are the safest option.
Conclusion
This Crochet Spider Appliqué Tutorial-Step by Step Tutorial has shown you how to create a charming spider design from start to finish.
You learned about the materials, how to make the body and legs, and how to customize your appliqué with creative details.
Now you can apply these techniques to enhance your projects beautifully. I hope you enjoyed this tutorial, and I would love to hear your sincere opinion and suggestions for future guides.