
If you have been searching for a fun and practical crochet project, this Crochet “Stanley” Cup Holder! Beginner Friendly! – Step by Step Tutorial is the perfect place to start. Crochet is not only a relaxing and rewarding hobby but also a creative way to design unique accessories that you can actually use. One of the most useful crochet projects for daily life is a cup holder, and with the Stanley Cup trend, it has become even more popular. This step-by-step guide is designed with beginners in mind, offering clear explanations and simple instructions.
Making your own crochet Stanley cup holder is more than just crafting. It is about creating something functional, stylish, and reusable. Instead of buying generic cup sleeves, you can crochet your own and add a personal touch. Handmade cup holders are also eco-friendly since they reduce the need for disposable sleeves. With a few basic materials and easy stitches, you will be able to make your very own cozy in no time. This tutorial is ideal for beginners who want to learn crochet through a practical project while also creating something trendy and useful.
In this article, we will cover the step-by-step instructions, materials required, and tips for success. We will also discuss how to make adjustments for different cup sizes, ensuring that your crochet Stanley cup holder fits perfectly. Whether you are making this for yourself, as a gift, or even to sell at craft fairs, this guide will give you all the details you need. By the end, you will feel confident in your ability to crochet a stylish and functional cup holder that will be admired by everyone who sees it.
Materials You Will Need for the Crochet Stanley Cup Holder
When starting this Crochet “Stanley” Cup Holder! Beginner Friendly! – Step by Step Tutorial, the first thing to do is gather all the necessary materials. Preparing in advance helps the process go smoothly and ensures that you have everything at hand before you begin crocheting. Luckily, this project requires only a few basic items, making it beginner-friendly and budget-friendly.
You will need medium-weight cotton yarn for the project. Cotton is the best choice because it is durable, washable, and provides the right texture for a sturdy cup holder. Choose any color that matches your personality or the cup you plan to use it for. Bright colors make the project fun, while neutral shades give it a sleek and modern look.
A crochet hook that matches your yarn weight is also necessary. Typically, a 4.0mm to 5.0mm hook works well for cotton yarn. Using the correct hook size ensures that your stitches are even and the fabric is tight enough to hold the cup securely. Beginners often find medium hook sizes easier to manage compared to very small or very large hooks.
You will also need scissors for cutting yarn, a yarn needle for weaving in ends, and a measuring tape to ensure your project fits the Stanley Cup size. These are standard tools in crochet, and if you plan to continue learning new projects, investing in a small crochet kit is a good idea.
Another optional but useful tool is a stitch marker. Since you will be working in rounds to create the cup holder, a stitch marker can help you keep track of the beginning of each round. This prevents mistakes and makes your work neater.
Finally, keep your Stanley Cup or the cup you plan to make the holder for nearby. This way, you can check the fit as you go. Adjustments can easily be made while crocheting, and this ensures the final product will be perfectly customized.
Step-by-Step Instructions for Beginners
Now that you have your materials ready, let’s dive into the Crochet “Stanley” Cup Holder! Beginner Friendly! – Step by Step Tutorial. This project mainly uses basic crochet stitches, making it perfect for beginners who want to practice while creating something useful. Take your time and enjoy the process.
Start by creating a slip knot and chaining enough stitches to form a ring that matches the base of your cup. Usually, 8 to 10 stitches joined into a circle are enough to begin. This creates the foundation for the bottom of your cup holder.
Once you have your ring, begin working single crochets into the circle. Increase evenly around to form a flat base. For example, place two single crochets in one stitch, then one single crochet in the next, repeating until you reach the size of the cup base. This ensures the cup will sit comfortably without slipping.
After finishing the base, you will begin crocheting in continuous rounds without increasing. This is where the sides of your cup holder start to take shape. Use half double crochets or single crochets for a tight and sturdy fabric. Continue crocheting until the height matches your cup.
For extra grip and style, you can add textured stitches such as front post double crochets. These not only enhance the design but also help keep the holder from sliding. You can also alternate colors to create stripes or patterns, giving your project a more customized look.
When you reach the desired height, finish the project by fastening off your yarn and weaving in the loose ends with a yarn needle. Try the cup holder on your Stanley Cup to check the fit. If it is slightly loose, you can add a drawstring at the top to tighten it. If it is too snug, simply use a larger hook size next time for a better fit.
Congratulations! You have just completed your beginner-friendly crochet Stanley cup holder. With practice, you will be able to make them faster and even experiment with different designs.
Tips for Customization and Creativity
One of the best things about this Crochet “Stanley” Cup Holder! Beginner Friendly! – Step by Step Tutorial is the endless customization possibilities. Once you learn the basic steps, you can get creative and personalize your holder in many different ways.
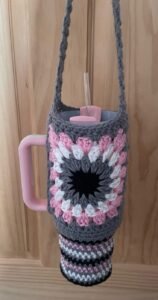
You can add a handle or strap to your cup holder. This makes it easier to carry around and adds functionality. A simple crochet chain stitched to both sides works perfectly as a strap.
Consider using multicolored yarn or switching yarn colors at intervals to create stripes or ombre effects. Color combinations can make your project truly stand out and match your favorite style.
Adding embellishments such as small crochet flowers, appliqués, or even embroidered initials gives your cup holder a unique look. These little details make the project more personal and gift-worthy.
You can also adjust the size to make cup holders for smaller tumblers, coffee cups, or even mason jars. Once you master the technique, resizing is simple by increasing or decreasing the starting chain and the number of rounds.
For those who want extra insulation, you can crochet with two strands of yarn held together. This makes the holder thicker and better at keeping your drink hot or cold for longer periods.
Lastly, remember that practice makes progress. Don’t be discouraged if your first attempt isn’t perfect. Each project teaches you new skills and helps you improve as a crocheter.
Benefits of Making a Crochet Stanley Cup Holder
Beyond being a fun craft, making your own crochet Stanley cup holder has many practical benefits. This Crochet “Stanley” Cup Holder! Beginner Friendly! – Step by Step Tutorial will not only teach you crochet basics but also show you how handmade projects can be sustainable and stylish.
First, it is eco-friendly. By making and using your own crochet cup holder, you reduce the need for disposable cardboard sleeves. This small step helps the environment and promotes sustainable living.
Second, it protects your hands. Hot drinks can be uncomfortable to hold, while cold drinks can cause condensation. A crochet cup holder acts as insulation, keeping your hands comfortable at all times.
Third, it adds personality to your drinkware. Instead of using plain cups or store-bought holders, you can showcase your creativity through handmade designs. Each project is unique and can reflect your style.
Fourth, it is a cost-effective project. With just a small amount of yarn, you can make multiple cup holders. This makes it a great option for gifting or even selling at craft fairs or online shops.
Fifth, it is a beginner-friendly project that helps you learn and practice basic stitches. Many people start their crochet journey with small, useful items like cup holders before moving on to larger projects like blankets or garments.
Lastly, making cup holders can become a relaxing hobby that reduces stress. The repetitive motion of crocheting has been shown to be therapeutic, making it an enjoyable and productive pastime.
FAQ About Crochet Stanley Cup Holder
1. Can beginners really make this project easily?
Yes! This Crochet “Stanley” Cup Holder! Beginner Friendly! – Step by Step Tutorial is designed specifically for beginners. It only uses simple stitches like chain, single crochet, and half double crochet.
2. What type of yarn is best for a cup holder?
Cotton yarn is the best choice because it is strong, washable, and absorbs condensation well. Acrylic can be used, but cotton gives the best results for durability and function.
3. How long does it take to make a crochet Stanley cup holder?
Most beginners can complete this project in about two to three hours. With practice, it may take less than an hour to finish one.
4. Can I wash my crochet cup holder?
Yes, if you use cotton yarn, the holder can be washed by hand or in a gentle machine cycle. Lay it flat to dry to maintain its shape.
5. Can I sell crochet Stanley cup holders I make?
Absolutely! Handmade cup holders are popular at craft fairs and online shops. Just make sure to check sizing and use quality yarn so your customers are satisfied.
6. How can I make my cup holder fit different cup sizes?
You can adjust the number of starting chains and increase rounds for the base. Measuring your specific cup as you work will help you create the perfect fit.
Conclusion
Learning how to make a Crochet “Stanley” Cup Holder! Beginner Friendly! – Step by Step Tutorial is a wonderful way to start your crochet journey. This project combines practicality with creativity, giving you something both stylish and useful. From choosing your yarn to adding personal touches, the process is enjoyable and rewarding.
We hope this tutorial has inspired you to pick up your hook and try it out for yourself. Whether you are a complete beginner or someone looking for a quick project, this crochet cup holder is perfect.
Don’t forget to share your experience—leave a sincere opinion and suggestions in the comments so we can continue creating helpful guides for you!