
Learning how to make a crochet starfish – step by step tutorial is a fun and creative project that allows you to bring a touch of the ocean into your crochet collection. Starfish are unique sea creatures that inspire many crafters because of their shape, charm, and versatility in decoration. Whether you want to add them to beach-themed décor, children’s toys, or even as appliqués on bags and blankets, this tutorial will guide you through everything you need to know.
Crocheting a starfish may look complicated at first because of its five arms, but with simple techniques and clear instructions, anyone can make it. The process combines basic crochet stitches with a bit of shaping to create a realistic design. The best part is that you can experiment with different yarn textures and colors to customize your starfish however you like. Beginners and experienced crocheters alike will enjoy making this project.
In this crochet starfish – step by step tutorial, you will not only learn the stitches required but also how to shape the arms evenly, finish the starfish neatly, and use it in different creative projects. This pattern is a great way to practice shaping techniques, which can later be applied to other crochet projects like flowers, motifs, or even amigurumi.
Materials Needed for Crochet Starfish
Before beginning the crochet starfish – step by step tutorial, it is important to gather all the materials you will need. Having the right tools and yarn will make the process smoother and ensure your final piece looks neat and professional.
First, you will need yarn in the color of your choice. Cotton yarn is often preferred because it provides good stitch definition, but acrylic yarn can also work if you want a softer result. Choosing bright colors can make your starfish fun and playful, while natural tones will make it look more realistic.
A crochet hook that matches your yarn weight is essential. Typically, a size 3.5mm to 4mm hook works well for this project, but always check the yarn label for guidance. The size of your hook will determine the overall size of the finished starfish, so you can experiment with larger or smaller hooks depending on your desired result.
You will also need a yarn needle to weave in ends and scissors to trim any excess yarn. If you plan to turn your crochet starfish into a stuffed toy, you will also need some fiberfill stuffing. Stuffing helps the starfish hold its shape, especially if it will be used as part of a decoration or a child’s toy.
Optional materials include small beads, buttons, or embroidery thread if you want to add details such as eyes or extra patterns. This can make your crochet starfish unique and add personality to your creation. Having these extra supplies on hand gives you more creative freedom.
Once you have gathered your materials, set up a comfortable workspace with good lighting. This will make crocheting easier and more enjoyable, especially if you are working with detailed shaping like that required for a starfish. With everything ready, you are prepared to start your crochet starfish – step by step tutorial.
Step by Step Instructions to Crochet a Starfish
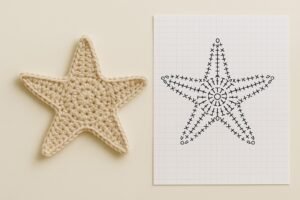
Now let’s dive into the actual process of creating your crochet starfish – step by step tutorial. The project begins with a simple circle, which forms the center of the starfish. From this circle, you will build each of the five arms evenly around.
Start by making a magic ring and crocheting single crochet stitches into the ring. This will be the foundation of your starfish. If you are not comfortable with the magic ring technique, you can chain four and slip stitch into the first chain to form a ring. The key is to have a secure base for the arms.
Next, you will work in the round, adding a few stitches to slightly enlarge the center. The number of stitches you use may vary depending on the size you want, but typically 10 to 12 stitches are enough to create a stable middle. This part is essential because it keeps the arms evenly spaced.
To create the arms, you will crochet chains extending from the center and then work back down with single and double crochet stitches. The arms are shaped by gradually increasing stitches at the beginning of each row and decreasing as you return. This gives them the tapering look of a real starfish.
Repeat this process five times to form all the arms. Make sure they are evenly spaced around the circle. If needed, you can count stitches carefully to ensure symmetry. This is one of the most important parts of the crochet starfish – step by step tutorial, as even arms create a balanced and beautiful design.
Finally, finish off your starfish by weaving in all yarn ends neatly. If you are adding stuffing, make sure to fill the starfish before closing the final arm completely. Once finished, gently shape the arms with your hands to make them uniform.
Creative Uses for Crochet Starfish
One of the best things about following a crochet starfish – step by step tutorial is that the finished piece can be used in countless ways. Starfish motifs are versatile and can brighten up many different projects.
First, crochet starfish make beautiful appliqués. You can sew them onto bags, hats, blankets, or even clothing to create a beach-inspired look. This is a great way to add handmade charm to everyday items.
They can also be used as decorations. Crochet starfish look wonderful as part of a summer or nautical-themed table centerpiece. You can scatter them across the table, attach them to napkin rings, or even string them together into a garland. Their cheerful shape adds warmth to any setting.
If you add stuffing, your starfish can become a small toy. Children love sea creature toys, and a crochet starfish is soft, safe, and lightweight. You can even create a collection of crochet sea creatures like fish, shells, and octopuses to go along with it.
Another creative idea is to turn your starfish into a keychain or bag charm. By attaching a small key ring or clasp, you can carry your handmade starfish wherever you go. This makes a thoughtful handmade gift as well.
Crochet starfish also make great ornaments for Christmas trees, especially if you decorate them with metallic or glittery yarn. They can remind you of summer during the holiday season and bring a unique twist to traditional ornaments.
Finally, they can be part of educational tools. Teachers and parents can use crochet starfish to teach children about marine life in a fun and interactive way. Crafting and learning combined make the project even more valuable.
Tips for Success in Crochet Starfish
To get the most out of this crochet starfish – step by step tutorial, here are some useful tips to keep in mind while working on your project.
Start by choosing the right yarn and hook size. If your yarn is too thick or your hook is too large, the starfish might look bulky and lose its delicate shape. On the other hand, very fine yarn can make the project more difficult for beginners. A medium-weight cotton yarn is usually the best choice.
Always count your stitches carefully. Since the starfish relies on symmetry, missing a stitch can cause one arm to look different from the others. Taking time to double-check each round will save you from frustration later.
Blocking can help shape your starfish after it is finished. Simply dampen the crochet piece and pin it into place on a foam board until it dries. This ensures that all five arms are straight and evenly shaped.
Experiment with color combinations. While a natural beige or orange may resemble real starfish, bright blues, pinks, or purples can make your project fun and whimsical. Using variegated yarn can also create interesting patterns.
If you are making a toy or keychain, reinforce the stitches by tightening them a little more than usual. This will make the starfish more durable and help it withstand daily use.
Finally, practice patience. Like many crochet projects, creating a starfish requires careful attention to detail. Taking your time will not only improve the look of your project but also make the process more enjoyable.
FAQ About Crochet Starfish
1. Is a crochet starfish beginner-friendly?
Yes, this crochet starfish – step by step tutorial is great for beginners. It uses simple stitches like single crochet, double crochet, and chains. With clear instructions, even someone new to crochet can complete it.
2. How long does it take to make a crochet starfish?
The time depends on your skill level, but most people can finish a small crochet starfish in about 1 to 2 hours. Larger or more detailed versions may take longer.
3. Can I make the starfish bigger or smaller?
Absolutely. You can adjust the size of your crochet starfish by changing the yarn weight and hook size. Thicker yarn and larger hooks make a bigger starfish, while finer yarn and smaller hooks create a delicate version.
4. What can I do with a crochet starfish?
You can use it as decoration, appliqué, toy, keychain, or ornament. The versatility of this project makes it useful for many purposes.
5. Do I need stuffing for a crochet starfish?
Stuffing is optional. If you want your starfish flat, you can leave it unstuffed. For a plump, 3D version, a little fiberfill stuffing works perfectly.
6. How do I make my starfish arms even?
The key is counting stitches carefully and spacing each arm evenly around the center. Blocking after finishing can also help straighten and shape the arms.
Conclusion
Creating a crochet starfish – step by step tutorial is a delightful project that combines creativity, skill, and fun. From gathering materials and following detailed instructions to exploring different uses and adding your own personal touches, this tutorial gives you all the tools to succeed.
Crochet starfish are not only beautiful but also versatile, making them a wonderful addition to any crafter’s collection.
Now that you have learned how to make your own crochet starfish, I encourage you to give it a try. Share your results, leave your honest opinion, and suggest new ideas for future crochet tutorials. Your feedback helps make every project even more inspiring!