
The Crochet Starfish Tutorial-Step by Step Tutorial is a creative and enjoyable project that allows you to bring a touch of the ocean into your home through the art of crochet. Whether you want to decorate a beach-themed room, enhance a summer craft collection, or create a unique handmade gift, this tutorial provides everything you need to make a beautifully textured crochet starfish. From yarn selection to final assembly, each stage in the Crochet Starfish Tutorial-Step by Step Tutorial is explained in a simple and humanized way, making it accessible for beginners and enjoyable for experienced crocheters as well.
Crocheting a starfish is an excellent opportunity to practice shaping techniques and expand your knowledge of common stitches while creating something visually appealing. The Crochet Starfish Tutorial-Step by Step Tutorial focuses on helping you understand the structure of each arm, how to maintain symmetry, and how to give your starfish a three-dimensional appearance. These small details help your final piece look realistic, charming, and durable, especially if you plan to use it as a decorative item for wall art, table settings, toys, or bag accessories.
This tutorial also highlights essential principles of organization, color selection, and tension control. The Crochet Starfish Tutorial-Step by Step Tutorial supports you through every step so that you gain confidence while crocheting and enjoy the relaxing experience of working with yarn. Before moving into the structured steps, you will find helpful explanations that prepare you for the techniques ahead. With patience and creativity, your starfish will come to life beautifully, showcasing your skill and artistic touch.
Choosing the Right Materials for Your Starfish
To begin the Crochet Starfish Tutorial-Step by Step Tutorial, it’s important to gather the correct materials. The yarn you choose will influence the texture and final look of your starfish. Cotton yarn is highly recommended because it creates firm stitches that help maintain the starfish shape. Acrylic yarn also works well, especially if you want a softer or more playful finish.
Select a hook size appropriate for your yarn, usually between 3.0 mm and 4.5 mm. Using a smaller hook will make your stitches tighter, giving your starfish more definition. The Crochet Starfish Tutorial-Step by Step Tutorial encourages checking your tension before starting the main body to ensure your starfish will not look too loose or floppy.
You will also need a yarn needle to sew the arms together and weave in the ends. This step helps keep the final result neat and ensures the starfish holds its structure. Stitch markers can also be helpful, especially if you are new to crocheting in rounds. These tools make it easier to track stitches and keep your work even throughout the project.
Color selection is another important aspect of this tutorial. A realistic starfish often uses shades of orange, sand, coral, or dusty pink. However, feel free to choose any color that matches your creative vision. The Crochet Starfish Tutorial-Step by Step Tutorial encourages personalization to make your final piece unique.
Stuffing is optional, but many crafters prefer lightly filling the arms to give the starfish a three-dimensional appearance. If you choose to stuff it, fiberfill works perfectly. Keep the stuffing light so the arms remain flexible and natural-looking.
Before you begin crocheting, organize all your materials in one place. This keeps the process smooth and enjoyable, ensuring you can follow every step of the Crochet Starfish Tutorial-Step by Step Tutorial without interruptions.
Crocheting the Starfish Arms
The starfish consists of five arms, and each arm is constructed individually to ensure the final piece has a realistic shape. In the Crochet Starfish Tutorial-Step by Step Tutorial, you will begin each arm with a magic ring followed by increases to create a tapered shape. This provides a solid foundation for each arm and keeps the structure consistent.
Each arm is created in rounds that gradually increase and then decrease in stitch count. This shaping technique helps form the natural point of a starfish. The tutorial encourages counting your stitches carefully, as maintaining equal stitch distribution is essential for symmetry. Even the slightest stitch change can affect how the final starfish looks.
Once you reach the widest part of the arm, you will decrease in the next rounds to create the narrowing shape toward the tip. The Crochet Starfish Tutorial-Step by Step Tutorial breaks these steps into simple actions to ensure you feel confident while shaping each arm. Decreasing stitches might seem challenging at first, but with practice, the technique becomes very natural.
If you choose to stuff the arms, do so lightly as you decrease. This gives the starfish a soft but structured form. Avoid overfilling, as the arms should remain slightly flexible to mimic the natural appearance of a starfish. The tutorial recommends adjusting the amount of stuffing as you go along to avoid lumps or uneven sections.
Repeat the same process for all five arms. Because consistency is crucial, many crocheters like to finish all arms before moving to assembly. The Crochet Starfish Tutorial-Step by Step Tutorial encourages double-checking that all arms are the same size and shape before continuing.
Once all arms are complete, fasten off and leave a long tail for sewing. These tails will be crucial during assembly when attaching the arms together to form the starfish.
Assembling the Crochet Starfish
After completing the five arms, the next step in the Crochet Starfish Tutorial-Step by Step Tutorial is the assembly process. Begin by laying all the arms flat on a surface, arranging them in a symmetrical star shape. This helps you visualize how they will connect and ensures that you sew them together in the correct orientation.
Start sewing the arms together using the long tails you left on each arm. Attach them side by side, working carefully to make the joins invisible. The Crochet Starfish Tutorial-Step by Step Tutorial recommends sewing slowly and checking frequently to maintain symmetry. Even stitches make the final result smoother and more professional.
If you added stuffing, make sure the stuffing does not shift while assembling. Adjust the shape gently with your fingers as you sew. Keeping the arms aligned ensures your starfish maintains a natural and balanced appearance. Positioning is just as important as stitching during this step.
After the arms are fully joined, reinforce the center area with a few extra stitches. This prevents gaps and strengthens the overall structure. The Crochet Starfish Tutorial-Step by Step Tutorial emphasizes secure sewing to ensure that the starfish can be handled, displayed, or washed without losing shape.
Once the starfish is fully assembled, weave in all yarn ends neatly. Clean finishing gives the piece a polished look and prevents unraveling. This step might seem small but contributes greatly to the durability and beauty of your handmade creation.
Finally, shape the starfish with your hands, adjusting the arms so they sit evenly and resemble a natural starfish pose. Light shaping helps define the final look, and the tutorial encourages taking your time with this final touch.
Decorating and Using Your Crochet Starfish
The final step in the Crochet Starfish Tutorial-Step by Step Tutorial is adding optional decorations. You can embroider small details along each arm to mimic natural starfish textures. Simple surface stitches or small knots can add dimension and character to your piece. Choose a color slightly lighter or darker than your main yarn to create subtle contrast.
Another fun option is adding beads or tiny buttons that resemble natural sea textures. These additions are purely decorative but can enhance the uniqueness of your starfish. The Crochet Starfish Tutorial-Step by Step Tutorial supports creative freedom so your piece can match any theme you choose.
You can also attach a loop to the back if you want to turn your starfish into a wall hanging. This works well for beach-themed décor or nursery decorations. The lightweight nature of crochet makes the starfish easy to display without heavy hardware.
If you plan to use the starfish as part of a larger craft project, such as a mobile or garland, make sure the arms are firmly attached. The tutorial emphasizes durability for pieces that may be handled frequently or used in playful settings.
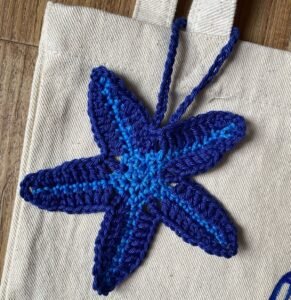
Crochet starfish also make excellent accessories, such as bag charms, keychains, or decorative appliqués for beach wraps and summer bags. The versatility of the design allows you to use your finished creation in many different ways.
No matter how you choose to use it, the Crochet Starfish Tutorial-Step by Step Tutorial ensures that your handmade starfish will be durable, attractive, and ready to brighten any space with a touch of ocean inspiration.
Crochet Starfish Tutorial-Step by Step Tutorial
1. Is this project good for beginners?
Yes, this tutorial is beginner-friendly because it uses basic stitches and clear shaping techniques.
2. What is the best yarn for a crochet starfish?
Cotton yarn provides structure, but acrylic works well for softer, more playful starfish designs.
3. Do I have to stuff the starfish?
Stuffing is optional. Light stuffing adds shape, but a flat starfish is also beautiful.
4. How long does it take to finish?
Most people complete it in one to three hours, depending on skill level and desired size.
5. Can I wash the crochet starfish?
Yes, as long as you use washable yarn. Hand washing is recommended to preserve its shape.
6. Can I make larger or smaller starfish?
Absolutely. Adjust the number of rounds and stitches to resize the project easily.
Conclusion
This Crochet Starfish Tutorial-Step by Step Tutorial guided you through every stage of creating a charming crochet starfish, from choosing yarn and crocheting each arm to assembling and decorating your final piece.
You now have all the steps needed to make a beautiful handmade starfish that can be used as decoration, a gift, or a personal craft project. I hope you enjoyed this tutorial and feel inspired to create many more ocean-themed designs.
Please leave your sincere opinion and share suggestions for future tutorials—I truly appreciate your feedback!