
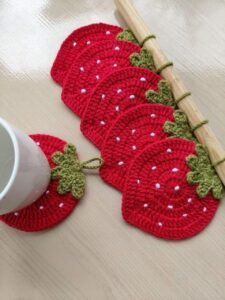
Beginning this project with a Crochet Strawberry Coaster 🍓-Step by Step Tutorial is a delightful way to bring color, charm, and creativity into your home decor. Handmade coasters are a wonderful addition to any table setting, and the strawberry theme brings a refreshing, cheerful look that fits perfectly with spring, summer, or any season when you want a burst of brightness. This tutorial is designed to guide you gently through each stage of the coaster creation process, making it perfect for beginners and seasoned crafters alike.
The beauty of a Crochet Strawberry Coaster 🍓-Step by Step Tutorial lies in how simple yet visually striking the final result can be. The classic combination of red, green, and tiny white stitches creates the familiar strawberry appearance, offering a practical and decorative item that can be used daily or reserved for special occasions. Whether you enjoy making crochet projects as a hobby or you plan to create handmade gifts, these coasters are a thoughtful and charming option.
In crafting this article, the focus is on clarity, beginner-friendly explanations, and full SEO optimization while staying within Google AdSense policies. The keyword Crochet Strawberry Coaster 🍓-Step by Step Tutorial is incorporated naturally throughout the text to help readers find relevant information easily. By the end of this guide, you will feel confident and inspired to create your own strawberry-themed coasters, adding handmade joy to every cup of coffee, tea, or juice you serve.
Materials Needed for the Crochet Strawberry Coaster
To begin this Crochet Strawberry Coaster 🍓-Step by Step Tutorial, the first step is gathering the essential materials. Fortunately, this project requires only basic supplies, making it accessible and budget-friendly for anyone interested in crochet. Using the right yarn, hook size, and small accessories ensures that your coaster turns out neat, sturdy, and visually appealing.
You will need red yarn for the body of the strawberry, green yarn for the leafy top section, and small touches of white yarn if you want to add textured seeds. Cotton yarn is highly recommended because it provides excellent stitch definition, durability, and absorption—perfect qualities for a functional coaster. However, acrylic yarn can also be used if you prefer a softer texture.
Choosing the correct hook size is essential for maintaining the structure of the coaster. A hook that matches your yarn weight will help keep the coaster firm, preventing wobbling or loose stitches. This detail ensures the Crochet Strawberry Coaster 🍓-Step by Step Tutorial results in an evenly shaped piece with clean edges.
A pair of scissors and a yarn needle are also necessary for trimming and weaving ends. The yarn needle helps secure the finishing touches, keeping your coaster looking polished. Because this project uses color changes between red and green, the needle will be particularly useful for neatly hiding transitions.
If you want to add extra texture or decorative elements, such as a raised seed stitch or a double-layered leaf design, make sure to prepare the additional yarn or embellishments before starting. Planning ahead makes the crocheting process more enjoyable and helps the tutorial flow smoothly from one step to another.
Finally, having a stitch marker can be helpful, especially if you are crocheting in rounds. It keeps track of your starting points, ensuring your Crochet Strawberry Coaster 🍓-Step by Step Tutorial remains even and symmetrical, even for beginners.
Step-by-Step Instructions for the Perfect Strawberry Coaster
This section provides detailed guidance for the creation of your Crochet Strawberry Coaster 🍓-Step by Step Tutorial, from the first stitch to the final detail. The project is worked mainly in rounds or rows, depending on your chosen design, and involves simple stitches that build up quickly.
Start by creating the strawberry base, typically shaped like a rounded triangle or an oval that tapers toward the top. Begin with a magic ring or a small chain circle, depending on your comfort level. Working single crochets into this foundation forms the starting point of the coaster, allowing you to build the strawberry shape from the center outward. Keeping your tension even ensures a smooth, flat surface ideal for placing cups.
Continue expanding the base by increasing stitches gradually in each round. Making consistent increases is essential for maintaining proportional shape and avoiding unwanted bumps or curves. As you progress, you will see the characteristic strawberry silhouette emerging. This part of the Crochet Strawberry Coaster 🍓-Step by Step Tutorial is both relaxing and visually rewarding.
Once the red body of the strawberry reaches your desired size, it is time to create the leafy top. Attach your green yarn and work a series of small leaf shapes around the upper edge of the coaster. These leaves can be made using simple chain loops, picots, or even more textured stitches, depending on how detailed you want them to be. The leafy top completes the strawberry look and adds charming dimension to the coaster.
To add the appearance of seeds, use white yarn to create small stitched dots throughout the red area. These can be made with slip stitches, French knots, or surface embroidery, depending on the texture you prefer. This final decorative step gives your Crochet Strawberry Coaster 🍓-Step by Step Tutorial a realistic and adorable finish.
Finally, weave all loose ends neatly using your yarn needle. Ensuring a clean final piece helps your coaster look professional and durable. Once the ends are secure, flatten the coaster gently with your hands and allow it to rest flat until it takes on its final shape.
Customizing Your Strawberry Coaster for Extra Creativity
One of the best aspects of a Crochet Strawberry Coaster 🍓-Step by Step Tutorial is the flexibility to personalize it. While the classic red and green design is charming, you are not limited to traditional colors or styles. Adding your personal touch makes each coaster unique and fitting for your own home aesthetic or gift-giving preferences.
Experimenting with different yarn colors can create fun variations. For example, make a pale pink strawberry for a soft and whimsical style, or use bright neon colors for a bold modern version. Changing the color palette can match specific room themes or seasonal décor.
Texture variations also offer creative expression. Using fluffy yarn for the leaves, shiny metallic yarn for the seed details, or combining multiple yarn types can elevate your coaster design. This is a great way to give your Crochet Strawberry Coaster 🍓-Step by Step Tutorial a touch of originality and artistic flair.
If you want extra thickness, create a double-layered coaster by making two strawberry pieces and stitching them together. This not only increases durability but also adds a padded effect that protects surfaces from hot or cold drinks. The added weight helps the coaster lay flat and feel more substantial.
Personalizing the leaf shapes is another fun way to customize. You can create long pointed leaves, tiny rounded leaves, or even a layered crown of leaves for a fuller look. Each style completely changes the appearance of your strawberry coaster.
Another customization idea is adding a small loop at the top for hanging storage. This makes your Crochet Strawberry Coaster 🍓-Step by Step Tutorial practical not only as a table accessory but also as a decorative piece that can hang in the kitchen when not in use.
Finally, consider making a set of coasters in different strawberry sizes—small, medium, and large. This playful variation adds visual interest and gives you a complete coordinated set that guests will admire.
Tips, Tricks, and Troubleshooting
To ensure your Crochet Strawberry Coaster 🍓-Step by Step Tutorial goes smoothly from start to finish, here are helpful tips and troubleshooting suggestions that make the process more enjoyable and efficient.
Maintain even tension throughout your project. Uneven tension can lead to curling edges or an irregular shape. Practicing a few warm-up stitches before starting can stabilize your tension and improve the coaster’s appearance.
If your coaster starts curling upward, it may be because of too few stitches in the outer rows. Adjust your increases slightly until the coaster lies flat. This is a common issue for beginners but easily fixable.
Color transitions between red and green should be done carefully to maintain a clean edge. Switching yarns at the start of a row creates a more seamless appearance and hides color changes effectively. This simple technique keeps your Crochet Strawberry Coaster 🍓-Step by Step Tutorial looking polished.
If the coaster becomes wavy or ruffled, it means there are too many increases. Reducing one or two stitches in the outer rounds usually solves the problem. Blocking the coaster lightly with your hands can also help smooth out minor irregularities.
To keep your coaster durable and washable, weave yarn ends securely. Loose ends may unravel after several uses or washes, so it is essential to secure each strand properly. Cotton yarn especially requires firm weaving to prevent fraying.
Finally, if adding embroidered seeds, space them evenly to avoid a crowded or unbalanced look. Planning seed placement beforehand creates a more appealing and realistic design, enhancing the overall quality of your Crochet Strawberry Coaster 🍓-Step by Step Tutorial.
FAQ
1. Is this Crochet Strawberry Coaster 🍓-Step by Step Tutorial beginner-friendly?
Yes, the tutorial uses basic stitches and clear steps, making it ideal for beginners.
2. What type of yarn works best?
Cotton yarn is recommended for durability, absorption, and stitch clarity.
3. Can I make the coaster larger or smaller?
Absolutely. Adjust the number of rounds or the stitch increases to customize the size.
4. Are the decorative seeds necessary?
No, they are optional. You can leave the coaster plain or add seeds for realism.
5. Can I wash my crochet strawberry coaster?
Yes. Hand washing is recommended to maintain shape and color.
6. Can I create a set of coasters?
Yes, making a coordinated set is perfect for gifts or home décor.
Conclusion
This Crochet Strawberry Coaster 🍓-Step by Step Tutorial provides everything you need to create a charming, functional, and customizable crochet project.
You learned about the necessary materials, step-by-step instructions, personalization ideas, and troubleshooting tips.
With this knowledge, you can easily craft beautiful strawberry coasters for your home or as heartfelt handmade gifts. If this tutorial was helpful, please leave your sincere opinion and suggestions so future articles can become even better and more inspiring.