
If you’re looking for a fun, creative, and practical project, this Crochet Tiger Magnetic Keychain – Step by Step Tutorial is perfect for you! Combining the charm of crochet with the functionality of a keychain, this adorable tiger design is both stylish and useful. Whether you’re an experienced crocheter or just getting started, this project is simple enough for beginners and still satisfying for advanced crafters. It’s also an excellent handmade gift idea for animal lovers or anyone who appreciates cute and functional accessories.
The beauty of a crochet tiger magnetic keychain is that it’s small, lightweight, and can easily be attached to keys, bags, or even displayed on your fridge thanks to the magnet. The combination of soft yarn and a strong magnet creates a unique piece that’s both decorative and functional. Plus, it’s a fantastic way to use leftover yarn from previous projects while creating something you’ll actually use every day.
In this Step by Step Tutorial, you’ll learn how to crochet the tiger’s face, attach the magnet, and assemble the keychain neatly. The process involves simple stitches such as single crochet, double crochet, and slip stitch, making it approachable for all skill levels. Get your yarn ready and follow along—you’ll love making your very own cute tiger keychain!
Materials You Will Need for the Crochet Tiger Magnetic Keychain
Before starting this Crochet Tiger Magnetic Keychain – Step by Step Tutorial, make sure you have all your materials ready. Having everything prepared will make your crafting process smooth and enjoyable.
You will need cotton or acrylic yarn in three main colors: orange for the tiger’s body, black for the stripes, and white for the face details. Cotton yarn is ideal for this type of project because it gives a clean, sturdy finish that holds its shape well. You’ll also need a small amount of pink yarn for the nose and optional light brown or cream yarn for shading details.
A 2.5 mm or 3 mm crochet hook works best for this project, giving you tight stitches that help maintain the keychain’s form. You’ll also need a yarn needle for sewing the parts together, a pair of scissors, and stitch markers if you want to keep track of your rounds.
The other important materials are a keychain ring and a small round magnet. Choose a strong magnet so that your keychain can hold firmly to metallic surfaces without falling off. Make sure the magnet is well-encased in yarn or fabric to ensure safety and longevity.
For stuffing, use a small amount of polyester fiberfill or leftover yarn scraps. This will give your tiger’s head a nice, firm shape. Optional items include small safety eyes or black embroidery thread if you prefer stitching the eyes instead of using plastic ones.
Once you’ve gathered everything, you’re ready to start crafting. Let’s move on to the fun part—bringing your crochet tiger magnetic keychain to life!
Step-by-Step Instructions for Making the Tiger Head
Now that your materials are prepared, let’s begin the actual crocheting in this Crochet Tiger Magnetic Keychain – Step by Step Tutorial. The first step is to create the tiger’s head, which forms the main body of the keychain.
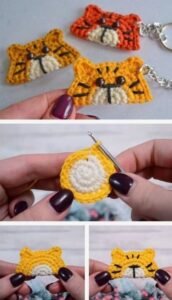
Start by making a magic ring with your orange yarn. Crochet six single crochets into the ring and pull it tight. This forms the base of your round shape. Continue working in rounds, increasing gradually until you have a small, rounded disc that will become the tiger’s head.
After reaching the desired diameter, keep crocheting without increases for several rounds to form the height of the head. This creates a slightly domed shape perfect for a keychain. Make sure your stitches are tight so the stuffing doesn’t show through.
Once the head shape is ready, switch to your black yarn to add the tiger stripes. You can crochet the stripes directly into the rounds using color changes or embroider them later using surface stitches. Both methods give a beautiful, realistic look to your little tiger.
Next, use your white yarn to crochet small patches for the cheeks or snout area. Sew them neatly to the front of the head. Embroider the nose using pink yarn and create the mouth with black thread. This adds character and personality to your tiger.
Finally, insert a small amount of stuffing inside the head to give it a firm but soft feel. Then close the opening using a slip stitch or invisible seam technique. You’ll now have an adorable tiger face ready to be turned into a magnetic keychain!
Assembling the Magnet and Keychain
At this point in the Crochet Tiger Magnetic Keychain – Step by Step Tutorial, it’s time to assemble the magnetic part and the keychain components. These steps are simple but important to ensure your keychain looks polished and durable.
Begin by carefully placing the magnet inside or behind the tiger’s head. If your magnet is small, you can sew a small felt pocket at the back of the tiger and insert the magnet inside. This helps secure it and prevents it from slipping out over time.
If you prefer, you can attach the magnet externally by crocheting a small round cover in orange yarn and sewing it to the back of the head. Make sure the magnet is strong enough to hold the keychain securely to metal surfaces like lockers, refrigerators, or doors.
Next, attach the keychain ring. You can do this by sewing a small loop at the top of the tiger’s head using sturdy yarn or embroidery thread. Make sure the loop is tightly secured so it doesn’t loosen with regular use. Then, attach the keychain ring or clasp to the loop.
You can also add a small decorative chain, ribbon, or even a tag with your initials to personalize your crochet tiger keychain. These little additions make it more unique and gift-worthy.
After attaching all the parts, double-check the security of your stitches. Reinforce the magnet and the loop if necessary. Your tiger keychain should now be both functional and adorable—ready to brighten up your keys or workspace!
Creative Variations and Finishing Touches
One of the best parts of this Crochet Tiger Magnetic Keychain – Step by Step Tutorial is the ability to customize it to your taste. Once you’ve completed the basic design, you can add fun variations and personal touches to make it truly your own.
Try experimenting with different yarn colors. While orange and black are the classic tiger combination, you can also use pastel shades like light pink, mint green, or baby blue for a whimsical twist. Kids especially love colorful animal keychains!
Another fun idea is to add tiny accessories to your tiger. A miniature bow tie, a flower on one ear, or even a small scarf can make your design even more charming. These details give your keychain a bit of personality and make it a perfect handmade gift.
If you enjoy embroidery, you can decorate the tiger’s face with small details like freckles, eyelashes, or patterns around the eyes. Embroidery adds texture and gives a more artistic touch to your finished piece.
For an eco-friendly version, consider using leftover yarn or recycled materials. This is a great way to reduce waste and still create something beautiful. Handmade crafts that use sustainable materials are also highly appreciated gifts.
Finally, make sure to block and shape your finished keychain gently if needed. This helps the tiger’s face look neat and well-defined. With these creative finishing touches, your crochet tiger magnetic keychain will be ready to impress!
Crochet Tiger Magnetic Keychain
1. Can beginners make this crochet tiger keychain easily?
Yes! This Crochet Tiger Magnetic Keychain – Step by Step Tutorial is beginner-friendly. It uses basic stitches like single crochet and is small enough to finish in one sitting.
2. What kind of magnet should I use?
Use a small, strong neodymium magnet. It’s lightweight but powerful, ensuring that your keychain stays securely attached to any metal surface.
3. Can I wash the keychain?
It’s best to avoid soaking the magnet. If it gets dirty, gently clean the yarn surface with a damp cloth and let it air dry.
4. Is it safe for children?
Yes, but only if you ensure the magnet and small parts are securely sewn and not removable. Always supervise small children when playing with items containing magnets.
5. What yarn is best for this project?
Cotton yarn is ideal because it’s strong, holds its shape, and doesn’t stretch too much. Acrylic yarn can also work if you prefer a softer texture.
6. Can I sell the finished keychains?
Absolutely! Handmade crochet tiger keychains make fantastic craft fair items or online shop products. They’re popular due to their cute design and functionality.
Conclusion
Creating a Crochet Tiger Magnetic Keychain is a fun and rewarding project that combines creativity with practicality. Throughout this Step by Step Tutorial, you’ve learned how to crochet the tiger’s head, add stripes, attach a magnet, and assemble a sturdy keychain that’s perfect for everyday use or as a handmade gift.
This project allows you to express your creativity while practicing your crochet skills. The end result is a unique accessory that brightens up your keys, bags, or home décor. It’s small, cute, and customizable—making it an ideal project for all ages.
Now that you know how to make your own crochet tiger magnetic keychain, why not try different color schemes or add small accessories to give each one a personal touch?If you enjoyed this tutorial, please leave your honest opinion and suggestions below. Your feedback helps improve future tutorials and inspires more creative crochet projects for everyone to enjoy!