
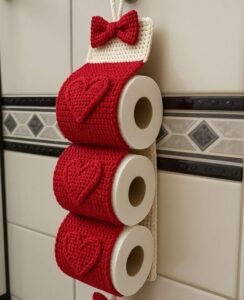
If you love combining functionality with handmade charm, then this Crochet Toilet Paper Holder with 3 Rolls – Step by Step Tutorial is perfect for you. Creating a crochet toilet paper holder is not only a practical addition to your bathroom but also a wonderful way to express your creativity through yarn. With this step-by-step tutorial, you’ll learn how to make a holder that stores three rolls neatly while adding a touch of handmade beauty to your home décor.
Crocheting your own bathroom accessories allows you to personalize your space and give it a cozy, unique touch. This Crochet Toilet Paper Holder with 3 Rolls – Step by Step Tutorial is a great project for beginners and experienced crocheters alike. It requires simple stitches, basic tools, and just a bit of time to create a useful piece that will make your bathroom look organized and stylish. You can choose colors that match your bathroom’s theme or opt for classic neutrals to keep things elegant and minimal.
This project also makes a thoughtful handmade gift. Imagine gifting someone a beautiful crochet toilet paper holder—it’s something practical yet decorative, and it’s made with love. Whether for your own home or as a personalized present, this Crochet Toilet Paper Holder with 3 Rolls – Step by Step Tutorial will show you how to craft a functional item that’s both charming and durable. Let’s get started and create a piece that will bring warmth and creativity into your bathroom.
Materials Needed for the Crochet Toilet Paper Holder
Before starting your Crochet Toilet Paper Holder with 3 Rolls – Step by Step Tutorial, it’s essential to gather all the necessary materials. Having everything ready will help you work efficiently and stay organized throughout the process. You’ll need medium-weight yarn for this project—cotton yarn is a great choice since it’s durable, washable, and keeps its shape well. Choose a color that matches your bathroom decor, whether it’s a calming neutral or a pop of bright color.
You’ll also need a crochet hook, typically size 4 mm or 5 mm, depending on your yarn thickness. Using the right hook size ensures that your stitches are tight enough to hold the shape of the holder while still allowing some flexibility. A yarn needle will be used for weaving in the ends, and scissors for cutting the yarn.
You’ll need a wooden or plastic ring for hanging the holder, as well as a small stick or dowel to provide support at the top. Fiberfill or thick yarn cords can be used to reinforce the structure if desired. Having a measuring tape nearby is helpful to ensure that each pocket can fit a standard toilet paper roll comfortably.
Make sure to work in a clean, well-lit space where you can easily spread out your materials. Organizing your yarn and tools in a basket or tray will make it easier to find what you need. Once everything is ready, you’re set to begin your Crochet Toilet Paper Holder with 3 Rolls – Step by Step Tutorial and enjoy the creative process.
Step by Step Instructions
Now, let’s start crafting the main structure of your Crochet Toilet Paper Holder with 3 Rolls – Step by Step Tutorial. Begin by making the base rectangle that will serve as the foundation for the three roll pockets. Chain about 25 to 30 stitches, depending on the width you want. Work single crochet stitches along the chain to form the first row. Continue crocheting rows until your piece reaches the desired length to hold all three rolls stacked vertically.
Next, create the pockets. For each pocket, chain the same width as the base and crochet about 12 to 15 rows, depending on how deep you want each roll compartment to be. These pockets will cradle the toilet paper rolls snugly without letting them slip out. Once you have made three identical rectangles, set them aside for assembly later.
After completing the pockets, crochet a small flap at the top of the base for hanging. Chain enough stitches to fit through your chosen ring, then fold and sew it securely to the top edge. This will allow the holder to hang neatly on a hook or nail.
Now, position the three pockets evenly along the base piece, making sure each one overlaps slightly with the one above it. Use stitch markers or pins to hold them in place. Then, sew the sides and bottom edges of each pocket to the base, leaving the top edges open to insert the toilet paper rolls.
Once all the pockets are securely attached, weave in all yarn ends neatly using your yarn needle. Make sure there are no loose threads. You can also crochet a decorative border around the edges to give your Crochet Toilet Paper Holder with 3 Rolls – Step by Step Tutorial a polished finish.
Lastly, test your holder by placing three rolls inside. Adjust the spacing if needed. You’ll be amazed at how practical and attractive your finished piece looks—it’s both functional and handmade, adding personality to any bathroom wall.
Customization and Design Ideas
One of the best things about this Crochet Toilet Paper Holder with 3 Rolls – Step by Step Tutorial is how customizable it is. You can play with different colors, textures, and embellishments to make it truly your own. For example, try crocheting each pocket in a different color for a vibrant, playful look, or use gradient yarn for a smooth, elegant color transition.
If you prefer a more classic style, opt for natural tones like beige, gray, or white. Adding a lace border or delicate shell stitch around the edges can elevate the overall design, giving it a vintage touch. You can also crochet small flowers or bows and sew them onto the pockets for a decorative accent.
Consider incorporating patterns like stripes or chevrons to make the piece more eye-catching. You can alternate between two colors in each row or use leftover yarns from previous projects to create a colorful patchwork effect. This is a great way to reduce waste while crafting something beautiful and practical.
For those who love rustic or farmhouse-style décor, using jute or twine instead of cotton yarn can give your toilet paper holder a natural, textured look. Pair it with wooden rings for hanging to maintain the rustic theme.
Another creative option is to crochet a matching bathroom set, including a tissue box cover, towel holder, or small basket using the same color scheme. This will create a cohesive, stylish look in your bathroom while showing off your crochet skills.
Finally, if you plan to give your crochet holder as a gift, you can personalize it by adding embroidered initials or decorative buttons. Handmade items like this are always appreciated because they combine beauty and utility with a personal touch.
Tips for a Perfect Crochet Finish
Even if you’re new to crochet, you can achieve professional results with this Crochet Toilet Paper Holder with 3 Rolls – Step by Step Tutorial by following a few helpful tips. First, maintain consistent tension throughout your work. Uneven tension can make your holder look lopsided or affect the fit of the toilet paper rolls.
When joining the pockets to the base, sew slowly and carefully to ensure they are aligned properly. This helps the finished piece look symmetrical and neat. Always check that each pocket can comfortably fit a roll before sewing the next one in place.
Blocking your finished holder can make a big difference in appearance. Gently dampen your crochet piece and lay it flat to dry in the desired shape. This helps smooth out any uneven stitches and gives your project a more polished look.
Be sure to weave in all ends securely. Loose threads can make the project look unfinished and may unravel over time. Using a yarn needle, thread the tails through several stitches in different directions for durability.
If your yarn choice makes the holder too stretchy, you can reinforce it with a lightweight fabric backing. Simply cut a piece of fabric the same size as the base and sew or glue it to the back. This will help your Crochet Toilet Paper Holder with 3 Rolls – Step by Step Tutorial maintain its shape and last longer.
Lastly, take pride in your work! Every handmade item has its own character, and small imperfections only add to its charm. With patience and creativity, you’ll have a beautiful and functional piece you can proudly display or gift to others.
FAQ about Crochet Toilet Paper Holder
Q1: Can beginners make this crochet toilet paper holder?
Yes! This Crochet Toilet Paper Holder with 3 Rolls – Step by Step Tutorial is beginner-friendly. It uses simple stitches like single crochet and basic sewing techniques.
Q2: What type of yarn is best for this project?
Cotton yarn is highly recommended because it’s sturdy, washable, and maintains its shape over time.
Q3: Can I make a holder for fewer or more rolls?
Absolutely. You can adjust the length of the base and number of pockets to fit as many rolls as you like.
Q4: How do I clean the crochet holder?
Hand wash gently with mild detergent, then air dry flat. Avoid using bleach or machine drying to prevent stretching.
Q5: How do I make sure the holder doesn’t stretch out too much?
Use tighter stitches and consider adding a fabric backing for support. Cotton yarn also helps reduce excessive stretching.
Q6: Can I add decorations to the holder?
Yes! Add flowers, bows, or appliques to personalize your design. You can even match it with other bathroom crochet accessories.
Conclusion
This Crochet Toilet Paper Holder with 3 Rolls – Step by Step Tutorial has guided you through every stage of creating a practical and stylish bathroom accessory. From choosing your yarn and materials to crafting the base, assembling the pockets, and adding personal touches, you now have all the skills to make your own beautiful holder.
Crocheting such useful home items not only enhances your space but also gives you a sense of accomplishment and joy. Every stitch you make adds warmth and character to your home, transforming something ordinary into something special.
We hope this tutorial inspired you to pick up your crochet hook and start crafting today. If you enjoyed this guide, please leave your honest opinion and share your suggestions below. Your feedback helps us create more helpful and creative crochet tutorials for all skill levels!