
Crochet Your Own Adorable Baby Flower Sandals – Step by Step Tutorial is the perfect project for those who love making handmade gifts and adorable baby accessories. Whether you are an experienced crocheter or just starting out, these tiny sandals are a delightful way to practice your skills while creating something truly charming for a little one. Handmade baby sandals have a special touch that store-bought items can’t match, making them a perfect choice for baby showers, birthdays, or simply to show your love.
When making baby sandals, attention to detail is everything. From selecting the right yarn to choosing the perfect hook size, every step in this step-by-step tutorial ensures that the final product is both beautiful and comfortable for the baby. These sandals are not just a fashion accessory — they are a way to add a soft and cozy layer to those tiny feet while making them look extra cute. By following this guide, you’ll learn how to make the perfect size, how to secure the straps, and how to create a sweet crochet flower to finish the look.
In addition to being a charming gift, crocheting baby flower sandals is also a relaxing and rewarding hobby. Crocheting offers a moment of peace and mindfulness, and working on a small project like this can be completed in just a few hours. The best part is that you can customize the colors, styles, and embellishments to match any outfit or special occasion. Let’s get started with this Crochet Your Own Adorable Baby Flower Sandals – Step by Step Tutorial and turn a ball of yarn into something truly memorable.
Choosing the Right Materials for Baby Flower Sandals
When making baby flower sandals, your choice of materials is essential. Babies have delicate skin, so you need a yarn that is soft, breathable, and hypoallergenic. Cotton yarn is often the preferred choice because it is gentle, durable, and machine-washable. You can also choose organic cotton for an eco-friendly and even softer option.
The crochet hook size you use will affect the tightness and texture of the sandals. A smaller hook will create a firmer structure, while a slightly larger hook will make the fabric softer and more flexible. For baby sandals, most crafters use a 3.0 mm to 3.5 mm hook, but this can vary depending on your yarn’s thickness.
Another important element is the color palette. Soft pastels like pink, baby blue, mint, and lavender are classic choices, but bright summer colors like yellow and coral can also be delightful. You can even mix two shades for a more playful look — for example, a white sole with colorful straps.
Buttons, ribbons, and small embellishments add personality to your sandals. However, remember that baby safety comes first: make sure any decorative pieces are securely attached to prevent choking hazards. Embroidered flowers are a safe and charming alternative to small plastic buttons.
If you are planning to sell or gift the sandals, it’s a good idea to pre-wash the yarn before starting. This ensures that the final product will not shrink or lose shape after the first wash. It also removes any residue from the manufacturing process, keeping the sandals extra safe for babies.
Finally, keep your work environment clean and free from dust or pet hair. These sandals are going on tiny feet, so hygiene is just as important as craftsmanship.
Step-by-Step Instructions to Crochet Baby Flower Sandals
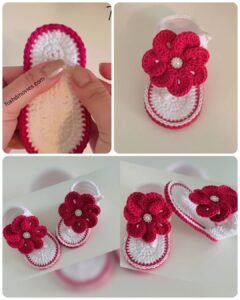
To begin this Crochet Your Own Adorable Baby Flower Sandals – Step by Step Tutorial, start with the sole. You will crochet an oval base using simple stitches like single crochet (sc) and half double crochet (hdc). This gives a sturdy yet soft foundation for the sandal. Work in the round, increasing evenly to shape the sole and ensure it lies flat.
Once the sole is finished, you can move on to the straps. A common design uses two straps that cross over the foot and button on the side. This keeps the sandals secure without being too tight. You can crochet these straps directly onto the sole or make them separately and sew them on later.
For the flower, use a contrasting yarn color to make it stand out. Start with a magic ring, crochet several chain loops, and fill them with petals using double crochet (dc) stitches. You can make a single-layer flower for a simple look or add more layers for extra flair.
Attach the flower to the front strap or side of the sandal. Make sure to sew it securely, especially if the sandals will be worn by a very young baby. This not only ensures safety but also makes the sandals durable through multiple washes.
When finishing off, weave in all yarn ends carefully. Use a tapestry needle to tuck the ends neatly into the stitches so they don’t come loose. This gives your sandals a polished and professional look.
Lastly, give the sandals a gentle wash and let them air-dry before use or gifting. This helps soften the yarn further and makes them fresh and ready for a baby’s first wear.
Tips for Customizing Your Baby Flower Sandals
One of the best things about making your own crochet baby flower sandals is that you can customize them to suit any style. Changing the yarn color alone can completely transform the look of your sandals. For example, neutral tones like beige or cream can create a timeless, vintage-inspired piece, while bold colors make them fun and summery.
You can also experiment with different types of flowers. Instead of the classic daisy, try crocheting roses, tulips, or even sunflowers. These variations give the sandals a unique personality and make them even more special.
Adding beads or embroidery to the flower center can create an elegant touch. Just remember to ensure all embellishments are baby-safe and firmly attached. Safety is always the top priority for handmade baby accessories.
If you want a more secure fit, consider making an ankle strap instead of a side button closure. An adjustable strap with a small buckle or Velcro can provide extra comfort and keep the sandal from slipping off.
For seasonal variations, use lightweight cotton yarn for summer sandals and soft, warm yarn blends for cooler months. You can even make a winter version with a closed-toe design while keeping the flower decoration.
Customizing also allows you to match the sandals to specific outfits or occasions, such as weddings, birthdays, or family photoshoots. This makes them not only practical but also a stylish accessory.
Common Mistakes and How to Avoid Them
One common mistake when making baby flower sandals is choosing the wrong yarn type. Using stiff or scratchy yarn can make the sandals uncomfortable for the baby. Always opt for soft, high-quality yarn that is safe for sensitive skin.
Another issue is making the sandals too loose or too tight. Babies grow quickly, so it’s important to follow size guidelines but also allow a little room for growth. A good tip is to compare your work with the actual measurements of the baby’s foot.
Skipping proper finishing steps can lead to problems later. Loose ends can unravel, and unsecured decorations can fall off. Taking the time to weave in ends neatly and double-stitch embellishments is worth the effort.
Some crocheters rush through the flower-making process, resulting in uneven petals. Slow down and count your stitches carefully to create a balanced, beautiful flower.
Overcomplicating the design can also be a problem. While it’s tempting to add lots of details, too many elements can make the sandals uncomfortable or unsafe. Simplicity often works best for baby wear.
Finally, forgetting to block or shape the sandals after finishing can affect their look. Lightly shaping the soles and straps ensures they keep their intended form and fit perfectly.
FAQ – Crochet Baby Flower Sandals
1. What is the best yarn for baby sandals?
Soft cotton yarn is the most recommended because it is breathable, gentle on the skin, and easy to wash.
2. Can beginners make baby flower sandals?
Yes! This step-by-step tutorial is beginner-friendly, and the project is small enough to complete in a few hours.
3. How do I know what size to make?
Measure the baby’s foot and follow a size chart for crochet baby shoes. You can adjust the pattern slightly by changing hook size or adding stitches.
4. Are these sandals safe for newborns?
They can be, but always ensure no small parts (like buttons) are loose, and that the fit is comfortable without restricting movement.
5. How do I wash crochet baby sandals?
Hand wash or machine wash on a gentle cycle in cold water. Air-dry to prevent shrinking.
6. Can I sell the sandals I make from this tutorial?
Yes, as long as you make them yourself. Handmade baby sandals are popular at craft fairs and online marketplaces.
Conclusion
Making Crochet Your Own Adorable Baby Flower Sandals – Step by Step Tutorial is a rewarding project that combines creativity, practicality, and love.
With the right materials, a bit of patience, and this clear guide, you can create sandals that are not only beautiful but also comfortable and safe for tiny feet.
Now it’s your turn to pick up your yarn and hook, follow the steps, and make your own pair. If you try this tutorial, please leave your honest opinion and suggestions — your feedback helps improve future patterns and inspires other crafters to start their own crochet journey.