
Starting this project titled Crocheted bag, a favorite this summer.–Step by Step Tutorial is an exciting opportunity to create a stylish and functional accessory that perfectly matches the lively, sunny energy of the season. The crocheted bag trend has gained immense popularity due to its handmade charm, versatility, and unique texture. With just a hook, yarn, and patience, you can craft a beautiful piece that complements casual outfits, beach looks, and everyday summer adventures. This article will guide you through each stage of the process, offering clear explanations and useful tips to make your experience enjoyable and successful.
A crocheted bag is more than just a fashion item; it is a reflection of creativity and craftsmanship. By following this step by step tutorial, you will learn essential techniques to build a sturdy structure, form decorative patterns, and finish your piece professionally. Whether you are a beginner eager to learn or an experienced crocheter looking for a new summer project, this guide provides everything you need. The goal is to ensure that your bag is not only beautiful but also durable and practical for summer activities such as travel, shopping, or beach outings.
Throughout this complete tutorial, you will explore the materials required, the recommended yarn types, basic stitches used in many crochet projects, and helpful strategies for shaping and assembling your bag. By following the instructions carefully, you will confidently create your own Crocheted bag, a favorite this summer.–Step by Step Tutorial, giving you a handmade accessory full of personality. Crafting your own bag also adds meaning to the final product, making it even more special to wear during the warm months.
Choosing the Materials and Preparing for Your Crocheted Bag
To begin, selecting the right materials is essential to ensuring your project’s success. The type of yarn you choose directly influences the look, texture, and durability of your crocheted bag. Many crafters prefer cotton yarn for summer accessories because it is lightweight, strong, and offers excellent stitch definition. Cotton also helps the bag keep its shape and provides a comfortable feel when carrying it outdoors during hot weather.
Before starting your project, make sure you have the correct hook size. The yarn label typically recommends an ideal hook size to achieve the best tension. Using a smaller hook makes the stitches tighter, which is perfect for bags because it prevents stretching and keeps your items secure. Meanwhile, a slightly larger hook creates a softer texture if you prefer a more relaxed design. Always test your yarn and hook combination with a small swatch to ensure the texture matches your expectations.
Having your tools organized before you begin makes the entire process smoother. Keep your scissors, stitch markers, measuring tape, and tapestry needle nearby. Stitch markers are especially helpful when working in rounds or shaping the body of the bag, as they allow you to track your progress and maintain consistent stitching.
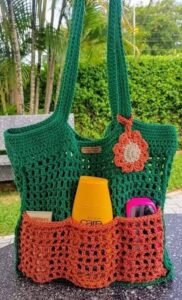
Once your materials are prepared, consider the shape and size you want for your crocheted bag. Some styles are wide and roomy, ideal for beach trips or grocery shopping, while others are small and cute, perfect for short outings. Planning your design early ensures that your bag meets your expectations and needs, giving you full control of the final result.
Before moving forward, review the basic stitches involved in this step by step tutorial. Most crocheted bags use stitches like single crochet, half double crochet, or double crochet. These stitches create a sturdy texture while allowing for decorative patterns. Practicing these stitches beforehand will ensure that your work remains even and consistent throughout the project.
Once you are comfortable with your materials and prepared with the necessary tools, you are ready to begin shaping the base of your bag. This stage marks the first exciting step toward bringing your Crocheted bag, a favorite this summer.–Step by Step Tutorial to life.
Creating the Base and Forming the Body of the Bag
The base of your crocheted bag is one of the most important parts because it provides structure and stability. Most bags begin with a chain that determines the width of the bag. After making your initial chain, crochet evenly along both sides to create an oval shape. This method helps your bag achieve a solid, flat bottom that can support the weight of the items you carry.
As you continue to build the base, make sure your increase stitches are evenly spaced. Inconsistent increases can distort the shape, causing the bottom to curve or ripple. By maintaining a regular pattern, you ensure your bag has a smooth and balanced foundation. This also improves the overall look of your finished piece and makes the next steps easier to follow.
After completing the base, the next phase is crocheting upwards to form the body. This is typically done by working in continuous rounds without increases. As you crochet round after round, the sides naturally rise, creating the main compartment of your bag. This step is repetitive, making it an excellent opportunity to listen to music or relax as you enjoy the meditative rhythm of crochet.
Pay attention to your tension while forming the bag’s body. Consistent tension ensures that your stitches look uniform and that the bag holds its shape. If your stitches become too loose, the bag may stretch more than desired. If they’re too tight, the material can become stiff and uncomfortable. Finding a balance is key for a beautiful and functional finish.
If you want to add decorative patterns, such as mesh stitches or textured designs, this is the perfect moment. Adding unique stitch combinations gives your crocheted bag personality and reflects your personal style. This fun creative touch makes your Crocheted bag, a favorite this summer.–Step by Step Tutorial even more meaningful.
As you near the top of the body, begin planning how you want the opening and handles to look. The top portion is important because it influences both style and comfort. A neat upper edge also gives the bag a professional appearance, preparing it for the final assembly steps.
Adding Handles, Finishing Edges, and Strengthening the Bag
Handles are essential to finishing your crocheted bag, giving it functionality and completing its design. You may choose short handles for a hand-carry bag, longer straps for a shoulder bag, or a single long strap for a crossbody style. To add handles, you typically create chains between stitch groups or crochet sturdy straps separately and sew them onto the bag.
When working on the handles, it is important to make them strong enough to support the weight of your items. Double-stranded yarn or reinforced stitches can help prevent stretching. A secure handle not only improves usability but also increases the longevity of your bag, making it dependable for summer outings.
Before attaching the handles, take time to finish the upper edge of the bag neatly. You can add a row of tight single crochet stitches for a clean and polished border. This prevents the top from becoming too loose and gives the design a professional appearance. Decorative edging can also be added if you want a more stylish finish.
Strengthening the interior of the bag is another option for improving durability. Some crocheters choose to add a fabric lining inside the bag. This helps keep small items contained and enhances the structure. Although optional, a lining can elevate your bag’s functionality, especially if you plan to use it daily.
Before completing the handles, check their placement to ensure they are even on both sides. Uneven handles can throw off the symmetry, affecting both appearance and comfort. Taking a few minutes to measure and adjust helps achieve a balanced, visually pleasing look.
Once the handles are fully attached and the edges are finished, your bag is nearly complete. This step often brings a sense of satisfaction, as the structure comes together beautifully. The final phase continues to build on the excitement of completing your Crocheted bag, a favorite this summer.–Step by Step Tutorial.
Final Touches, Customization, and Preparing Your Bag for Use
Adding final touches is a wonderful opportunity to personalize your crocheted bag and make it uniquely yours. Decorations like tassels, wooden beads, appliqués, or crocheted flowers can enhance the overall style. These details reflect your creativity and help your bag stand out as a handmade accessory crafted with care.
If you want extra functionality, consider adding interior or exterior pockets. Small crocheted pockets are perfect for holding keys, coins, or lip balm. They help keep the inside of your bag organized and prevent items from getting lost. Adding them is simple and requires only a small amount of yarn and basic stitches.
You may also choose to add a button, drawstring, or zipper closure to secure the top of your bag. This is especially useful if you plan to carry your bag to the beach or while traveling. A closure provides peace of mind, ensuring that your belongings stay safe no matter where you go.
Before using your bag, gently block it if necessary. Blocking helps shape the bag perfectly and evens out any irregularities in the stitches. Simply dampen it slightly, shape it with your hands, and allow it to dry naturally. This extra step gives your crocheted bag a polished and even appearance.
Once everything is complete, step back and admire your work. Creating a crocheted bag is a rewarding experience, especially when you see your effort transformed into a functional, beautiful accessory. Carrying something handmade brings a sense of pride and joy that ready-made items simply cannot match.
With your bag finished, you now have a stylish accessory that embodies the essence of summer. Your handmade piece reflects the detailed process described in this Crocheted bag, a favorite this summer.–Step by Step Tutorial, and it will surely become a favorite item in your wardrobe.
Frequently Asked Questions
1. What is the best yarn for crocheted summer bags?
Cotton yarn is highly recommended because it is durable, lightweight, and perfect for warm weather.
2. How long does it take to make a crocheted bag?
Depending on the complexity and your experience, it can take a few hours to a couple of days.
3. Can beginners make a crocheted bag?
Yes. This project is beginner-friendly, especially when following a step-by-step tutorial like this one.
4. How can I make the bag stronger?
Use tight stitches, choose sturdy yarn, reinforce the handles, or add a fabric lining.
5. What hook size should I use?
Check the yarn label, but most summer bags work well with medium-sized hooks for firm texture.
6. Can I customize the design?
Absolutely. You can change colors, add patterns, decorate with accessories, or adjust the size.
Conclusion
This complete guide has taught you how to create a beautiful and functional Crocheted bag, a favorite this summer.–Step by Step Tutorial using accessible materials, simple techniques, and creative finishing touches.
You learned how to prepare your materials, form the base and body, attach handles, and customize your bag with decorative elements.
I hope this tutorial has inspired you to start your own summer project. Please leave your honest opinion and share suggestions—I would love to know what you think and how your crocheted bag turned out!