
Crocheted bag with heart-Step by Step Tutorial is a wonderful project for anyone who loves handmade accessories and wants to create something meaningful, stylish, and practical. This tutorial will guide you through the process of making a charming bag featuring a heart motif that adds personality and warmth to your piece. Whether you want to gift it to someone special or keep it for yourself, this Crocheted bag with heart-Step by Step Tutorial is perfect for beginners and experienced crafters alike. As we go through the steps, we will focus on beginner-friendly instructions, thoughtful design, and a relaxing creative experience.
Crochet bags are popular because they are versatile, durable, and customizable. You can choose your favorite yarn colors, adjust the size, and even add embellishments if you wish. One of the greatest joys of following a Crocheted bag with heart-Step by Step Tutorial is the ability to express your own style through handmade work. The heart design in the center makes the bag feel extra special, representing love, care, and creativity. It is a small detail that makes a big difference in the finished look.
Before starting your project, it is important to prepare the right materials and understand the steps you will follow. This tutorial is written clearly, with each step broken down so that even those with basic crochet knowledge can succeed. You will learn how to make the bag base, incorporate the heart pattern, create the sides, add handles, and finish your bag neatly and professionally. Take your time, follow each part of the Crocheted bag with heart-Step by Step Tutorial, and enjoy the process as much as the final result.
Materials and Preparation
To begin this Crocheted bag with heart-Step by Step Tutorial, you will need yarn in at least two colors: one for the main bag and another for the heart motif. Cotton yarn is recommended because it provides a sturdy and neat finish, but acrylic yarn can also work if you prefer a softer touch. Choose medium-weight yarn to ensure that your bag holds its shape well without being too heavy.
Next, select the correct crochet hook size. You should use the hook size that matches your yarn weight, typically listed on the yarn label. However, you can adjust the hook size slightly if you crochet tighter or looser than usual. A smaller hook will make the stitches tighter and the bag firmer, while a slightly larger hook will make the fabric softer and more flexible.
You will also need a pair of scissors and a yarn needle for sewing pieces together and weaving in loose ends. Stitch markers can be helpful to keep track of your rounds or mark where the heart design begins. Keeping your materials organized before starting will help your work progress smoothly.
Before beginning the main project, crochet a small swatch to check your gauge. Matching the gauge ensures that your bag will be the correct size. If your stitches are too tight, try using a larger hook. If your stitches are too loose, switch to a smaller hook. This small step makes a big difference in the final fit and structure of your bag.
Take a moment to review the stitches you will be using. Most crochet bags use chain stitches, single crochet, half double crochet, and sometimes slip stitch. These basic stitches are easy to learn and provide a clean finish. If you are new to any stitch, practice it a few times before starting the main project.
Once your materials are ready and you feel confident with your stitches, you are ready to begin the Crocheted bag with heart-Step by Step Tutorial.
Starting the Bag Base
To start the Crocheted bag with heart-Step by Step Tutorial, create a foundation chain that determines the width of your bag. The length of this chain depends on how big you want your bag to be. Make sure your chain is even and not twisted before you begin working the first row.
Work the first few rows in single crochet stitches to create a strong and durable base. The bottom of the bag needs to be sturdy so it can hold items without stretching too much. Continue working in rows until the base reaches the height you want.
Once the base is completed, you will begin working in rounds around the base to form the sides of the bag. Working in continuous rounds creates a smooth, seamless shape. Use a stitch marker to keep your place, especially if your pattern requires shaping.
When the sides of the bag begin to take form, keep your tension consistent. This ensures that the fabric looks clean and professional. If you notice uneven stitches, you can gently adjust your technique without removing your progress.
This stage of the Crocheted bag with heart-Step by Step Tutorial is quite relaxing because you can easily fall into a rhythm. Enjoy the repetitive nature of crochet, which many find calming and meditative. As you work, you will see your bag gradually taking shape.
Once the sides reach the point where the heart design will begin, prepare your contrasting yarn. You are now ready to add the decorative heart pattern.
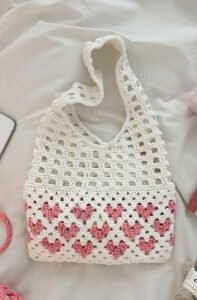
Adding the Heart Motif
The heart motif is the highlight of the Crocheted bag with heart-Step by Step Tutorial, and it adds character and charm to the design. There are several ways to create the heart pattern, but the most common is through colorwork, where you change yarn colors to form the shape.
To begin, find the center of the bag front where the heart will be placed. If you are using a chart pattern, count your stitches carefully so that the heart appears centered. Mark the starting point with a stitch marker so you don’t lose your place.
When working color changes, hold both yarn colors at the back of your work to prevent loose strands. Switch colors cleanly by completing the last stitch of the old color with the new color. This keeps your heart edges smooth and neat.
Work slowly during this step and watch your pattern closely. The heart will begin to appear row by row, and you will see your bag transform visually. If a stitch looks off, gently undo it and try again for best results.
Once the heart is complete, continue with the main yarn color until the bag reaches its desired height. The heart will look beautiful and stand out clearly against the main color. This detail makes the bag special and personal.
Completing the heart motif is a rewarding part of the Crocheted bag with heart-Step by Step Tutorial, because it showcases your creativity and attention to detail.
Adding Handles and Finishing the Bag
The final step in the Crocheted bag with heart-Step by Step Tutorial is to add the handles and finish the bag. Handles can be made with simple crochet chains, thicker straps, or even braided yarn for texture. Choose the style that best fits your design and comfort.
To attach the handles, count the stitches on both sides of the bag to make sure they are even. Uneven handles will make the bag hang awkwardly. Once positioned correctly, secure them with strong stitching to ensure durability.
Next, weave in all loose yarn ends with a yarn needle. This step gives your bag a neat and polished look. Trim any excess yarn once the ends are safely woven inside the fabric.
If you want to add a lining inside the bag, you can sew a fabric layer cut to the exact size of the bag interior. This prevents stretching and helps the bag hold its shape when carrying items. However, this step is optional.
Take a moment to examine your finished work. You have completed a handmade accessory that reflects your personality and creativity. Every stitch you made contributes to the story of your crafting journey.
This completes the Crocheted bag with heart-Step by Step Tutorial, and now your beautiful handmade bag is ready to use or gift to someone special.
FAQ
1. Is this project suitable for beginners?
Yes, this tutorial is beginner-friendly, especially if you are familiar with basic crochet stitches.
2. What is the best yarn for this bag?
Cotton yarn is recommended for its strength and stitch definition.
3. Can I change the size of the bag?
Yes, you can adjust the foundation chain length to make the bag larger or smaller.
4. Do I need to add a lining?
A lining is optional but useful for added durability and structure.
5. How can I wash the crocheted bag?
Hand wash gently in cool water and let it air dry flat to maintain its shape.
Conclusion
Throughout this Crocheted bag with heart-Step by Step Tutorial, you learned how to prepare materials, create the bag base, add the heart motif, shape the sides, and attach the handles.
This project encourages creativity, patience, and careful crafting while providing a beautiful and meaningful final result.
I hope this guide has inspired you to continue exploring your crochet journey. Please leave your honest opinion and suggestions, as your feedback helps improve future tutorials and encourages creative sharing.
