
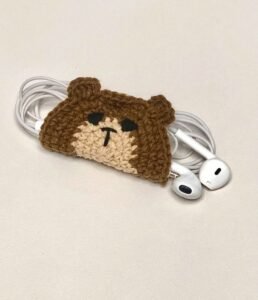
A crocheted bear headphone holder – step by step tutorial is the perfect project for anyone who loves crochet, organization, and cute accessories all in one. This charming piece not only helps you keep your headphones neatly stored but also adds a touch of personality to your everyday items. Many crafters struggle with tangled cords and misplaced earphones, so having a practical yet adorable solution is a great idea. By learning how to make this item yourself, you get both functionality and creativity combined in a fun project.
What makes the crocheted bear headphone holder so special is its blend of simplicity and style. You don’t need advanced crochet skills to complete it, which makes this project accessible to beginners and enjoyable for experienced makers alike. The bear shape brings out a playful vibe that appeals to kids, teens, and even adults who enjoy handmade, cozy crafts. Plus, the step by step tutorial allows you to go through the process slowly and clearly, ensuring you won’t feel overwhelmed.
Beyond just being a craft, creating a crocheted bear headphone holder teaches patience, technique, and attention to detail. Once completed, you’ll have a personalized accessory that’s practical for everyday use, especially for keeping your headphones tangle-free in your bag or pocket. Handmade gifts are also deeply appreciated, so this project can become a thoughtful present for family or friends who love both bears and music. Let’s explore how to make your own crocheted bear headphone holder – step by step tutorial in detail.
Materials Needed for a Crocheted Bear Headphone Holder
Before starting the crocheted bear headphone holder – step by step tutorial, it’s essential to gather all necessary materials. Having everything prepared will make your process smoother and more enjoyable.
First, you will need cotton yarn or acrylic yarn in colors of your choice. Typically, brown, beige, or cream are great choices for the bear body, but you can always add fun colors to make it more unique. Yarn thickness should be medium weight for durability and structure.
Second, prepare a crochet hook that matches your yarn size. Most yarn labels recommend hook sizes, so you can follow those guidelines. For this project, a 3.5 mm to 4 mm hook is usually ideal.
Third, you’ll need stuffing material such as polyester fiberfill. This gives shape to the bear and makes it soft to hold. Only a small amount is necessary since the headphone holder is compact.
Next, make sure you have safety eyes and a small button for finishing touches. Safety eyes add a professional look to the bear, but if you prefer, you can embroider the eyes and nose with black yarn for a handmade finish.
You’ll also need scissors and a yarn needle to cut, sew, and weave in ends. These tools are essential for a clean final result.
Lastly, don’t forget your headphones or earphones to test the holder’s functionality once it’s complete. This ensures that your crocheted piece is not only decorative but also practical.
Step by Step Instructions for Crocheted Bear Headphone Holder
This crocheted bear headphone holder – step by step tutorial will guide you through creating the base, adding details, and finishing your piece.
Begin with the magic ring technique to create the bear’s head. This is the central part of the holder and where the headphones will be wrapped around. Crochet in continuous rounds to make a circular base that gradually increases in size.
Once the circle reaches the desired size, continue crocheting without increasing to build depth. This forms the pocket-like structure that allows the headphones to stay inside securely. Adjust the size depending on how large or small your earphones are.
The next step is to crochet the bear’s ears separately. Make two small semicircles and sew them on top of the head. This adds character and gives your project its recognizable bear shape.
Now, crochet two small arms and attach them to the sides. These can help hold the headphones in place, acting like little hooks. You can either stuff them lightly or leave them flat for a sleeker look.
After assembling the main parts, add the facial details. Attach the safety eyes, embroider a nose, and stitch a little smile. These features bring the bear to life and make it irresistibly cute.
Finally, finish the piece by securing loose ends with your yarn needle and making sure everything is tightly stitched. Wrap your headphones around the bear’s body and tuck them into the pocket to test its practicality.
Tips for Perfecting Your Crocheted Bear Headphone Holder
Working on the crocheted bear headphone holder – step by step tutorial is enjoyable, but a few tips can make it even easier.
First, maintain a consistent tension while crocheting. Loose stitches may make the holder floppy, while overly tight stitches could make it too stiff. Balanced tension ensures durability and shape.
Second, always use a stitch marker to keep track of rounds, especially since this project involves continuous crochet in the round. This helps avoid mistakes and uneven shapes.
Third, choose yarn colors wisely. Neutral colors make the bear classic, while bright shades can make it look playful and more suited for children. Adding two-tone designs, like a light face with darker ears, also enhances its appearance.
Fourth, when attaching parts like ears and arms, sew them securely. These parts are small and can come loose if not stitched tightly. Using a yarn needle with strong thread helps.
Fifth, don’t skip stuffing control. Adding too much fiberfill can stretch stitches, while too little may make the bear look flat. Use just enough to keep it soft yet structured.
Lastly, personalize your project. You can add a small bow, a tiny scarf, or even a keychain ring to turn your headphone holder into a multi-purpose accessory.
Why Make a Crocheted Bear Headphone Holder?
There are many reasons why a crocheted bear headphone holder – step by step tutorial is worth trying.
First, it’s a beginner-friendly project that helps improve crochet skills like working in the round, shaping, and sewing small parts. It builds confidence for larger projects.
Second, it’s a functional accessory that prevents tangled headphones. This saves time and frustration when you’re on the go.
Third, it makes an affordable gift. Handmade items carry sentimental value, and people love receiving something created with care and creativity.
Fourth, it’s an eco-friendly craft since you’re making a reusable item instead of buying mass-produced accessories. This reduces waste and supports sustainable crafting.
Fifth, it’s a project that brings joy and relaxation. Crocheting is known for its calming effects, and working on something small and cute is particularly rewarding.
Finally, it’s a chance to express creativity. Whether you stick to a classic bear look or experiment with colors and styles, the result is always personal and unique.
FAQ About Crocheted Bear Headphone Holder
1. How long does it take to make a crocheted bear headphone holder?
On average, it takes about 2 to 3 hours, depending on your crochet speed and experience. Beginners may take longer.
2. Can I use leftover yarn for this project?
Yes, this is a great stash-busting project. Small amounts of yarn are enough to complete the bear.
3. Do I need to use stuffing?
Stuffing adds shape and makes the bear more structured, but you can skip it if you prefer a flat design.
4. What type of headphones fit best?
This holder is ideal for small wired earphones. Larger over-ear headphones won’t fit in this design.
5. Can I wash the crocheted bear headphone holder?
Yes, but it’s best to hand wash with mild soap and air dry to maintain its shape and details.
6. Is this project suitable for children to make?
Older children who know basic crochet can attempt it, but small parts like safety eyes should be used with caution.
7. Can I turn this into a keychain?
Absolutely. By attaching a key ring or clip, you can make it portable and multifunctional.
8. What’s the best yarn for durability?
Cotton yarn is strong and durable, making it a perfect choice for an item that will be used often.
9. Can I sell crocheted bear headphone holders I make?
Yes, handmade items like these are popular at craft fairs and online shops. Just make sure your stitching is neat and sturdy.
10. Do I need to follow the tutorial exactly?
Not at all. The step by step tutorial gives guidance, but you’re free to adapt, modify, or personalize the design.
Conclusion
The crocheted bear headphone holder – step by step tutorial is a fun and rewarding project that combines functionality with cuteness.
By following the instructions, gathering the right materials, and adding your personal touches, you can create an accessory that is both practical and charming.
This craft not only helps you stay organized but also brings joy every time you use it. If you try making this project, share your honest opinion and suggestions. Your feedback can inspire even more creative variations for this delightful crochet accessory.