
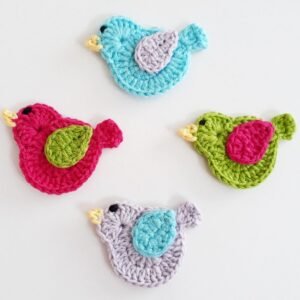
If you love small crochet projects that add charm and personality to your creations, this Crocheted Bird Applique – Step by Step Tutorial is perfect for you. Crochet appliques are wonderful because they can be used in many different ways—on clothing, blankets, bags, or even framed as wall art. The bird motif is especially sweet, as it brings a touch of nature, peace, and creativity to any handmade project.
Making a crocheted bird applique is not only fun but also a great way to use leftover yarn from other projects. It’s a beginner-friendly crochet design that allows you to practice color changes, shaping, and small details without spending hours on a large piece. Whether you’re looking to embellish a baby blanket, decorate a tote bag, or personalize your home decor, this bird applique can do it all.
In this Step by Step Tutorial, you’ll learn how to choose the right materials, make the bird shape, add the details that bring it to life, and find creative ways to use it. The project requires minimal materials and only a few basic stitches, but the result is impressive. Let’s start by preparing everything you’ll need for your crochet adventure and learn how to make this beautiful crocheted bird applique from scratch.
Materials You Will Need for the Crocheted Bird Applique
Before starting this Crocheted Bird Applique – Step by Step Tutorial, gather your materials to make the process smooth and enjoyable. You don’t need much—just some yarn, a hook, and a few simple tools to bring your cute bird to life.
First, choose your yarn. Cotton yarn is ideal because it holds its shape well and provides a neat, defined stitch. You can also use acrylic yarn if you prefer a softer texture. Pick at least two or three colors: one for the bird’s body, one for the wings, and one for the beak or small details. Lighter shades are great for a soft, natural look, while bright tones make the applique stand out.
Next, select the right crochet hook. For fine details, use a smaller hook such as 2.5 mm or 3.0 mm, depending on the thickness of your yarn. A smaller hook gives you tighter stitches, which helps your applique maintain its shape.
You’ll also need a pair of scissors, a yarn needle for sewing in ends, and optionally, some embroidery thread if you’d like to add small details like eyes or feather lines. A tiny bead or button can also be used for the bird’s eye if you want a three-dimensional effect.
Before you start crocheting, it’s helpful to organize your workspace. Keep your yarn colors handy and your hook ready. Having all materials within reach will make this Crocheted Bird Applique – Step by Step Tutorial easier to follow and more enjoyable to complete.
Crocheting the Bird’s Body
The first part of this Crocheted Bird Applique – Step by Step Tutorial is creating the body. The shape is typically round or slightly oval, depending on the bird style you want. Start by making a magic ring using your main yarn color.
Work six single crochets into the ring and pull it tight. Continue increasing each round by six stitches until you reach the desired size—usually about 2 to 3 inches in diameter for a small applique. You can make it bigger or smaller depending on where you plan to use it.
Once you reach the size you like, stop increasing and crochet one round without adding any stitches. This forms a smooth edge around the body. If you want a slightly oval shape, add two extra stitches at the end of each round on one side. This creates the curve for the bird’s belly.
Now, shape the tail. Crochet two or three chains from the body and work back with single crochets or half double crochets to form a pointed tip. You can make the tail short or long depending on your design preference.
Cut the yarn and weave in the end using a needle. At this stage, you have the basic shape of your crocheted bird applique, which will serve as the foundation for the rest of the details. Next, we’ll work on the wings and other features that bring your bird to life.
Adding the Wings and Beak
The next step in the Crocheted Bird Applique – Step by Step Tutorial is adding the wings and beak. These details give your bird character and make it instantly recognizable.
To make the wing, use a different color of yarn. Start with a small magic ring and work six single crochets inside it. Increase slightly in the next round, but not too much—you want the wing to be smaller than the body. Once finished, fold it gently in half to give it a natural, lifted appearance.
Position the wing on the side of the body, slightly overlapping the center. Sew it in place with your needle and matching thread. If you prefer, you can also attach it using a few crochet stitches directly onto the body.
For the beak, use yellow or orange yarn. Chain two or three stitches and work one single crochet in the second chain from the hook. Fasten off and sew this small triangle onto the front of the bird’s face area. The beak should point slightly upward for a cheerful expression.
You can now embroider or attach an eye. A black embroidery thread or a small bead works perfectly. Stitch a simple dot for a minimalist look, or create a small curved line to represent a closed, happy eye.
This step brings your bird to life. Even though it’s small, the combination of color and texture makes it look adorable. You can experiment with different shapes and sizes of wings or beaks to create a variety of bird styles in this crocheted bird applique project.
Adding Decorative Details and Finishing Touches
Now that your crocheted bird applique has its main parts ready, it’s time to add decorative elements that make it unique and polished. These finishing touches help your crochet art stand out.
Start by outlining the body with a round of slip stitches in a contrasting color. This not only makes the edges neater but also defines the bird’s shape more clearly. It’s an easy way to make your applique pop when sewn onto a background.
You can add feather details by using embroidery stitches. A few straight stitches on the wing or tail can represent feathers beautifully. If you like texture, use different types of yarn—metallic, fluffy, or gradient-colored yarn—to highlight certain parts.
For an extra cute touch, crochet a small heart or flower and attach it near the bird’s tail or belly. This gives your applique a whimsical and cheerful look, perfect for baby blankets or decorative pillows.
Don’t forget to secure all your loose ends. Weave in the yarn tails neatly so they don’t unravel. If you’re planning to wash your project later, make sure the stitches are tight and secure.
Once everything is done, gently press your applique with a warm iron under a cloth. This flattens the stitches and gives it a professional finish. Now your crocheted bird applique is ready to be attached to any surface you like!
Creative Uses for Your Crocheted Bird Applique
Now that you’ve completed the Crocheted Bird Applique – Step by Step Tutorial, it’s time to explore creative ways to use it. The possibilities are endless, and this small crochet piece can brighten up many everyday items.
One of the most popular uses is as a decoration for baby clothes or blankets. The bird design looks adorable on baby onesies, hats, or nursery accessories. Just sew it on securely to make it both decorative and durable.
You can also attach your applique to tote bags, scarves, or cushions for a handmade touch. It transforms ordinary items into something personal and artistic. If you’re into home decor, frame a set of appliques in different colors and sizes for a lovely wall art display.
Another idea is to use it in greeting cards or gift tags. Attach your crocheted bird applique to paper with a bit of glue or thread, and you have a unique handmade embellishment that adds warmth to your gift.
If you love keychains or ornaments, simply attach a loop or ring to the top of the bird. You can make a flock of little birds and hang them as car charms, Christmas decorations, or mobile toys.
This small crochet project is versatile, beginner-friendly, and a great way to express your creativity. Whether you make it for yourself or as a thoughtful gift, each bird tells its own story through your choice of colors and stitches.
Crocheted Bird Applique
1. Is this project suitable for beginners?
Yes! The Crocheted Bird Applique – Step by Step Tutorial is designed for beginners. It uses basic stitches like single crochet, slip stitch, and chain.
2. What kind of yarn works best for appliques?
Cotton yarn is ideal because it’s durable and keeps its shape well. However, you can use any yarn you like depending on the texture you want.
3. Can I make the bird bigger or smaller?
Absolutely. Just adjust your hook size and yarn thickness or add more rounds to the body.
4. How can I attach the applique to fabric?
You can sew it using a needle and matching thread or attach it with fabric glue if you prefer a no-sew option.
5. What colors should I use for a bird applique?
There are no rules! You can use realistic bird colors like blue, yellow, or brown, or go wild with rainbow shades for a fun, playful look.
6. How do I keep my applique from curling?
Blocking your crochet—gently stretching and pressing it flat after finishing—helps it stay smooth and even.
Conclusion
In this Crocheted Bird Applique – Step by Step Tutorial, you learned how to create an adorable and versatile crochet piece that can be used in countless creative ways. From choosing the right yarn and hook to shaping the body, adding wings and beak, and finishing with decorative touches, this project is both fun and rewarding.
Whether you’re a beginner or an experienced crocheter, this small project allows you to experiment with color and design while improving your crochet skills. Each applique you make can be unique, reflecting your personal style.
I hope you enjoyed making your crocheted bird applique as much as I enjoyed guiding you through the process. Don’t forget to share your thoughts—leave your honest opinion and suggestions below about this tutorial. Your feedback helps inspire even more creative crochet ideas!