
Crocheted bucket hat tutorial with fairy flower. is a charming and creative way to combine fashion and handmade artistry into a unique accessory that stands out in any season. This complete Crocheted bucket hat tutorial with fairy flower. will guide you through each step, helping you create a stylish hat that blends comfort with delicate floral details. Whether you are a beginner or someone with experience in crochet, this Crocheted bucket hat tutorial with fairy flower. is designed to be easy to follow while still offering beautiful results that look professional and trendy.
One of the most appealing aspects of this Crocheted bucket hat tutorial with fairy flower. is its versatility. You can customize the size, colors, and flower details to match your personal style or current fashion trends. Handmade bucket hats have gained popularity due to their uniqueness, and this Crocheted bucket hat tutorial with fairy flower. allows you to create a one-of-a-kind piece that reflects your creativity. The addition of a fairy flower design adds a whimsical and delicate touch, making the hat even more special.
Another advantage of following this Crocheted bucket hat tutorial with fairy flower. is the opportunity to develop your crochet skills while creating something functional. This project combines basic stitches with decorative techniques, making it both educational and enjoyable. By practicing this Crocheted bucket hat tutorial with fairy flower., you can improve your craftsmanship and even explore the possibility of turning your creations into a small business.
Materials Needed for Crocheted Bucket Hat Tutorial with Fairy Flower.
To begin your Crocheted bucket hat tutorial with fairy flower., it is essential to gather the right materials. You will need yarn, a crochet hook, scissors, a yarn needle, and stitch markers. Having the proper tools ensures a smooth and enjoyable crafting experience.
Choosing the right yarn is crucial in this Crocheted bucket hat tutorial with fairy flower.. Cotton yarn is highly recommended because it is breathable and comfortable, making it ideal for wearable items like hats. You can also experiment with blended yarns for different textures.
Selecting the correct crochet hook size is important in this Crocheted bucket hat tutorial with fairy flower.. A suitable hook helps maintain consistent stitches and ensures that the hat fits properly. Beginners should follow recommended sizes based on the yarn used.
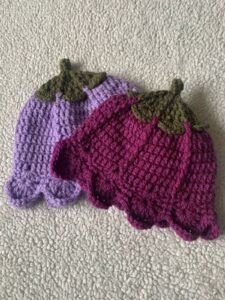
Color selection plays a key role in this Crocheted bucket hat tutorial with fairy flower.. Soft pastel tones work well for the fairy flower design, while neutral shades can create a more versatile and modern look.
Additional tools like stitch markers are helpful in this Crocheted bucket hat tutorial with fairy flower.. They allow you to keep track of rounds and maintain accuracy throughout the project.
Finally, preparing your workspace is essential for a successful Crocheted bucket hat tutorial with fairy flower.. A clean and well-lit area improves focus and makes the process more enjoyable.
Step-by-Step Crocheted Bucket Hat Tutorial with Fairy Flower.
The first step in this Crocheted bucket hat tutorial with fairy flower. is creating the crown of the hat. Start with a magic ring and work in rounds, gradually increasing stitches to form a flat circle. This forms the top of your bucket hat.
Next, in this Crocheted bucket hat tutorial with fairy flower., begin shaping the sides of the hat. Continue crocheting without increases to build the height. This step determines how deep the hat will be.
As you continue the Crocheted bucket hat tutorial with fairy flower., create the brim by increasing stitches again. The brim should extend outward slightly, giving the hat its classic bucket shape.
The next step in this Crocheted bucket hat tutorial with fairy flower. is crafting the fairy flower. Use a contrasting color to crochet small petals that will later be attached to the hat.
After completing the flower, attach it securely in this Crocheted bucket hat tutorial with fairy flower.. Position it on the side of the hat for a decorative and stylish effect.
Finally, review your work in this Crocheted bucket hat tutorial with fairy flower.. Check for loose ends and ensure that all parts are securely attached. A clean finish enhances the overall look of your hat.
Tips to Improve Your Crocheted Bucket Hat Tutorial with Fairy Flower.
Maintaining consistent tension is essential in this Crocheted bucket hat tutorial with fairy flower.. Even stitches create a polished and professional appearance, while uneven tension can affect the fit.
Choosing the right color combinations is important in this Crocheted bucket hat tutorial with fairy flower.. Harmonious colors enhance the beauty of the fairy flower and make the hat more visually appealing.
Attention to detail is key in this Crocheted bucket hat tutorial with fairy flower.. Small finishing touches, such as neatly woven ends, can make a big difference in the final result.
Using high-quality materials is recommended in this Crocheted bucket hat tutorial with fairy flower.. Durable yarn ensures that your hat will last longer and maintain its shape.
Practice is crucial when following this Crocheted bucket hat tutorial with fairy flower.. The more you crochet, the more confident and skilled you will become.
Finally, experiment with different designs in this Crocheted bucket hat tutorial with fairy flower.. Try adding more flowers or changing the brim style to create unique variations.
Turning Crocheted Bucket Hat Tutorial with Fairy Flower. Into a Business
The skills learned from this Crocheted bucket hat tutorial with fairy flower. can be turned into a profitable opportunity. Handmade accessories are highly popular, especially unique items like crocheted hats.
Start by creating a small collection using this Crocheted bucket hat tutorial with fairy flower.. Offering different colors and styles can attract a wider audience.
Pricing your products correctly is important in this Crocheted bucket hat tutorial with fairy flower. journey. Consider material costs, time, and market demand when setting prices.
Marketing plays a significant role in the success of your Crocheted bucket hat tutorial with fairy flower. business. High-quality images and clear descriptions can help showcase your products effectively.
Customer satisfaction is essential in this Crocheted bucket hat tutorial with fairy flower. business. Providing quality products and good service builds trust and encourages repeat customers.
Finally, continue improving your skills through this Crocheted bucket hat tutorial with fairy flower.. Staying updated with trends and techniques will help you grow and succeed.
Crocheted Bucket Hat Tutorial with Fairy Flower.
What is the best yarn for a Crocheted bucket hat tutorial with fairy flower.?
Cotton yarn is the best choice because it is breathable and comfortable for wearable items.
Is the Crocheted bucket hat tutorial with fairy flower. suitable for beginners?
Yes, it is beginner-friendly and uses basic crochet techniques.
How long does it take to complete a Crocheted bucket hat tutorial with fairy flower.?
It usually takes a few hours to a day, depending on your skill level.
Can I customize the design in this Crocheted bucket hat tutorial with fairy flower.?
Yes, you can change colors, add more flowers, or adjust the size to fit your style.
Do I need special tools for this Crocheted bucket hat tutorial with fairy flower.?
Basic crochet tools are enough to get started.
Can I sell hats made from this Crocheted bucket hat tutorial with fairy flower.?
Yes, handmade crocheted hats are popular and can be sold for profit.
Conclusion
This Crocheted bucket hat tutorial with fairy flower. has provided a complete guide to creating a stylish and unique handmade accessory.
You learned about the necessary materials, step-by-step instructions, helpful tips, and how to turn your creation into a business opportunity.
By practicing and exploring your creativity, you can produce beautiful hats that reflect your personal style. If you enjoyed this article, please leave your honest opinion and share your suggestions to help improve future tutorials.