
Creating a Crocheted Christmas bell-Step by Step Tutorial is a delightful way to bring handmade charm into your holiday décor. Right from the beginning, this guide is designed to help you understand every stage of crafting your own festive bell using yarn, creativity, and a bit of patience. Whether you are a beginner or someone who has been crocheting for years, this tutorial offers clear explanations and humanized language so you can enjoy the process with ease. By following this Crocheted Christmas bell-Step by Step Tutorial, you will be able to create a beautiful ornament that looks stunning on any Christmas tree or as part of a holiday display.
A project like the Crocheted Christmas bell-Step by Step Tutorial blends tradition with creativity, making it ideal for decorating, gifting, or even selling handmade crafts during the festive season. Many crocheters love making Christmas ornaments because they are quick, enjoyable, and full of meaning. Bells, in particular, are symbols of celebration and joy, and making them in a crocheted version gives them an extra touch of warmth and uniqueness. This tutorial will guide you through all the essential materials, techniques, and tips needed to achieve a lovely result, even if you are new to holiday-themed crochet.
By learning how to craft a bell through this Crocheted Christmas bell-Step by Step Tutorial, you can personalize your ornament with different yarn colors, decorative beads, or bows to match your holiday theme. Throughout the article, you will find easy explanations, practical suggestions, and SEO-optimized content that follows Google AdSense guidelines. Every detail has been designed to make your reading experience smooth and informative. Before diving into the first step, take a moment to gather your materials and prepare your creative space for this festive crafting journey.
Materials Needed for the Crocheted Christmas Bell
To begin your Crocheted Christmas bell-Step by Step Tutorial, you will first need to gather some basic crochet materials that are easy to find. Most of the required items are simple tools you may already have at home if you regularly crochet. The main goal is to ensure that everything is accessible and beginner-friendly, so you can start your project without stress or unnecessary complications.
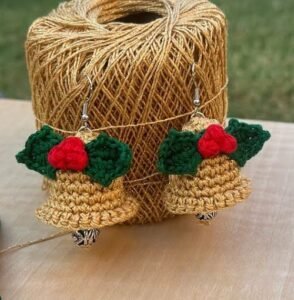
You will need yarn in your preferred Christmas color, and many people choose classic shades such as red, green, white, gold, or silver. Any soft but sturdy yarn will work well for this tutorial, as long as it can hold the bell’s shape. The yarn texture also affects the final appearance, so pick something that complements your holiday style and matches your creative vision.
You will also need a crochet hook that matches the thickness of your chosen yarn. Check the yarn label for the recommended hook size or select one that feels comfortable in your hands. Working with the proper hook size will help your stitches look even and well-shaped, giving your bell a nice structure.
Additionally, having scissors, a yarn needle, and a small piece of stuffing material (optional) will be helpful for finishing and shaping your bell. Some people like to insert a tiny bell or bead inside to create a soft ringing sound, but that part is completely optional. Lastly, consider adding decorative elements such as small bows or glittery yarn for extra holiday charm.
Before moving into the next step in this Crocheted Christmas bell-Step by Step Tutorial, make sure your workspace is organized. Keeping all materials in one place will make the crafting experience more enjoyable and help you maintain a smooth flow throughout the project.
Step-by-Step Instructions to Crochet the Christmas Bell
To continue with the Crocheted Christmas bell-Step by Step Tutorial, begin by creating a foundation chain that forms the base of your bell. This chain will determine how wide the lower edge of the bell will be. Make sure your chain is neither too tight nor too loose so the bell can keep its shape as you build upwards.
After forming the base chain, crochet in the round using simple stitches like single crochet or half double crochet, depending on the style you prefer. Working in the round helps give the bell its classic curved shape. Keep your tension consistent to make the structure smooth and visually appealing.
As you continue crocheting row by row, you will gradually decrease stitches in certain points to create the top of the bell. This shaping is essential for forming the bell’s cone-like form. Follow the decrease pattern carefully and count your stitches often to avoid mistakes that could affect the final shape.
Once the shape of the bell is complete, you can add a small loop at the top using a few chain stitches. This loop will allow you to hang your crocheted bell on the Christmas tree or anywhere you prefer. Make sure the loop is secure and strong enough to hold the weight of the ornament.
Optionally, you can place a small bead or decorative bell inside your crocheted ornament. This additional touch makes the piece even more charming and festive. Insert the bead before fully closing the bottom and use your yarn needle to secure everything neatly.
After completing this step in the Crocheted Christmas bell-Step by Step Tutorial, the main structure of your ornament is ready, and you can begin working on the finishing details to personalize your creation.
Finishing Touches and Decoration Ideas
The next part of this Crocheted Christmas bell-Step by Step Tutorial focuses on the creative details that make your bell unique. Decorating your bell is one of the most enjoyable steps, as it allows you to express your personal style and holiday spirit. You can choose subtle embellishments or bold decorations, depending on your preference.
One popular finishing touch is adding a small bow at the top or around the base of the bell. Ribbons in red, gold, or green are especially festive for the holiday season. Knot the ribbon securely and trim the ends neatly for a polished look that enhances the crocheted design.
Another decoration option is adding beads or pearls along the stitches of the bell. This gives the piece a charming, sparkling effect. Beads can be sewn in with a yarn needle and placed evenly around the bell for balance and elegance. This detail elevates your ornament and makes it look more sophisticated.
Some crafters enjoy using metallic yarn to crochet a thin border around the bottom edge of the bell. This adds a beautiful shimmer without overpowering the design. Using contrasting colors like gold on red or silver on white creates a stunning festive highlight.
Adding texture is also a fun way to personalize your Christmas bell. You might crochet a small snowflake or star to attach to the bell’s exterior. These tiny crocheted additions blend beautifully with the main piece and reinforce the holiday theme.
As you finish decorating, remember that the most important thing is expressing your creativity. Whether you prefer a simple look or a more detailed ornament, this Crocheted Christmas bell-Step by Step Tutorial provides endless possibilities to make your bell special and meaningful.
Tips for Success and Customization
The final steps of this Crocheted Christmas bell-Step by Step Tutorial include some valuable tips for ensuring your project looks polished and professional. Paying attention to small details and taking your time can make a huge difference in the final result.
One helpful tip is to block your bell lightly once it is complete. Blocking helps shape your work and smooth out uneven stitches. Use gentle shaping and allow the bell to dry completely before decorating or displaying it.
If you want your bell to be extra sturdy, consider inserting a little stuffing or a lightweight plastic form inside the bell. This helps it maintain its shape and prevents it from collapsing over time, especially if you use softer yarn.
You can also experiment with different yarn types to change the final look. Cotton yarn gives a crisp, clean finish, while acrylic yarn offers softness and flexibility. Metallic yarn provides a festive sparkle that fits perfectly with Christmas themes.
Another customization idea is to create multiple bells in different sizes. Varying the hook size and yarn thickness allows you to craft a full set of ornaments that look beautiful when displayed together. This adds a cohesive yet dynamic look to your Christmas decoration collection.
Color combinations also play a big role in personalization. You can stick to traditional Christmas shades or try something new like pastel colors or rustic tones. With this Crocheted Christmas bell-Step by Step Tutorial, you are free to adapt the style to match your holiday décor perfectly.
Finally, remember to take your time and enjoy the process. Crochet is a relaxing and fulfilling craft, and making your own Christmas ornaments adds a meaningful touch to your holiday celebrations.
Crocheted Christmas Bell
1. Can beginners follow this Crocheted Christmas bell-Step by Step Tutorial?
Yes, beginners can follow this tutorial easily. The steps are simple, and the stitches used are basic, making it a great project for those learning crochet.
2. What type of yarn is best for a crocheted Christmas bell?
Any medium-weight or cotton yarn works well. Choose a yarn that holds shape and complements your holiday theme.
3. Do I need stuffing for the bell?
Stuffing is optional. It helps keep the bell firm, but you can skip it if you prefer a softer, more flexible ornament.
4. Can I make the bell larger or smaller?
Yes, adjusting your hook size and yarn thickness allows you to create bells in different sizes.
5. How long does it take to complete the ornament?
Most people finish it within one to two hours, depending on experience and decoration details.
6. Can I add real bells inside the crochet ornament?
Yes, you can insert a small metal or plastic bell for a charming ringing sound.
Conclusion
This article has guided you through a complete Crocheted Christmas bell-Step by Step Tutorial, from choosing materials to customizing and decorating your final ornament.
You learned how to create the shape, finish the details, and add creative touches that make your bell unique.
I hope this tutorial inspires you to make beautiful handmade decorations this holiday season. Please leave your honest opinion and share any suggestions so I can continue creating useful and inspiring content for you.