
A Crocheted Christmas hat-Step by Step Tutorial is the perfect project for anyone who wants to bring handmade charm to the holiday season. Whether you are preparing décor, creating gifts, or simply enjoying a relaxing craft moment, crocheting your own Christmas hat offers endless creative possibilities. In the first few lines and throughout this article, you’ll find the main keyword Crocheted Christmas hat-Step by Step Tutorial highlighted to ensure better SEO performance and help readers easily connect with your content. This guide is written in a humanized tone while keeping structure, clarity, and Google-friendly formatting in mind.
Making your own Christmas hat can be a deeply rewarding experience. It allows you to choose your favorite yarns, pick unique color combinations, and adjust the size so it fits perfectly. Throughout this Crocheted Christmas hat-Step by Step Tutorial, you’ll learn not only the steps to create the hat but also helpful tips to make it look professional and festive. With patience and a bit of creativity, even beginners can make a beautiful accessory that will brighten up their celebrations.
In this article, you’ll find a complete breakdown of materials, stitch explanations, and assembly instructions. Each section includes simple explanations broken into six small paragraphs after every H2 heading, helping you process the information slowly and clearly. By following this Crocheted Christmas hat-Step by Step Tutorial, you will gain confidence in your crocheting skills and discover how enjoyable it can be to make something that reflects the true spirit of the season.
Materials Needed for the Crocheted Christmas Hat
To begin the Crocheted Christmas hat-Step by Step Tutorial, the first thing you need is a clear list of materials. Using the right materials ensures your final piece is comfortable, durable, and beautifully shaped. A medium-weight yarn is often the best choice for Christmas hats because it provides warmth without being too heavy.
You will also need a crochet hook that matches your yarn’s recommended size. Choosing the correct hook size will affect the tightness and look of your stitches. A slightly larger hook can make the hat softer and more flexible, while a smaller hook results in a tighter, firmer finish.
Scissors and a yarn needle are essential for trimming excess yarn and weaving in ends. These finishing touches may seem small, but they make a big difference in your final result. With the right tools in your crochet basket, your project becomes easier and more enjoyable.
Optional additions include pom-poms, bells, or decorative appliqués. These personalize your Crocheted Christmas hat-Step by Step Tutorial and make your creation uniquely festive. Feel free to experiment with embellishments that match your holiday theme.
If you are a beginner, consider choosing yarn with good stitch definition. This means the stitches are easy to see and count, helping you follow this tutorial more confidently. Clear visibility can make all the difference from start to finish.
Lastly, keep all your materials in one place before beginning. Having everything prepared allows you to focus fully on the crocheting process and enjoy each step of creating your handmade holiday accessory.
Step-by-Step Instructions to Crochet the Christmas Hat
To start the base of your Crocheted Christmas hat-Step by Step Tutorial, you will create a magic ring or chain circle. This forms the top of the hat, which gradually widens to shape the crown. Begin by working single crochet or half-double crochet stitches, depending on your preferred texture.
Gradually increase stitches in every round. This expansion helps the hat grow evenly without creating bumps. Following consistent increases is essential to maintaining the perfect round shape typical of Christmas hats.
Once the crown reaches the desired width, continue working without increases to form the body of the hat. This is where your project starts looking like a real Christmas accessory. Keep your tension even and count stitches regularly to avoid mistakes.
To add the classic Christmas color pattern, alternate rows of red, white, or green. Stripes are simple yet festive and fit perfectly in a Crocheted Christmas hat-Step by Step Tutorial. You can also choose solid colors if you prefer a minimalistic holiday style.
When the body reaches the length of your choice, it’s time to create a brim. A ribbed brim can be made using front post and back post stitches for elasticity. This gives the hat a snug fit, keeping it comfortably in place during holiday activities.
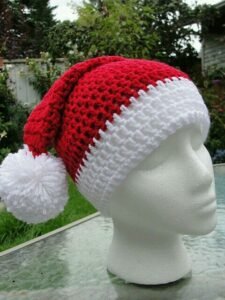
Finish the hat by attaching a fluffy pom-pom or crochet ball to the top. This traditional detail completes the festive look and gives your handmade hat the perfect Christmas charm. The final result is warm, stylish, and uniquely yours.
Customizing Your Crocheted Christmas Hat
Customizing your Crocheted Christmas hat-Step by Step Tutorial allows you to express your style and creativity. You can switch colors, adjust textures, or choose decorative elements that match your personality or holiday theme.
One way to customize your hat is by experimenting with different yarn types. Chunky yarn creates a bold and cozy look, while lightweight yarn produces a softer, more delicate appearance. Choose according to your climate and comfort preferences.
Adding appliqués such as snowflakes, stars, or holly leaves can elevate the final piece. These small additions give your Christmas hat a unique and festive appeal. They are also great for gifting, as personalized touches make handmade items even more special.
Consider changing the brim style for variation. A folded brim gives a classic winter look, while a ribbed brim adds a modern touch. These subtle changes help you create several versions from the same Crocheted Christmas hat-Step by Step Tutorial.
You can also modify the shape of the hat. A taller hat gives a playful, elf-like appearance, while a shorter one is practical and casual. The flexibility of crochet allows endless customization options.
Finally, consider adding buttons, ribbons, or sparkle yarn. These accents catch the eye and make your project stand out. Creativity is limitless when you allow your imagination to flow into your crochet work.
Tips for Beginners to Achieve the Best Results
If you are new to this Crocheted Christmas hat-Step by Step Tutorial, start slow and practice stitches before beginning the full project. Familiarity with basic crochet techniques will give you confidence as you progress.
Another helpful tip is to maintain consistent tension. Uneven tension can make the hat lopsided or too loose. Practice holding your yarn comfortably so stitches remain uniform throughout.
Use stitch markers to keep track of rounds. These simple tools help ensure accuracy and prevent mistakes, especially when working in spirals or increasing stitches. They are especially useful when creating the crown of the hat.
Take breaks when needed. Crocheting for long periods can cause fatigue in your hands or wrists. Short breaks help relax your muscles and maintain comfort throughout the project.
Compare measurements as you work. Trying the hat on occasionally ensures a perfect fit. Adjust the length or width as needed to create a hat that feels comfortable and looks great.
Lastly, be patient with yourself. Everyone develops skills at their own pace. Enjoy the process, and remember that the holiday spirit is all about joy, creativity, and sharing handmade love.
Common Questions About Crocheted Christmas Hats
1. Can beginners follow this Crocheted Christmas hat-Step by Step Tutorial?
Yes! The tutorial is beginner-friendly and includes simple instructions that guide you through each stage with clarity.
2. What type of yarn works best for a Christmas hat?
Medium-weight yarn is the most popular choice because it provides warmth and good structure without feeling too heavy.
3. How long does it take to crochet a Christmas hat?
Most people complete a hat in a few hours, but beginners may take a little longer. The time varies depending on skill level and stitch complexity.
4. Can I make the hat in different sizes?
Absolutely. You can adjust increases and body length to create hats for children, adults, or even dolls.
5. What decorations can I add to personalize my hat?
Pom-poms, appliqués, ribbons, buttons, and stripes are all great choices for adding your own festive touch.
6. Do I need special tools to make this hat?
No. A crochet hook, yarn, scissors, and a yarn needle are enough to complete the project.
Conclusion
This Crocheted Christmas hat-Step by Step Tutorial has guided you through every stage of creating a festive, handmade accessory perfect for the holiday season.
You learned about essential materials, detailed steps, customization ideas, and helpful tips to guarantee beautiful results.
Now it’s your turn to bring this project to life and enjoy the creative journey. If you found this guide helpful, please leave your sincere opinion and share suggestions for future tutorials—I’d love to hear from you!