
Crocheted coasters in the shape of cookies-Step by Step Tutorial is a delightful and creative project that brings charm, fun, and functionality to your home decor. Right from the start, this craft invites crocheters of all skill levels to explore texture, color, and adorable design while making something useful and decorative. Whether you are preparing gifts, decorating for a themed party, or simply adding a touch of whimsy to your coffee table, crocheted coasters in the shape of cookies-step by step tutorial provides the perfect opportunity to make something both beautiful and practical. Throughout this article, we will highlight the main keyword, offer simple explanations, and present a clear structure that makes learning easy and enjoyable.
Creating crocheted coasters in the shape of cookies combines two things that many people love: crochet and sweet treats. The playful nature of this project makes it especially appealing during holidays, birthdays, or crafting gatherings with friends. By following this step by step tutorial, you will learn how to shape stitches, choose the right materials, and add small details that make your coasters look just like real cookies. This guide focuses on making the process accessible, even if you are a beginner, while still providing techniques that more experienced crocheters will appreciate.
Before diving into the detailed instructions, it’s important to understand that crocheted coasters in the shape of cookies-step by step tutorial projects allow for almost endless customization. You can choose colors inspired by chocolate chip cookies, gingerbread, sandwich cookies, or even brightly decorated holiday cookies. The beauty of this craft is that every piece becomes unique. Taking your time, practicing your stitches, and experimenting with small variations are all part of the fun and creativity that crochet offers. Now that we have introduced the project, let’s begin the tutorial and explore how to create these adorable cookie-shaped coasters.
Choosing the Right Materials for Cookie-Shaped Coasters
When starting a crocheted coasters in the shape of cookies-step by step tutorial, choosing the right materials is essential for both the look and functionality of your finished pieces. Using cotton yarn is highly recommended because it absorbs moisture, washes easily, and keeps its shape well over time. Cotton also gives the coasters a firm texture, making them durable for daily use.
Selecting the correct hook size ensures your stitches are neither too tight nor too loose. Most cookie-shaped coasters work best with a medium-sized hook, which helps maintain a circular shape and uniform stitch pattern. Adjusting your hook according to your tension may be necessary, so don’t hesitate to experiment until you find the perfect combination.
For cookie details, such as frosting, sprinkles, or chocolate chips, you can use leftover yarn in contrasting colors. Small scraps work perfectly for these accents, and adding them brings each cookie coaster to life. These decorative touches help reinforce the overall theme while allowing you to express creativity through color combinations.
A pair of scissors is essential for trimming ends neatly, ensuring your coaster looks polished. A tapestry needle for weaving in ends and adding decorative stitches is also helpful. Keeping these simple tools nearby makes the crafting process smoother and more enjoyable.
It’s also a good idea to organize your materials before beginning the step by step tutorial, as this helps you stay focused and prevents interruptions during the crafting process. Having everything ready from the beginning allows you to follow the instructions closely and finish each coaster with confidence.
Lastly, consider preparing a comfortable workspace with good lighting. Being able to clearly see your stitches ensures clean results and makes the entire crochet experience more relaxing and pleasant.
Step-by-Step Instructions for Crocheting Cookie-Shaped Coasters
To start the crocheted coasters in the shape of cookies-step by step tutorial, you will begin by forming a magic ring. This foundational technique creates a tight, clean center for the coaster and is ideal for circular projects. Once you secure the ring, you will crochet several single crochets into it to establish the base.
Next, you will gradually increase your stitch count to create a growing circle. Increasing evenly ensures your coaster lies flat, which is essential for functionality. These increases form the cookie’s main shape, giving it a soft, round appearance that resembles a real cookie.
As the circle expands, you may add a decorative edge to mimic cookie ridges or the texture of baked dough. This can be done using simple stitches such as half double crochets or slip stitches. Small variations in the edge design create charming differences between coasters, making each one special.
Once the base is finished, you can begin adding “cookie toppings.” Using contrasting yarn, embroider small stitches to simulate chocolate chips, icing lines, colorful sprinkles, or sandwich cream layers. These details elevate the design and add personality to each coaster.
After finishing the decorative touches, you will weave in all yarn ends securely. This step ensures durability, especially if the coasters will be washed or frequently handled. Neatly finishing your work also gives the coaster a professional appearance.
If desired, you can lightly block the coasters to help them maintain their shape. Blocking is optional but can be helpful if your coaster curls slightly or if you want perfectly smooth edges.
Creative Variations for Cookie-Inspired Crochet Coasters
One of the greatest joys of following a crocheted coasters in the shape of cookies-step by step tutorial is the ability to personalize each coaster. You can choose to make your coasters look like classic chocolate chip cookies by adding random brown stitches as chips. This variation is simple and always visually appealing.
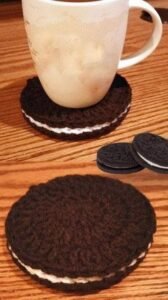
Another fun option is creating sandwich-style cookies by making two circles and connecting them with a contrasting stripe of yarn to represent filling. Colors like white, pink, or brown help simulate flavors such as vanilla, strawberry, or chocolate.
Holiday-themed cookie coasters are also extremely popular. Use red, green, white, or gold yarns to create festive designs that complement seasonal decorations. Adding embroidered snowflakes, candy cane stripes, or festive dots enhances the holiday spirit and makes your coasters perfect for gifting.
You can also decorate your coasters with embroidered icing swirls. This detail brings a bakery-style look to the project and adds a touch of whimsy. Use thin yarn or embroidery thread for delicate, clean lines.
For a minimalist approach, try creating simple sugar-cookie-inspired coasters using soft beige or cream yarn. The subtle look fits into many decor styles and highlights the beauty of simple crochet stitches.
Finally, experiment with playful shapes beyond the basic circle. Slight modifications allow you to create heart-shaped or star-shaped cookie coasters if you enjoy expanding the project. Variation keeps the crafting experience exciting and opens the door to endless creativity.
Tips to Ensure Durability and Quality
To ensure your crocheted coasters in the shape of cookies-step by step tutorial results in long-lasting pieces, consider using sturdy cotton yarn. Cotton withstands heat, moisture, and repeated washing, making it ideal for coasters that will be used frequently.
Keeping your tension consistent throughout the project ensures your coaster remains flat and uniform. If your stitches are too tight, the coaster may curl. If they are too loose, the coaster may become floppy. Practice makes perfect, so don’t hesitate to redo the first few rounds if needed.
It’s also helpful to weave in your yarn ends securely. Use a tapestry needle and weave each end through several stitches to keep them from loosening or unraveling. This step enhances both durability and appearance.
Washing your coasters by hand or on a gentle machine cycle helps preserve their shape and color. Lay them flat to dry for the best results. Careful maintenance ensures your coasters look fresh even after many uses.
If you plan to gift these coasters, consider creating a matching set using coordinated colors or themes. Sets always make a stronger visual impact and show consistent craftsmanship.
Finally, enjoy the process without rushing. Taking your time allows you to appreciate each step, ensuring the finished product reflects care, creativity, and precision.
About Crocheted Coasters in the Shape of Cookies
1. Are cookie-shaped coasters suitable for beginners?
Yes, this project is beginner-friendly and the crocheted coasters in the shape of cookies-step by step tutorial provides simple instructions that anyone can follow.
2. What yarn is best for cookie-shaped coasters?
Cotton yarn is recommended because it absorbs moisture and maintains coaster shape.
3. How long does one cookie coaster take to make?
Most crocheters can complete one coaster in under an hour, depending on experience.
4. Can I wash these coasters?
Yes, they can be washed gently by hand or on a soft machine cycle.
5. Do I need special tools?
No, you only need basic tools: yarn, a hook, scissors, and a tapestry needle.
6. Can I customize the cookie decorations?
Absolutely! You can add sprinkles, icing swirls, chocolate chips, or filling layers.
Conclusion
In this article, you learned how to follow a crocheted coasters in the shape of cookies-step by step tutorial, from choosing materials to adding cute decorative touches.
We explored variations, tips for better results, and answers to common questions. I hope this tutorial.
Inspires you to create fun, beautiful, and practical coasters that brighten your home. Please leave a sincere opinion and share suggestions—I would love to know what you think!