
If you love combining creativity and practicality, this Crocheted Door Organizer – Step by Step Tutorial is a perfect project for you. Handmade organizers have become an essential part of home décor, especially when you want to keep your living space tidy while adding a touch of charm and warmth. A crocheted door organizer not only helps you save space but also enhances the beauty of any room. Whether you hang it behind your bedroom, bathroom, or kitchen door, it becomes a functional and stylish addition to your home.
Creating your own crocheted door organizer gives you the chance to personalize it according to your needs. You can decide the number of pockets, colors, and overall design to match your home’s aesthetic. Unlike mass-produced organizers, handmade ones carry a personal touch that reflects your personality and style. Plus, they are eco-friendly and reusable—an ideal choice for those who love sustainable living and crafting.
This step by step tutorial will walk you through every part of the process—from selecting yarn and tools to assembling and decorating your finished piece. Even if you are new to crochet, don’t worry! This project uses basic stitches and simple techniques, making it suitable for beginners. By the end of this guide, you’ll have a beautiful, durable, and functional door organizer that keeps your essentials neatly stored while showcasing your crochet skills.
Materials You Will Need for the Crocheted Door Organizer
Before beginning your Crocheted Door Organizer – Step by Step Tutorial, gather all the necessary materials. Having everything ready before you start will make the process smoother and more enjoyable. The main material you’ll need is yarn—cotton yarn is the best option since it’s strong, washable, and holds its shape well. You can choose your favorite colors, but neutral tones or earthy shades often blend beautifully with home décor.
Next, choose the right crochet hook for your yarn. Usually, a 4 mm or 4.5 mm hook works perfectly for medium-weight cotton yarn. You’ll also need scissors, a yarn needle for weaving in ends, stitch markers, and a measuring tape. If you plan to hang your organizer with a wooden dowel or metal rod, make sure to have that as well. This will help the organizer stay straight and sturdy when attached to the door.
In addition to the basic tools, you’ll need buttons or wooden rings if you plan to create closures for the pockets. These small accessories add a professional touch to your crocheted door organizer. A sewing needle and thread may also come in handy to attach these details securely.
Optional but highly recommended materials include fabric lining for the pockets. Adding a simple piece of fabric inside each pocket can make them more durable, especially if you intend to store heavier items like keys, brushes, or small bottles. You can also add decorative items such as lace, ribbons, or small crocheted flowers to give your organizer a personalized look.
Once you have all your materials in place, find a comfortable spot to work. A well-lit space and a little time to focus will make your crocheting experience even more enjoyable.
Step by Step: Crocheting the Base
The first step in this Crocheted Door Organizer – Step by Step Tutorial is creating the base, which will serve as the main body of the organizer. Start by making a foundation chain that matches the width you want for your organizer. For a medium-sized design, a chain of about 40 to 50 stitches works well.
Next, crochet several rows of single crochet stitches to form a rectangular shape. The number of rows you make will determine the height of your organizer. A good size is about 50 cm tall, but you can adjust it based on how many pockets you want to include. Make sure your stitches are even and firm so that the base is sturdy enough to support the pockets later.
Once you’ve reached the desired height, finish off your base and weave in any loose ends. If you prefer, you can crochet a border around the rectangle using single crochets or half double crochets. This gives the piece a neat and professional edge. You can also use a contrasting color to add a decorative touch that complements your room’s design.
To add more strength, consider doubling the yarn for the base or working with two strands at once. This technique makes the fabric thicker and ensures that it won’t sag when you add weight to the pockets. The sturdier your base, the longer your crocheted door organizer will last.
After completing the base, block it lightly if necessary to ensure it lays flat and even. This step helps in giving your organizer a polished look before you start attaching the pockets.
Making and Attaching the Pockets
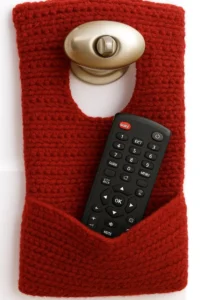
Now that the base is ready, it’s time to create the pockets for your Crocheted Door Organizer. The pockets can be square or rectangular, depending on what you plan to store. For example, smaller pockets work well for keys or notepads, while larger ones can hold mail, brushes, or even small towels.
To make a pocket, start with a foundation chain that matches the width you want. Crochet rows of single or half double crochet stitches until you achieve the desired height. Keep in mind that each pocket should be slightly shorter than the base width to ensure a snug fit when sewn on.
You can make as many pockets as you like, but three to four is a good number for most organizers. Once all your pockets are ready, arrange them on the base to plan their placement. Make sure they’re evenly spaced for a balanced look.
Next, attach the pockets by sewing or crocheting along the sides and bottom, leaving the top open. Use strong, tight stitches so the pockets can handle the weight of items placed inside. To reinforce them, you can crochet a small border around each pocket’s opening. This not only adds strength but also gives a nice decorative touch.
If you’d like to add more functionality, you can create small loops or dividers inside the pockets. These can help you organize smaller items like pens, crochet hooks, or hair accessories. Personalizing your crocheted door organizer in this way ensures it perfectly suits your daily needs.
Finally, add buttons, ties, or ribbons to close certain pockets if you prefer. These small details make the design look finished and add charm to your handmade piece.
Adding Finishing Touches and Hanging the Organizer
Once your pockets are attached, it’s time to add the final details to complete your Crocheted Door Organizer – Step by Step Tutorial. The top part of the organizer needs a sturdy way to hang. Crochet a few loops along the top edge or create a wide band to insert a wooden dowel or metal rod. This will ensure your organizer hangs evenly on the door.
If you want, crochet two long cords to use as ties for hanging. Simply attach them at each top corner and tie them around a hook or handle. You can also make a single long strap to hang it like a wall organizer. Choose whichever option best suits your space.
To decorate your organizer, you can add small crochet motifs such as flowers, hearts, or stars. These embellishments bring personality and color to the final piece. A few decorative buttons or a border in a contrasting color can also make a big difference in the overall look.
Once all decorations are in place, check that all ends are securely woven in and that the organizer is sturdy. Give it a gentle press with a cool iron (if your yarn allows it) to flatten any curled edges.
When it’s ready, hang your crocheted door organizer on your chosen door and admire your handiwork. You now have a beautiful, practical item that keeps your essentials organized and adds a handmade touch to your home décor.
For extra versatility, you can use your organizer in various rooms: in the kitchen for utensils, in the bathroom for toiletries, or in the bedroom for accessories. Handmade organizers like this one are not only functional but also showcase your creativity and dedication to crafting.
FAQ
1. What type of yarn is best for a crocheted door organizer?
Cotton yarn is ideal because it’s sturdy, easy to clean, and holds its shape well. Avoid very stretchy or delicate yarns since they may not support the weight of stored items.
2. How can I make my door organizer stronger?
You can double the yarn or add a fabric lining inside the pockets for extra strength. Also, ensure your stitches are tight and consistent.
3. Is this project suitable for beginners?
Yes! This Crocheted Door Organizer – Step by Step Tutorial is beginner-friendly. It mainly uses simple stitches like single crochet and half double crochet.
4. Can I wash the crocheted organizer?
Yes, most cotton organizers can be hand-washed with mild detergent and cold water. Let it air dry flat to maintain its shape.
5. How many pockets should I make?
That depends on your preference and available space. Typically, three or four pockets work well for most designs.
6. What can I store in a crocheted door organizer?
You can store various small items such as mail, keys, accessories, crochet hooks, brushes, or even small tools—whatever helps keep your home tidy.
Conclusion
Making your own Crocheted Door Organizer is both enjoyable and rewarding. Through this Step by Step Tutorial, you’ve learned how to crochet the base, create and attach pockets, and add finishing touches that make your organizer both functional and beautiful. This handmade piece is not just a storage solution—it’s a reflection of your creativity and craftsmanship.
A crocheted organizer adds warmth and charm to your home, proving that practical items can also be decorative. You can adapt this design to suit any room or purpose, making it a versatile and personal addition to your space.
Now that you’ve completed this project, take a moment to admire your work and enjoy the satisfaction of creating something useful with your own hands. Don’t forget to leave your honest opinion and suggestions about this tutorial—your feedback inspires new ideas and helps others who love crochet as much as you do!