
Learning how to create a beautiful accessory through a Crocheted flower necklace-Step by Step Tutorial is an exciting way to combine creativity, crafting, and personalization into a single project. Right from the beginning, this technique brings a sense of joy because it transforms simple yarn into an elegant handmade jewelry piece. In this article, you will explore an easy and enjoyable method to craft your own necklace, whether you plan to use it as a personal accessory or as a thoughtful gift. The goal is to guide you in a clear and approachable way so you feel confident throughout the entire process.
Following this Crocheted flower necklace-Step by Step Tutorial allows even beginners to dive into crocheting without worry. The steps are presented clearly, the structure is simple, and each stitch gradually builds into something more beautiful. Crochet jewelry has become increasingly popular because it is lightweight, customizable, and requires only basic materials. With patience and practice, you can craft stunning pieces that reflect your personal style. By applying the techniques described here, you will learn not only to make the necklace but also to enhance your crochet skills overall.
By taking your time with this Crocheted flower necklace-Step by Step Tutorial, you will quickly realize that crochet art is both relaxing and rewarding. Handmade accessories carry personality and charm, especially when decorated with delicate crochet flowers. This project also encourages creativity because you can explore different yarn types, color combinations, and sizes. Whether you prefer classic pastel shades or bright expressive tones, your necklace will be unique. Now that you understand what the tutorial offers, let’s begin the detailed process of making your very own crocheted flower necklace.
Materials Needed for the Crocheted Flower Necklace
Before starting the Crocheted flower necklace-Step by Step Tutorial, it is important to gather all the necessary materials. Having everything at hand will make the crafting process smoother and more enjoyable. Most of the required items are affordable and easy to find in craft stores. This ensures that both beginners and experienced crafters can follow along without difficulty.
For this project, you will typically need lightweight yarn, a crochet hook that matches the yarn size, scissors, and a yarn needle. Each of these serves a specific purpose and contributes to the final look of the necklace. Choosing the right yarn type can also influence the softness, durability, and overall design of your finished piece. Cotton yarn is often recommended because it offers a clean and defined stitch appearance.
In addition to yarn, you may want to prepare some optional decorative items such as beads or charms. Adding these touches can make your crocheted necklace even more elegant and personalized. Accessories like these are easy to attach and can be incorporated between flowers or at the ends of the necklace. They offer a unique finish to your craft.
Selecting your color palette is another important step in this Crocheted flower necklace-Step by Step Tutorial. You can choose different colors for each flower or create a monochromatic design for a more classic look. No matter what you choose, color harmony will greatly influence the final aesthetic. It is always fun to experiment and see how different combinations work together.
When choosing your crochet hook, ensure that it is comfortable to hold and suitable for your yarn weight. A good hook will help you maintain consistent stitches and reduce hand fatigue. This is especially important if you plan on making more than one necklace or crafting for extended periods.
Lastly, have your scissors and yarn needle ready to finish your project neatly. These tools help with trimming excess yarn and weaving in ends. Keeping your workspace organized will allow you to enjoy the crafting process and follow each step efficiently.
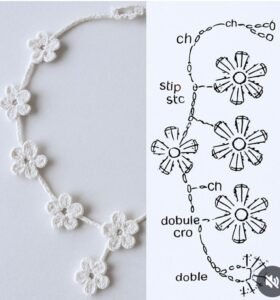
Step-by-Step Instructions for Creating the Flowers
The heart of this Crocheted flower necklace-Step by Step Tutorial lies in creating the individual crochet flowers. These flowers form the main decoration of the necklace and can be made in different sizes and colors. Each flower is simple and quick to crochet, making it a great project even for beginners.
To begin your flower, start with a magic ring or a chain loop, depending on your preferred technique. The magic ring allows you to adjust the center size easily, while a chain loop offers a slightly looser opening. Either method works well and provides a solid foundation for your petals. Many crocheters enjoy experimenting to discover which style suits their hands best.
Once you have your ring, you can start forming the petals by working basic crochet stitches into the center. Common stitches for this step include single crochet, half double crochet, and double crochet. The combination of these stitches determines the shape and texture of each petal. Simple stitch variations can give your flower a delicate or bold appearance.
As you move around the ring, you will notice the flower taking shape quickly. It is important to keep your tension even to ensure a uniform result. This is where following a methodical rhythm becomes valuable, especially for those practicing their skills. The more consistent you become, the more refined your flowers will appear.
After completing the petals, tighten the ring or close the loop and fasten off your yarn. Use your yarn needle to weave in the loose ends neatly. This step ensures that the flower stays secure and durable when assembled into the necklace. You can create as many flowers as you want, depending on the length and fullness you desire.
Feel free to experiment with different sizes by changing your stitch height or the number of petals. Small flowers offer a delicate, minimal look, while larger flowers create a bold fashion statement. This creative freedom is what makes crochet jewelry special and customizable.
Assembling the Crocheted Flower Necklace
Once the flowers are ready, the next part of the Crocheted flower necklace-Step by Step Tutorial involves assembling the necklace. This step brings all your individual pieces together and forms the final accessory. The assembly process is simple, but attention to detail ensures a clean and polished look.
Start by deciding how long you want your necklace to be. You can create a single strand, multiple layers, or a choker-style design. A basic chain stitch cord works beautifully as the foundation, but you can also use braided yarn or crochet a thicker strap if you prefer. Each style gives the necklace a different aesthetic.
After preparing your necklace base, begin attaching the flowers one by one. You can sew them directly onto the strap using your yarn needle or crochet them into the chain as you work. Sewing gives you more control over spacing, while crocheting them in creates a smooth integrated design. Both methods look lovely.
Consider the spacing between flowers to achieve a balanced arrangement. Some people prefer evenly spaced flowers, while others enjoy clustering several flowers together for a fuller effect. This is your chance to personalize the design to match your taste and creativity.
If you chose to include decorative beads or charms earlier, you can attach them at this stage. They can be placed between flowers or at the ends of the necklace strap. These additions bring a whimsical or elegant touch, depending on your style choices. Small details often make the biggest difference.
Once all elements are in place, check the necklace for any loose threads or uneven attachments. Use your needle to reinforce any weak spots and adjust the flowers as needed. This finishing touch ensures that your necklace is both beautiful and durable.
Try on the necklace to see how it drapes and sits around your neck. You can make small adjustments to length, placement, or decorations at this stage. Enjoy the delightful moment of seeing your creation come to life.
Tips for Personalizing Your Flower Necklace
As you finish the Crocheted flower necklace-Step by Step Tutorial, you may be inspired to personalize your design further. Adding your own creative touches can transform the project into a truly one-of-a-kind accessory. Experimenting with colors, textures, and arrangements can help you express your individuality.
Trying different yarn types is a great way to change the style of your necklace. Cotton gives a clean and classic look, while acrylic or blended yarns can create unique textures. Metallic or sparkly yarns can add a festive touch, making your necklace suitable for special occasions.
You can also personalize your flowers by modifying the petal shapes. Adding more stitches creates fuller petals, while tighter stitches give a more compact appearance. Simple changes like these can completely transform the look of your necklace.
Another fun option is to mix various flower sizes within the same necklace. Smaller flowers can be placed near the ends while larger ones become focal points toward the center. This arrangement adds depth and movement to the accessory.
Color experimentation is one of the best ways to make your necklace stand out. You can create a gradient effect, alternate colors, or keep everything uniform. Each approach brings its own charm and visual impact.
Finally, you can enhance the elegance of your necklace by pairing it with matching crochet earrings or bracelets. Coordinated accessories bring harmony and sophistication to your handmade wardrobe.
About the Crocheted Flower Necklace-Step by Step Tutorial
1. Is this project suitable for beginners?
Yes, this Crocheted flower necklace-Step by Step Tutorial is perfect for beginners because it uses basic stitches and simple assembly steps.
2. How long does it take to complete the necklace?
Most people can complete it in one to two hours, depending on skill level and the number of flowers included.
3. What type of yarn works best?
Lightweight cotton yarn is recommended because it offers good stitch definition and comfort when worn.
4. Can I wash the crocheted necklace?
Yes, but it is best to hand wash it gently to preserve the shape and quality of the flowers.
5. Can I sell necklaces made with this tutorial?
Absolutely. Handmade crochet jewelry is popular, and you can sell your creations as long as you craft them yourself.
6. Can I make the flowers in different sizes?
Yes, adjusting stitch height or petal count allows you to create flowers in multiple sizes.
Conclusion
This Crocheted flower necklace-Step by Step Tutorial has guided you through every stage of creating a delicate and charming crochet accessory.
From gathering materials to forming flowers and assembling the necklace, each step helps build your confidence and creativity in crochet crafting.
By adding personal touches, experimenting with colors, and adjusting the design, you can create a unique piece that expresses your style. If you enjoyed this tutorial, feel free to share your honest opinion and leave suggestions for future projects.