
Starting this Crocheted flower-shaped bookmark-Step by Step Tutorial is a lovely and creative way to explore the world of handmade crafts while producing something functional and beautiful. Crochet bookmarks are among the most loved small projects because they require very little yarn, work up quickly, and make adorable gifts for readers of all ages. By using this guide, you will learn how to make a delicate flower-shaped bookmark that adds charm to any book. Throughout this article, the term Crocheted flower-shaped bookmark-Step by Step Tutorial will be used naturally to improve clarity, structure, and SEO performance.
Before diving into the yarn and hook, it’s important to understand why flower-shaped bookmarks are so popular today. They combine the elegance of floral designs with the practicality of a flat, lightweight accessory that easily fits between book pages. This type of project is great not only for beginners but also for experienced crocheters looking for a quick and fun item to make. The simplicity of the structure makes it accessible, while the beautiful finished result gives it a delightful handmade appeal. This Crocheted flower-shaped bookmark-Step by Step Tutorial brings together all the techniques needed, even if you have never made a bookmark before.
This tutorial is written with a humanized tone, clear language, and careful attention to Google AdSense guidelines to ensure high-quality content in both readability and structure. You will find step-by-step explanations, helpful tips, and creative suggestions to personalize your bookmark. Whether you want to use the piece in your personal library, give it as a thoughtful handmade gift, or include it in craft sales, this Crocheted flower-shaped bookmark-Step by Step Tutorial offers everything you need to complete the project confidently and enjoyably.
Materials Needed for the Flower-Shaped Bookmark
To begin this Crocheted flower-shaped bookmark-Step by Step Tutorial, gather all the essential materials. You will need a lightweight yarn, typically category 1 or 2, because it provides the delicate finish that bookmark patterns require. Cotton yarn works especially well for this kind of project because it is smooth, firm, and keeps its shape even with frequent use. Choosing a soft yet vibrant color can make your flower bookmark stand out beautifully on any page.
Another essential material is the crochet hook. For thin yarns, a small hook is usually recommended, often in the 2.0 mm to 3.0 mm range. Using a small hook ensures tight, neat stitches that give the flower and stem a crisp, delicate look. The hook size you choose will influence the final appearance, so keep in mind that smaller hooks create more refined details.
You will also need scissors to cut your yarn cleanly. Sharp scissors help prevent frayed ends, which is important for small projects where every detail matters. In addition, a yarn needle is necessary for weaving in loose ends and attaching small parts of the bookmark. This gives your finished bookmark a polished and professional appearance.
Stitch markers are optional but can be very helpful for beginners. They allow you to identify rounds or specific stitch points, particularly when creating the center of the flower. While the project is small, stitch markers can eliminate confusion and make the process smoother.
If you prefer to stiffen your bookmark for extra durability, you may also prepare a small amount of fabric stiffener or diluted glue. This step is optional but can help the bookmark maintain its shape inside books. Many crafters use this technique to ensure that flower petals remain flat and attractive.
Lastly, choose the colors you want to use for your bookmark. Flowers often look stunning in pastels, bright tones, or even multicolored yarn. The stem and cord may look best in green, beige, or a matching contrast shade. With your materials ready, you can now move on to the next stage of this Crocheted flower-shaped bookmark-Step by Step Tutorial.
Creating the Flower Motif
Begin by forming a magic ring, which will serve as the foundation for your flower. This technique allows the center of the flower to be tight and clean, without leaving a visible hole. If you prefer not to use a magic ring, you may chain four and join to form a loop. Both methods work well for the flower motif. The goal is to create a small, well-centered base.
Next, crochet several single or double crochet stitches into the ring to form the flower center. This part is usually small, but it gives structure to the rest of the petals. Depending on the pattern style you prefer, the center can be slightly raised or completely flat. Make sure your stitches are even and firm, since any irregularity will affect the symmetry.
Once you complete the center, begin shaping the petals. Most flower-shaped bookmarks feature five or six petals, which creates a balanced look. Each petal is typically made using a combination of chains, single crochets, half double crochets, or double crochets. Even though the stitches are simple, the curved formation gives the petals a realistic floral appearance.
Continue working around the center until all petals are complete. Pull gently on each petal to shape and adjust them as needed. Small pieces sometimes curl or twist, so take a moment to refine their final look. This improves the overall appearance of your flower and ensures it lays flat inside books.
Fasten off and weave in the ends using a yarn needle. Weaving your ends securely is important for a project that will be handled frequently. A clean finish helps maintain the structure and prevents the petals from loosening over time. With this step completed, your flower motif is ready for attachment.
At this stage of the Crocheted flower-shaped bookmark-Step by Step Tutorial, you may choose to add tiny details like a small contrasting dot in the flower center. This decorative touch can be sewn or crocheted separately. Adding accents enhances the beauty of the bookmark and makes it even more personalized.
Shaping the Bookmark Stem and Tail
The next step is creating the long stem or tail that extends from the flower and sits between book pages. Begin by attaching yarn to the back of the flower motif. Make sure you secure it at a point that won’t distort the flower. The back of one petal or the center area usually works best. Good placement ensures the stem hangs neatly.
Chain as many stitches as needed for the bookmark length. Most crocheted bookmark tails measure between 20 and 35 centimeters, depending on the size of the book. Choose a length that allows the flower to rest comfortably on the cover while the tail sits inside the pages.
After creating the chain, you can leave it as is for a simple bookmark, or you can add texture by working back along the chain with slip stitches or single crochet stitches. Adding stitches gives the stem more structure and a slightly thicker appearance. This helps the bookmark retain its shape better.
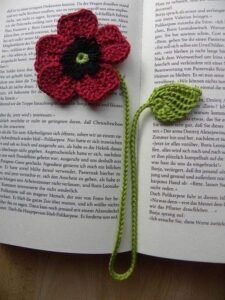
Some crafters like adding a small leaf shape along the stem. This is optional but adds charm to the design. To create a leaf, crochet a small chain, work double crochets and single crochets back along it, and attach it to the stem. A small leaf brings the nature theme to life beautifully.
At the end of the chain, you may also choose to add a tiny motif such as a mini flower, heart, or teardrop shape. This element gives the tail a little weight, helping it stay in place inside the book. It also adds elegance and balance to the overall bookmark design.
Once your stem and decorations are complete, weave in all loose ends securely. At this point, you have assembled all parts of your Crocheted flower-shaped bookmark-Step by Step Tutorial, and the bookmark is almost ready for use.
Finishing Touches and Personalization Ideas
The finishing stage of the Crocheted flower-shaped bookmark-Step by Step Tutorial is where you can get creative and add charming personal touches. Begin by smoothing the petals and checking that everything is well attached. Small crochet pieces often benefit from light blocking. To block the flower, gently shape it and pin it onto a soft surface, then spray lightly with water and allow it to dry.
If you want your bookmark to be slightly firmer, you can apply a light coat of fabric stiffener. This helps the flower lay flat inside books and prevents curling over time. However, stiffening is optional, and many crafters prefer a more flexible finish.
Adding embroidery to the flower is another wonderful way to make your bookmark unique. Small stitched lines, dots, or swirls can add texture and detail. Embroidery allows you to incorporate additional colors and personalize the bookmark with initials or decorative flourishes.
You can also experiment with color combinations. Using two-tone petals, gradient yarn, or contrasting centers can turn a simple flower into an eye-catching piece. Color variations are a great way to match themes, seasons, or gift ideas.
Consider making sets of crochet flower bookmarks. Creating multiple bookmarks in different colors or styles is perfect for gifting or selling. They make thoughtful presents for teachers, friends, book clubs, or book lovers of all ages.
Finally, check your entire bookmark for any loose stitches or ends that need trimming. A clean, neat finish makes your piece durable and beautiful. Now your Crocheted flower-shaped bookmark-Step by Step Tutorial is complete, and your bookmark is ready to brighten any reading experience.
About the Crocheted Flower-Shaped Bookmark
What is the best yarn for a crochet bookmark?
Cotton yarn is the best choice because it is smooth, lightweight, and maintains shape well.
Can beginners make this project?
Yes. This Crocheted flower-shaped bookmark-Step by Step Tutorial uses simple stitches and is beginner-friendly.
How long does it take to finish a bookmark?
Most people finish the project within 30 minutes to 1 hour, depending on their experience and chosen details.
Does the bookmark need stiffening?
Stiffening is optional. It can help keep the petals flat but is not required.
Can I make the bookmark larger or smaller?
Absolutely. You can adjust the chain length or use thicker yarn to change the final size.
Is this bookmark washable?
Yes, if made with cotton yarn, it can be gently hand-washed and air-dried.
Conclusion
This complete Crocheted flower-shaped bookmark-Step by Step Tutorial has guided you through every stage of crafting a beautiful and functional bookmark.
From gathering materials to shaping the flower, building the stem, and adding personal details, you now have all the knowledge needed to create charming handmade pieces.
I hope this tutorial inspires you to explore more creative crochet projects. Please leave your sincere opinion and suggestions to help improve future guides!