
Crocheted Harry Potter mittens-Step by Step Tutorial is a charming and creative project for fans who love both crochet and the magical universe of wizards. By using the theme of the Hogwarts houses and iconic colors, these mittens become more than just winter accessories—they transform into sentimental pieces that represent imagination, warmth, and nostalgia. Throughout this guide, we will explore the process of making Crocheted Harry Potter mittens-Step by Step Tutorial, ensuring the instructions are clear and enjoyable. Whether you are a beginner or already experienced in crochet, this project is accessible and deeply fulfilling.
Creating themed crochet pieces is a beautiful way to express personality through handmade art. Mittens, in particular, are functional and comforting accessories that protect your hands while allowing you to show off your personal style. The Crocheted Harry Potter mittens-Step by Step Tutorial focuses on crafting cozy mittens that feature recognizable color patterns inspired by Gryffindor, Slytherin, Hufflepuff, or Ravenclaw. You may choose the house that best represents your personality or make different pairs as thoughtful gifts. Handmade items always carry emotional value, making these mittens perfect for birthdays, holidays, or simply as a cozy winter project.
This tutorial embraces creativity, color selection, stitch repetition, and shaping techniques. You will learn how to measure the hand for proper mitten sizing, select the appropriate yarn type, and apply specific crochet stitches to shape the cuff, palm, and thumb sections. If you enjoy crafting accessories that feel meaningful and personal, this Crocheted Harry Potter mittens-Step by Step Tutorial will be a delightful experience. The final piece can be used daily or added to a themed costume for events, gatherings, or simply enjoying stories and movies during the cold season.
Materials and Color Selection
Choosing the right materials is the first and most essential step in the Crocheted Harry Potter mittens-Step by Step Tutorial. Since mittens are meant to be warm and comfortable, the yarn selection should focus on softness, durability, and comfort. Medium-weight acrylic or wool-blend yarn is an excellent choice, as it provides insulation and elasticity. These yarns hold their shape well and offer various color options that align perfectly with the house-inspired themes.
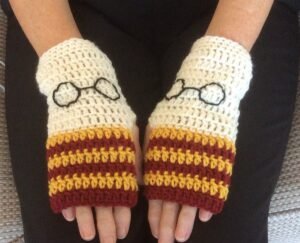
To match the Harry Potter aesthetic, you will select colors corresponding to the four Hogwarts houses. For Gryffindor, choose burgundy and gold tones. Slytherin calls for dark green and silver or gray. Hufflepuff is symbolized by warm yellow and black accents. Ravenclaw traditionally features deep blue with bronze, but many designs use blue and silver as an alternative. These contrasting colors create striking stripes and recognizable visual patterns that instantly connect with the theme.
In addition to yarn, you will need a crochet hook that matches the yarn weight, usually between 4.0mm and 5.5mm. A yarn needle will be important for weaving in ends and assembling smaller elements of the mittens. Scissors, stitch markers, and a measuring tape help keep your progress neat and accurate. Each tool plays an important role in maintaining even stitches and shaping.
Gauge is also important, especially for wearable items. Creating a small test swatch helps ensure your mittens will not turn out too tight or too loose. Adjusting hook size is a simple way to correct stitch density. Soft, well-fitted mittens feel much more comfortable and flattering on the hands.
Finally, it can be helpful to have a reference photo or color layout for the stripes and design placement. Even though creativity is encouraged, planning color transitions allows your project to look clean and intentional. Taking time to prepare makes the crafting process smoother and much more enjoyable.
Crocheting the Cuff and Hand Section
The cuff is the foundation of your Crocheted Harry Potter mittens-Step by Step Tutorial, as it determines the fit and comfort of the mitten. The cuff is usually worked in rows using slip stitches or half double crochet through the back loop, which creates elasticity. Elastic cuffs ensure the mittens stay snug around the wrist and trap warmth effectively during cold weather.
Once the cuff is complete, you will join the ends to form a loop. This marks the transition to crocheting in the round. The hand section begins with simple stitches worked evenly around the cuff. Most mitten designs use half double crochet or single crochet stitches, as they provide warmth and structure due to their tighter stitch pattern.
As you work upward, you can begin incorporating the signature stripe patterns. For example, you may work three rounds of one color followed by two rounds of another. Consistent stripe repetition is key to achieving a recognizable house-themed design. Switch colors slowly and weave the yarn into the project to avoid loose strands inside the mitten.
Shaping the mitten to match the curve of the hand requires gradual increases or maintaining even stitch count depending on the desired fit. Ensure that your work remains flat and even. Counting stitches throughout helps avoid accidental widening or tightening of the mitten shape. The mitten should fit comfortably without being too tight, allowing the fingers to move freely.
As you approach the area where the thumb will be, you will create a small opening. This can be done using a chain space or skipping several stitches before continuing. This opening will later be used to build the thumb section. Finishing the hand portion before adding the thumb helps establish shape and structure.
Once the hand section reaches the desired length, finish off with a clean round and prepare for the thumb. Make sure to try the mitten on occasionally during the process to ensure comfort and proper fit. Adjustments are easier to make early rather than after the mitten is complete.
Crocheting the Thumb
The thumb is a unique and important part of the Crocheted Harry Potter mittens-Step by Step Tutorial because it adds movement and functionality to the mitten’s structure. To begin, attach yarn at the opening you created earlier. Work stitches evenly around the opening, ensuring consistent spacing to avoid holes or uneven edges.
Crochet in rounds to create a cylindrical shape that fits comfortably around the thumb. Use shorter stitches like single crochet to achieve a dense, warm texture. The thumb does not require shaping unless a more tapered look is desired. Continue working until the thumb comfortably covers up to the knuckle or beyond, depending on your preference.
Color accents can also be added to the thumb, though many designs choose to match the primary hand color to maintain visual flow. If you do choose to add stripes, keep them minimal to avoid a cluttered look. Small accents are often more effective in themed projects.
Once the length is complete, reduce stitches gradually to close the top of the thumb. Finish by pulling the yarn tightly and weaving in the end securely. This prevents unraveling and gives the thumb a clean and professional finish.
Repeat the same steps for the second mitten. Be sure to follow the same measurements and stitch counts to maintain symmetry. Having two mittens that match visually and functionally enhances the overall aesthetic and usability of the project.
Take your time on the thumb portion—it may be small, but it is essential for comfort and ease of use. A well-made thumb ensures the mittens feel natural while wearing and allows for smooth hand movement.
Adding Decorative Finishing Touches
The final part of the Crocheted Harry Potter mittens-Step by Step Tutorial involves personalizing and embellishing your creation. Small decorative touches enhance the theme and make your mittens even more expressive. One idea is to embroider small initials, such as “HP,” or symbols like stars or lightning shapes, using contrasting yarn.
You may also add fringes at the cuff edge, though this is optional. If you want the mittens to closely resemble iconic scarf themes, fringe-like texture can evoke that style beautifully. Another option is adding small decorative buttons that reflect magical themes, such as stars or owls.
If you want the mittens to be extra cozy, brush the surface lightly with a yarn brush to fluff the fibers. This gives a soft, warm texture similar to wool or fleece. However, be gentle to avoid pulling stitches loose.
Make sure to weave in all yarn ends thoroughly and trim any excess. A tidy finish contributes to durability and ensures your mittens withstand regular wear and washing. Hand-washing is usually best for maintaining shape and texture.
Finally, take a moment to admire your work. You have created something unique, personal, and filled with meaning. These mittens are more than an accessory—they are a reflection of creativity and imagination.
FAQ
Are these mittens suitable for beginners?
Yes, as long as you are familiar with basic crochet stitches and working in the round.
What yarn should I use?
Medium-weight acrylic or wool-blend yarn works best for warmth and comfort.
How do I choose the correct size?
Measure the widest part of the hand and adjust stitch count accordingly.
Can I make these mittens for children?
Yes, simply reduce stitch counts to match smaller hand measurements.
Can I wash these mittens?
Hand-washing is recommended to keep the shape and maintain the yarn’s softness.
Conclusion
Throughout this Crocheted Harry Potter mittens-Step by Step Tutorial, you have learned how to choose materials, crochet the cuff and hand section, create the thumb, and add personal decorative details.
This project combines style, warmth, and creativity, resulting in mittens that are both practical and meaningful. I hope this tutorial has inspired you to make your own themed mittens or gift them to someone special.
Please leave your sincere opinion and suggestions. Your feedback is very important and helps improve future tutorials.