
If you are a crochet lover looking for a fun, cute, and versatile project, this Crocheted llama applique – Step by Step Tutorial is exactly what you need! Appliques are small, charming crochet pieces that can be used to decorate blankets, hats, bags, or even clothes. The llama, with its adorable expression and fluffy texture, is one of the most popular crochet motifs. In this tutorial, we’ll walk you through how to make your own crocheted llama applique from start to finish, perfect for beginners and experienced crocheters alike.
The beauty of this project is that it combines creativity, relaxation, and practicality. Making a crocheted llama applique allows you to explore different yarn textures and colors while practicing essential crochet stitches. You can personalize your llama with unique accessories like a mini saddle, colorful tassels, or tiny pom-poms to give it that traditional Andean flair. This tutorial will guide you through every detail, ensuring that you can confidently create a lovely llama applique for your projects.
Before you begin, gather your materials. You’ll need cotton or acrylic yarn in shades of white, beige, or brown for the body, and a variety of bright colors for decorations. A small crochet hook—typically between 2.5mm to 3.5mm—will help you achieve neat stitches and fine details. Remember to have scissors, a yarn needle, and some patience handy. Once you have everything ready, follow this Crocheted llama applique – Step by Step Tutorial and prepare to fall in love with your handmade masterpiece.
Materials and Preparation
To start this Crocheted llama applique – Step by Step Tutorial, make sure you have all the right materials prepared. Choosing the right type of yarn is essential for achieving a fluffy, defined look. Soft cotton or acrylic yarns are perfect because they’re easy to work with and maintain shape. Select neutral tones for the llama’s body and bright, cheerful colors for the decorative parts to create contrast and make your applique stand out.
You’ll also need a matching crochet hook size for your yarn. A 3mm hook is ideal for medium-weight yarns, while a smaller hook gives tighter, more defined stitches. For beginners, a slightly larger hook might make handling easier. Keep your tools close—scissors for cutting yarn, a tapestry needle for weaving ends, and maybe some stitch markers to keep track of your progress.
Before you start crocheting, create a small sample swatch. This helps you check your tension and stitch consistency. A consistent tension ensures your crocheted llama applique has smooth edges and doesn’t warp. Remember that appliques are often attached to other items, so maintaining proportion is key.
Now, plan your llama’s look. Do you want a traditional white llama or a colorful, whimsical one? Sketching or visualizing your llama before starting helps you decide where each color will go. Customizing your design adds personality to your project and makes it one of a kind.
If you’re planning to make several appliques, it’s helpful to cut small yarn pieces for each section in advance. This saves time and keeps your workspace tidy. Llamas look great in different color variations, so feel free to experiment!
Finally, ensure good lighting and a comfortable workspace. Crocheting smaller pieces requires attention to detail, so a bright, well-lit environment helps prevent eye strain and allows you to enjoy your crafting session even more.
Step-by-Step Crochet Process
Now comes the exciting part of this Crocheted llama applique – Step by Step Tutorial—actually crocheting your llama! Start with the body, which forms the foundation of your applique. Make a magic ring and crochet a few single crochet stitches to form the center. Gradually increase in each round until you have a flat, oval-shaped piece that resembles the llama’s body. Adjust the number of rows depending on your desired size.
Next, crochet the neck and head. Chain a few stitches from the top of the body, then work up in single crochet to shape the neck. The head can be made by crocheting a small oval or circular shape and attaching it to the neck. Use light increases and decreases to shape the snout and forehead gently.
After completing the main body, move on to the ears. Chain a few stitches and make small triangles with single and double crochets. Sew or crochet them onto the top of the head. Llama ears are slightly pointed, so don’t worry if they stand out—it adds character!
For the legs, make short chains and work a few rows of single crochet. These legs can be simple or textured, depending on your preference. Attach them evenly to the bottom of the body. Remember, symmetry makes your applique more polished.
The tail is easy—just a few stitches in a small curved shape attached to the back. A slightly fluffy yarn or a fringe-style tail gives it an adorable, soft appearance.
Finally, add facial details using embroidery. Use black yarn for the eyes and mouth. A tiny white stitch in the eye area adds a cute sparkle. Once done, you’ll already see your crocheted llama applique come to life!
Adding Decorations and Finishing Touches
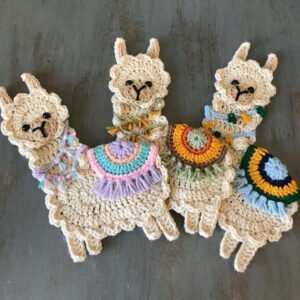
A Crocheted llama applique – Step by Step Tutorial wouldn’t be complete without some colorful embellishments. This is where your creativity shines. Llamas are often depicted wearing decorative saddles and vibrant tassels. Start by crocheting a small rectangle or semicircle in bright colors to create the saddle. Use simple stitches like single crochet and double crochet for structure.
Attach the saddle to your llama’s back using small, invisible stitches. You can add a second layer of contrasting color on top for depth. To make tassels, cut short yarn strands and tie them together, attaching them around the neck or saddle edges. The bright pops of color will give your applique a playful and lively look.
For even more detail, you can add miniature pompoms or beads. However, if you’re using your llama applique on a baby item or children’s accessory, avoid small detachable pieces to ensure safety. Instead, embroider small colored circles to mimic pom-poms.
If you want a traditional Andean touch, add small chains or braided yarn pieces around the neck to resemble a festive collar. This adds authenticity and makes your crocheted llama applique look handcrafted and culturally inspired.
Once all the decorations are attached, check the overall balance. Adjust any pieces that might look uneven. Use your yarn needle to weave in all loose ends neatly from the back. A clean finish is crucial to ensure your applique looks professional and lasts longer.
To finish, gently block your applique by pinning it on a flat surface and spraying it lightly with water. Let it dry completely. This step helps smooth out stitches and enhances the shape of your lovely llama.
Creative Uses for Your Llama Applique
Now that your crocheted llama applique is ready, it’s time to think about how to use it creatively! These appliques can be attached to a wide range of projects, adding charm and texture to everyday items. You can sew them onto tote bags, denim jackets, or even decorative pillows to give them a handmade touch.
For those who enjoy home décor, consider using the llama applique on wall hangings or framed art. A group of llamas in different colors can make a stunning and cheerful wall display. You can even glue them onto a canvas background for a modern, artistic look.
If you enjoy making gifts, crochet several llama appliques and attach them to cards, bookmarks, or baby blankets. Handmade gifts carry a special emotional value, and your crocheted llama applique will surely impress anyone who receives it.
For festive occasions, use your appliques as ornaments. Add a small loop of yarn to the top and hang them on Christmas trees or garlands. The colorful llamas bring warmth and playfulness to seasonal décor.
Another creative idea is to turn your applique into a brooch or keychain. Attach a small pin or keyring on the back using hot glue or stitching. This transforms your craft into a portable piece of art that showcases your crochet skills.
No matter how you use it, your crocheted llama applique will stand out as a symbol of creativity, patience, and artistic expression.
Crocheted Llama Applique
1. What type of yarn is best for a crocheted llama applique?
Cotton yarn is ideal because it holds shape well and provides a clean, crisp finish. However, acrylic yarn is also a great choice for beginners since it’s affordable and easy to handle.
2. Can I make the applique larger or smaller?
Yes, simply adjust your hook size or use thicker/thinner yarn. You can also add or reduce the number of rounds in the body and head.
3. How long does it take to make a crocheted llama applique?
For most crocheters, it takes about one to two hours to complete, depending on your experience and the level of decoration.
4. Can beginners follow this Crocheted llama applique – Step by Step Tutorial?
Absolutely! This tutorial is designed to be beginner-friendly, with simple stitches and easy-to-follow steps.
5. How can I attach the applique to other projects?
You can sew it using a yarn needle or glue it with fabric glue. Sewing provides better durability for washable items.
6. How do I keep the applique clean?
Hand washing with mild detergent is best. Avoid harsh chemicals and always air dry to maintain its shape and texture.
Conclusion
Creating a Crocheted llama applique is not only a delightful craft activity but also a way to express your creativity through yarn and color.
This Step by Step Tutorial has guided you through every stage—from gathering materials and crocheting the main parts to decorating and finding creative uses for your applique. Whether you use it for personal accessories, gifts, or home décor, your handmade llama will bring a touch of charm and uniqueness to any item.
We hope this tutorial has inspired you to grab your crochet hook and start crafting! If you enjoyed learning this Crocheted llama applique – Step by Step Tutorial, please leave your honest opinion and share your suggestions for future tutorials. Your feedback helps make every project even more creative and enjoyable!