
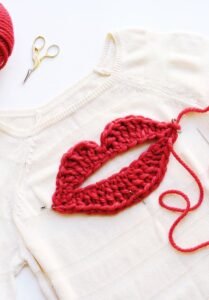
Creating a crocheted mouth for applique–Step by Step Tutorial is a wonderful way to add charm, personality, and expression to your handmade projects. Whether you are decorating amigurumi dolls, children’s accessories, decorative banners, or themed items, learning how to crochet a small mouth is both simple and fun. In this article, you will find a complete and well-structured guide focused on helping beginners and experienced crafters alike. Throughout the text, the main keyword crocheted mouth for applique–Step by Step Tutorial will appear naturally to improve SEO and readability.
Before diving into the instructions, it is important to understand why this technique is so valuable for your crafting journey. A small crocheted mouth can transform an ordinary piece into something truly expressive. With just a few stitches, you can create smiles, surprised expressions, or even themed faces for festive projects. This crocheted mouth for applique–Step by Step Tutorial was designed to make the process simple, practical, and accessible for all skill levels.
The popularity of appliqué crochet has grown significantly in recent years, especially among those who enjoy personalizing handmade items with charming finishing touches. This guide provides a detailed and clear explanation, helping you master this delightful technique while keeping the content easy to follow. You will find tips, steps, and creative ideas to use the crocheted mouth for applique–Step by Step Tutorial in many types of projects. Now, let’s begin this craft journey together.
Understanding the Basics of a Crocheted Mouth for Applique
Creating a crocheted mouth for applique starts with choosing the appropriate yarn and hook size. Thinner yarns tend to produce delicate and refined results, which work beautifully for small appliqués. Beginners often opt for cotton yarn because it holds shape well and provides a clean, polished look. Throughout this section, you will see how important proper material selection is to the success of your project.
The shape of the mouth varies based on the look you want to achieve. A simple curved smile is perfect for friendly or whimsical characters. A small oval shape can be ideal for animal-themed appliqués. In this Step by Step Tutorial, you will learn how to crochet different mouth shapes by adjusting only a few stitches and rows, making this technique extremely versatile and user-friendly.
Another important detail is tension. Maintaining even tension gives your crocheted mouth a smooth, symmetrical appearance. If you are new to crochet, practicing simple chain and slip stitches will help you prepare for the shaping steps in this tutorial. Each mouth design relies on basic stitches, making this guide suitable for all experience levels.
Before starting, think about the final placement of your appliqué. For instance, a crocheted mouth used on a plush toy requires secure sewing, while a mouth used on flat fabric can be lightly stitched onto the surface. This crocheted mouth for applique–Step by Step Tutorial explains precisely how to attach your appliqué professionally and neatly.
Choosing the ideal colors also plays a big role. Traditional red or pink shades are often used, but you can personalize your creation with neutral colors, pastels, or even vibrant tones for themed characters. The color selection can enhance the personality expressed through the appliqué, transforming simple projects into unique handmade treasures.
Finally, understanding the overall function of your appliqué helps you decide the best size and stitch technique. Small items benefit from minimalistic mouths, while larger crafts may require bigger, more expressive shapes. This tutorial will walk you through both small and medium-sized versions to help you build confidence in your crochet skills.
Step by Step Tutorial: How to Crochet a Simple Mouth
The first step in the crocheted mouth for applique–Step by Step Tutorial is to create a foundation chain. The number of chains determines the width of the mouth shape. Start with six to eight chains if you want a small smile, or increase the number for a wider expression. The chain acts as the base from which you will shape the curve.
Once the chain is complete, you will begin forming the curve by working slip stitches and single crochets. Slip stitches create a smooth, clean edge, while single crochets help shape the center. These stitches work together to build a natural smile-like curve that holds well when attached to any project.
Next, you will work back along the chain to strengthen the shape. This step ensures that your crocheted mouth remains firm and does not lose its curve over time. Small appliqués must be secure and stable, especially when used on children’s items or decorative pieces that receive frequent handling.
The following step involves hiding the ends neatly. Using a small tapestry needle, weave the ends into the back of the mouth shape to keep the front clean and polished. Leaving long tails can help in later sewing, making it easier to attach the appliqué securely onto the final item.
You may also block the mouth lightly if needed. Blocking helps smooth out stitches and enhances symmetry. Most small appliqués require only minimal shaping—just flattening with fingers or placing them under a heavy book for a short time. The blocking process supports the professional finish expected from the crocheted mouth for applique–Step by Step Tutorial.
To complete the mouth, inspect the curve and check for symmetry. A well-made mouth should have a balanced arc and even stitches. Small imperfections are natural and often add charm, especially on handmade items. With practice, your stitches will become more precise, making your appliqués look beautifully crafted every time.
How to Attach Your Crocheted Mouth to Any Project
After completing your crocheted mouth for applique, attaching it securely is the next important step. Proper attachment ensures that your appliqué stays in place and maintains its shape. Begin by positioning the mouth where you want it on your project surface and adjusting until the curve looks natural.
Using a tapestry needle threaded with a matching yarn tail, stitch small, invisible loops around the edge of the mouth. Take your time to make the stitches even and discreet. This gives your appliqué a professional finish that blends seamlessly with the rest of your project.
If you are adding the crocheted mouth to amigurumi or stuffed animals, place a finger behind the fabric to stabilize it while you sew. This prevents stretching and keeps the shape consistent. Soft surfaces require gentle tension to avoid distorting the appliqué during the sewing process.
For flat fabric items like blankets, towels, or clothing, consider using backstitching for extra durability. Backstitching ensures that the appliqué stays securely attached even after multiple washes. This technique is especially recommended for frequently used items.
You may also adjust the expression slightly while sewing. If the mouth needs a deeper curve or a slight tilt, you can manipulate its position subtly. This allows you to personalize the final look, making your handmade piece unique and expressive.
Once fully attached, gently pull the surrounding fabric to check for tightness and stability. A properly sewn appliqué should lay flat, maintain its shape, and blend smoothly. This final check completes the attachment stage of the crocheted mouth for applique–Step by Step Tutorial.
Creative Ways to Use Your Crocheted Mouth Appliqué
One of the most exciting aspects of learning the crocheted mouth for applique–Step by Step Tutorial is discovering the variety of creative uses. This small detail can bring characters to life, making each project visually appealing and full of personality. From toys to clothing, the possibilities are endless.
You can use the crocheted mouth on amigurumi animals, giving them cheerful expressions that children love. A simple curved smile can turn a basic plush toy into something adorable and memorable. Adding embroidered eyes alongside the mouth can create a complete face.
Another great use is decorating children’s accessories such as bags, hats, or pencil cases. Adding a crocheted mouth turns everyday items into fun and lively pieces that stand out. Kids especially enjoy accessories that feature expressive character faces.
Seasonal decorations also benefit from crocheted appliqués. For instance, holiday figures, themed banners, and festive ornaments can become more charming when you add a fun, expressive mouth. This technique allows you to personalize every decoration in a unique handmade style.
Home textiles like pillows and blankets are perfect surfaces for mouth appliqués too. A cozy pillow with a cute face can brighten up any room, giving a touch of personality to your home décor. Handmade details like these are also popular gift ideas.
Finally, you can use multiple mouth shapes to create a set of different expressions. This is especially useful for educational crafts, children’s storytelling projects, or decorative wall hangings. By mastering this crocheted mouth for applique–Step by Step Tutorial, you will be able to design expressive and delightful pieces for any purpose.
Crocheted Mouth for Applique
1. What materials do I need to make a crocheted mouth for applique?
You will need yarn, a crochet hook sized for your yarn, scissors, a tapestry needle, and optionally a stitch marker or blocking tools.
2. What crochet stitches are used in the mouth tutorial?
Most designs use chain stitches, slip stitches, and single crochets. These simple stitches provide clean shaping and are easy for beginners.
3. How do I keep the mouth from curling?
Maintaining even tension and working stitches carefully helps prevent curling. You can also lightly block the mouth for a smooth finish.
4. Can I use acrylic yarn instead of cotton?
Yes, acrylic works well, though cotton usually provides a sharper and cleaner look. Use whichever yarn you prefer.
5. What projects can I decorate with a crocheted mouth appliqué?
You can use it on amigurumi, children’s accessories, clothing, pillows, blankets, and seasonal decorations.
6. How do I attach the mouth securely?
Sew it using a tapestry needle and matching yarn, making small and discreet stitches around the edge.
7. Can I make different mouth shapes?
Absolutely. Adjusting the number of chains or stitches allows you to create smiles, ovals, or expressive curves.
8. Are crocheted mouths washable?
Yes, if attached securely. Items should be washed gently to maintain shape and longevity.
Conclusion
This crocheted mouth for applique–Step by Step Tutorial has guided you through everything you need to create expressive, charming appliqués for your handmade projects.
You learned how to choose materials, crochet different mouth shapes, attach them properly, and explore creative uses.
These small details bring character and joy to your creations, making each project unique and meaningful. I hope this tutorial inspires you to create many beautiful pieces. Please leave a sincere opinion and share suggestions on what you would like to learn next!