
If you are looking for a fun, practical, and stylish crochet project, a crocheted mug cover decoration – step by step tutorial is the perfect idea to explore. These cozy little covers not only make your mugs look charming but also keep your drinks warm for longer. With simple stitches and creative touches, you can transform an ordinary cup into a personalized piece of art.
Crocheted mug covers are also fantastic handmade gifts for friends, family, or even as items to sell at craft fairs. They are quick to make, don’t require a lot of yarn, and can be customized in countless colors, patterns, and styles. Whether you want a festive holiday mug cozy, a cute heart design for Valentine’s Day, or a rustic pattern for daily use, the options are endless.
In this crocheted mug cover decoration – step by step tutorial, we will go through every detail you need to create your own cozy. From choosing yarn and hooks to understanding stitches and finishing touches, you’ll learn how to make a practical accessory that adds both beauty and function to your favorite mug. By the end, you will feel confident enough to design your own unique mug covers.
Materials Needed for a Crocheted Mug Cover Decoration
The first step in any crochet project is gathering the right materials. For a crocheted mug cover decoration – step by step tutorial, the supplies are simple and easy to find, making it an excellent beginner-friendly project. You won’t need a large budget or advanced tools, just a few basics to get started.
You will need medium-weight yarn, which is often recommended for mug cozies because it provides enough thickness to insulate the cup. Cotton yarn is a great choice since it absorbs moisture and is washable. Acrylic yarn also works well if you want a softer feel and brighter colors. Choosing the right yarn can make a big difference in the final look of your project.
Next, you’ll need a crochet hook. For most mug cozies, a size H/8 (5mm) or G/6 (4mm) works perfectly. The hook size can be adjusted depending on how tight or loose you crochet. Beginners may prefer a slightly larger hook to make the stitches easier to see and handle.
Don’t forget scissors and a yarn needle for finishing off your work. The yarn needle helps you weave in loose ends neatly, ensuring your mug cover looks professional. Some people also like to add buttons or decorative elements, which require a needle and thread to attach.
Finally, it is helpful to have a mug handy while you crochet. This allows you to check the fit of your cozy as you work. Mugs come in different shapes and sizes, so having the actual cup nearby ensures that your crocheted mug cover decoration will fit perfectly.
By preparing all materials before you begin, you will have a smooth and enjoyable crocheting experience without interruptions. Now, let’s move to the actual crochet process and learn how to bring your mug cover to life.
Step by Step Tutorial for Crocheted Mug Cover Decoration
Now that you have your materials ready, it’s time to dive into the crocheted mug cover decoration – step by step tutorial. This process is simple, beginner-friendly, and rewarding. Even if you are new to crochet, you’ll be amazed at how quickly this project comes together.
The first step is to create a foundation chain that measures the height of your mug. For most mugs, this will be around 25–35 chains, depending on your yarn and hook size. Once you have your chain, add one or two extra chains to begin your first row of single crochet. This will form the base of your mug cozy.
Next, continue working rows of single crochet stitches until the piece wraps comfortably around your mug. Be sure to check the fit frequently. If your mug is wider at the top than at the bottom, you may need to adjust the number of stitches in certain rows to ensure a snug fit. This flexibility is one of the great advantages of crochet.
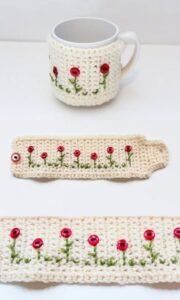
After reaching the desired length, you can add decorative stitches. For example, double crochet or half double crochet stitches can create texture and variety. Some people like to add stripes, while others incorporate small motifs such as hearts, stars, or flowers. These little details make your crocheted mug cover decoration unique.
To finish, leave a small opening or add a button closure to make it easier to put the cover on and off your mug. Simply crochet a loop on one side and sew a button on the opposite side. This closure not only makes your cozy functional but also adds a cute decorative element.
Once completed, weave in all loose ends using your yarn needle. Give your cozy a quick steam or wash to help the stitches settle. Now, your mug cover is ready to use, display, or gift!
Creative Ideas to Personalize Your Mug Cover
One of the most exciting parts of a crocheted mug cover decoration – step by step tutorial is personalization. Since this project is quick and small, you can experiment with colors, patterns, and styles without much risk. This makes it a fantastic project to practice your creativity.
You can use seasonal colors to make mug covers for different occasions. For example, red and green yarns are perfect for Christmas, while pastel shades work beautifully for spring and Easter. A mug cozy in warm autumn tones can also bring a cozy vibe to your morning coffee.
Adding appliqués is another way to personalize your mug cover. Small crochet flowers, animals, or symbols can be sewn onto the cozy to make it truly one-of-a-kind. You can even embroider initials or small words onto the cover, making it an excellent personalized gift idea.
Experiment with textures as well. Instead of just using single crochet stitches, try shell stitches, bobble stitches, or ribbing. These patterns give the mug cover more visual appeal and make it stand out.
For a more practical touch, some crocheters like to add a handle opening to their mug cover. This way, you can still comfortably hold your mug without removing the cozy. Simply leave a small gap when working your rows, then continue crocheting above the gap to create space for the handle.
Don’t be afraid to mix yarn types either. Combining cotton with metallic or textured yarns can result in stunning effects. The key is to experiment until you find a look that you love. With so many possibilities, every crocheted mug cover decoration can be different.
Benefits of Using a Crocheted Mug Cover
Beyond being stylish, a crocheted mug cover decoration – step by step tutorial also brings practical benefits. These cozy covers are more than just a pretty accessory; they serve several useful functions that make them worth creating and using.
First, they help keep drinks warm for longer. The yarn acts as an insulator, preventing heat from escaping quickly. Whether you enjoy coffee, tea, or hot chocolate, your drink will stay warmer compared to a plain mug.
Second, they protect your hands from very hot surfaces. If your mug gets too hot to touch, the crochet cover acts as a barrier, allowing you to hold it comfortably without burning your fingers.
Third, they can prevent condensation from cold drinks. If you use your crochet cover for iced beverages, it will absorb moisture and prevent water rings from forming on your table.
Another benefit is the opportunity to upcycle. Old yarn scraps can be transformed into beautiful mug covers, reducing waste and encouraging sustainable crafting. Since mug cozies don’t require much yarn, they are perfect for leftover pieces from other projects.
Additionally, mug covers make excellent gifts. Handmade items always carry sentimental value, and a cozy mug cover shows thoughtfulness and care. They are affordable, quick to make, and customizable for any personality or event.
Lastly, crocheting mug covers is a great way to relax and practice your skills. The repetitive stitches are soothing, and the small size of the project ensures you see results quickly. This makes it a rewarding project for both beginners and advanced crocheters alike.
FAQ About Crocheted Mug Cover Decoration
1. Can beginners make a crocheted mug cover decoration?
Yes, this is a perfect project for beginners because it mainly uses basic stitches like single crochet. It’s simple, quick, and a great way to practice.
2. How long does it take to complete one mug cover?
On average, a mug cover can be completed in one to two hours, depending on your skill level and chosen design.
3. What type of yarn is best for mug covers?
Cotton yarn is often the best choice since it is durable, washable, and absorbs moisture well. Acrylic yarn can also work if you prefer brighter colors.
4. Can I wash my crocheted mug cover?
Yes, most mug covers can be washed gently by hand or on a delicate machine cycle. Be sure to check your yarn label for specific washing instructions.
5. Do mug covers fit all mugs?
Not all mugs are the same size, so it’s best to measure your mug as you crochet. Adding a button closure can also make the cover more adjustable.
6. Can I sell crocheted mug covers?
Absolutely. Handmade mug covers are popular items at craft fairs, online shops, and as custom gift orders. They are affordable to make and highly marketable.
Conclusion
In this crocheted mug cover decoration – step by step tutorial, we explored everything you need to know about making your own cozy mug covers. From choosing materials to following the crochet steps, adding personal touches, and enjoying the many benefits, this project is both fun and practical.
Whether you are creating a gift, decorating your home, or practicing your crochet skills, a mug cover is a rewarding project with endless possibilities. Now that you have the knowledge, it’s time to pick up your yarn and hook and start creating your own.
I would love to know what you think about this tutorial. Leave your honest opinion and suggestions so we can keep improving and sharing more inspiring crochet ideas together!