
Crocheted piano scarf-Step by Step Tutorial is a charming and creative project that perfectly combines style, warmth, and a touch of musical personality. This scarf is designed to resemble the elegant layout of piano keys, making it a thoughtful accessory for musicians, music lovers, or anyone who enjoys unique handmade clothing. The process of following the Crocheted piano scarf-Step by Step Tutorial is relaxing and enjoyable, and the finished piece can be worn during colder seasons or gifted to someone special. By learning how to crochet this distinctive scarf, you not only create something beautiful but also practice valuable crochet techniques that strengthen your overall skills.
Before beginning the Crocheted piano scarf-Step by Step Tutorial, it is important to understand that this project is suitable for both experienced crocheters and enthusiastic beginners. The stitches involved are primarily basic and repetitive, which makes the process comfortable and meditative. Even if you are just starting your crochet journey, you will find that the pattern becomes familiar quickly. The key is to work at your own pace and enjoy watching the design develop row by row. One of the most satisfying parts of crocheting a piano scarf is seeing the contrast between the dark and light yarn form the iconic piano pattern.
This scarf is not only visually appealing, but it also carries meaning. Music often evokes memories, inspiration, and emotion, and creating a wearable piece that represents music adds a personalized touch to your wardrobe. The Crocheted piano scarf-Step by Step Tutorial guides you in making an accessory that feels personal and expressive. Whether you choose to keep the finished scarf for yourself or gift it to someone, it will certainly become a meaningful and cherished piece. The handmade nature of this project also makes it an eco-friendly and customizable alternative to store-bought scarves.
Materials Needed to Begin the Project
To start the Crocheted piano scarf-Step by Step Tutorial, you will need a few simple materials. Selecting the right yarn is essential to achieving the smooth contrast of the piano key design. Typically, you will need black and white yarn, though you may choose off-white or cream for a softer, vintage appearance. Acrylic or cotton yarn works well because it is comfortable, long-lasting, and easy to work with. Make sure the yarn is of the same weight for both colors, so the scarf maintains even thickness.
You will also need a crochet hook that matches the recommended size for your chosen yarn. If the yarn label suggests a specific hook size, it is helpful to follow that recommendation. Using the appropriate hook ensures your stitches will be neat and consistent. A hook that is too small can make the scarf stiff, while a hook that is too large can create loose and uneven stitches. Ensuring proper tension helps the finished scarf look clean and professional.
A pair of scissors will be needed to cut yarn when changing colors or finishing sections of the scarf. Sharp scissors make the process easier and help avoid fraying. In addition, a yarn needle is important for weaving in loose ends once the scarf is complete. Taking time to weave ends carefully contributes to the durability and polished appearance of the finished project.
Because this pattern involves frequent color changes, stitch markers may also be helpful. They allow you to keep your place easily and maintain symmetry across the length of the scarf. While they are optional, many crocheters find them useful when working on patterned projects. If you want to add personal expression to your scarf, you might also consider embellishments such as borders or tassels.
Finally, ensure you have enough workspace and good lighting. Good lighting makes it easier to see stitches clearly, especially when working with darker yarns such as black. Preparing your materials and environment ahead of time allows you to enjoy the crocheting process more comfortably.
Understanding the Stitches Used in the Project
The Crocheted piano scarf-Step by Step Tutorial primarily uses basic crochet stitches, making it suitable for crocheters of various skill levels. One of the most important stitches for this scarf is the chain stitch, which forms the foundation row. Practicing consistent tension while chaining helps create a smooth and even starting point for the scarf. Keeping this foundation neat contributes greatly to the overall shape.
The single crochet stitch is the main stitch used throughout the scarf. It creates a firm, dense texture, making the scarf warm and durable. Because the piano key pattern relies on clean lines, the single crochet stitch is ideal for achieving crisp color boundaries. Working single crochets evenly will help your design appear balanced and neat.
Color changes are essential in the creation of the piano key design. Learning how to switch yarn colors smoothly is an important step in this project. The simplest method involves completing the last yarn-over of one stitch with the new color before beginning the next stitch. This ensures that the color transition occurs cleanly at the stitch boundary without creating visible knots.
Carrying the yarn along the inside of the scarf is another technique used in this tutorial. Instead of cutting the yarn every time the color changes, the unused color can be held along the back and crocheted over. This helps avoid unnecessary ends and makes the scarf more comfortable to wear. It also speeds up the process and helps maintain structural integrity.
The slip stitch may also be used to join edges or create decorative finishing elements. Slip stitches add no height to the fabric, making them ideal for subtle borders or transitions. Using slip stitches thoughtfully creates smooth edges and a polished appearance.
A final technique to consider is blocking. Once the scarf is complete, gently wetting and shaping it will help it lay flat and show the design clearly. While blocking is optional, it can enhance the final result and give the scarf a more refined look.
Step-by-Step Pattern Instructions
To begin the Crocheted piano scarf-Step by Step Tutorial, start by creating a foundation chain that matches the desired width of your scarf. The width can vary depending on preference, but a typical piano scarf is narrow and long. Once the chain is completed, work your first row of single crochet stitches in your base color (usually white or cream).
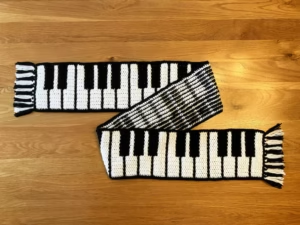
Next, begin forming the piano key pattern. The white keys make up the majority of the scarf background. The black keys are added at intervals by switching to black yarn for several stitches. The black keys are typically shorter in width, just like on a real piano. A consistent sequence pattern will help the scarf resemble the recognizable piano layout.
Continue crocheting row by row, switching colors as needed to maintain the pattern. Pay close attention to stitch counts so that each row aligns correctly. Using stitch markers or counting out loud may help keep your place. Working slowly and carefully at this stage ensures that the piano key design stays clean and accurate.
As the scarf grows in length, periodically check the edges for neatness. Slight adjustments to tension can keep the scarf from curling. If any minor curling occurs, it can be corrected during the final blocking process. Take breaks as needed to avoid hand strain, especially during repetitive color switching.
Once the scarf reaches your desired length, finish with a few rows of single crochet in the base color to provide symmetry. Secure and cut your yarn, leaving enough length to weave in ends. With a yarn needle, carefully weave in all loose yarn ends to prevent unraveling.
If desired, you can add finishing touches such as tassels or fringe. These additions can enhance the playful and artistic appearance of the scarf. Choose accents that complement the piano design while maintaining the elegance of the piece.
Adding Personal Style and Finishing Touches
One of the beautiful aspects of the Crocheted piano scarf-Step by Step Tutorial is how customizable it can be. While the classic piano scarf is black and white, you can choose alternate colors to create a more whimsical or modern look. For example, pastel shades can create a softer effect, while bold neon yarn can make the scarf stand out as a fun fashion accessory.
You may also choose to add initials, small motifs, or embroidered patterns to the ends of the scarf. Using surface crochet or embroidery techniques, you can personalize the scarf even further. These details help make the scarf unique and meaningful, particularly if it is being made as a gift.
Another way to personalize the scarf is by adjusting its length. Longer scarves can be wrapped more easily around the neck, while shorter scarves function more as decorative accessories. The flexibility of crochet allows you to adapt the pattern to meet your needs and preferences.
Consider adding a border around the scarf using a contrasting color. A simple single crochet or slip stitch border provides a clean frame and helps reinforce the scarf’s edges. Just be sure to maintain consistent tension to avoid warping the edges.
Tassels or fringe made from leftover yarn can add movement and flair to the ends of the scarf. You can make them thin and subtle or thick and dramatic depending on the style you prefer. Fringe can also help balance the scarf visually if you had slight tension changes during crocheting.
Finally, once all decorative elements are completed, gently block the scarf to shape it. Blocking helps even out stitches and ensures the scarf lays flat. After drying, the scarf is ready to wear or gift, bringing warmth and creativity to anyone who enjoys music or handmade accessories.
FAQ
Is this project suitable for beginners?
Yes, the Crocheted piano scarf-Step by Step Tutorial uses simple stitches, making it beginner-friendly with a little patience.
How long does it take to complete?
The time varies, but most crocheters complete it within a few days depending on experience and how much time they work each day.
What yarn works best for this project?
Soft acrylic or cotton yarn works well, as both are comfortable and easy to handle.
Do I need to block the scarf?
Blocking is optional but recommended to help the scarf lay flat and show the piano design clearly.
Can I customize the colors?
Absolutely. While black and white are traditional, any color combination can create a unique final result.
Conclusion
In this Crocheted piano scarf-Step by Step Tutorial, we explored how to choose materials, understand essential stitches, create the piano key pattern, and add personal finishing touches.
This project is meaningful, visually striking, and enjoyable to create. Whether for yourself or as a gift, this scarf will bring warmth and artistry into everyday life.
I hope you enjoyed this tutorial and feel inspired to start your own version. Please leave your honest opinion and suggestions—I would love to know how your scarf turns out and what project you would like to explore next!