
If you love adding handmade charm to your home, this Crocheted Spiral Stool Cover – Step by Step Tutorial will be the perfect project for you. Crochet stool covers are both decorative and practical, bringing color, comfort, and texture to any space. With a beautiful spiral design, this project will not only upgrade your stools but also give you a relaxing and rewarding crafting experience. Whether you’re a beginner or a seasoned crocheter, you’ll enjoy following this tutorial and creating a unique piece that fits perfectly in your home décor.
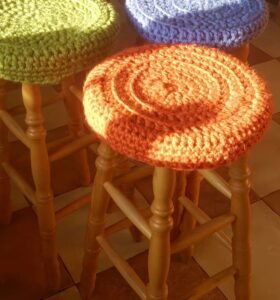
The Crocheted Spiral Stool Cover is a fun project that uses basic crochet techniques to create a visually striking spiral pattern. This design is often made using two or more contrasting colors of yarn, forming a mesmerizing swirl that instantly catches the eye. Beyond its aesthetic appeal, a crocheted stool cover helps protect your furniture from wear and tear and adds an extra layer of comfort. If you’ve been searching for a handmade touch to brighten up your kitchen, living room, or craft area, this pattern is an excellent choice.
In this Step by Step Tutorial, we’ll go through the full process — from selecting materials and understanding the pattern to assembling and finishing your spiral stool cover. Each step will be described clearly to make it easy to follow, even for those who have never crocheted a circular piece before. Take your time, enjoy the process, and by the end, you’ll have a cozy, colorful, and functional cover that you can proudly say you made yourself.
Materials and Preparation
Before starting your Crocheted Spiral Stool Cover – Step by Step Tutorial, it’s essential to prepare the right materials. Having everything ready beforehand ensures a smooth and enjoyable crocheting experience.
For this project, you’ll need medium-weight yarn in at least two contrasting colors. Cotton yarn is a popular choice because it’s durable, easy to clean, and holds its shape well. However, you can also use acrylic yarn if you prefer a softer or more budget-friendly option. Select colors that complement your room’s décor or reflect your personal style.
Next, choose a crochet hook that matches the yarn’s recommended size, usually 3.5 mm to 4.5 mm for worsted-weight yarn. A yarn needle will also be needed for weaving in loose ends, and a pair of scissors for cutting yarn as you switch between colors. If you want a snug fit for your stool, measure its diameter so you can adjust your number of rounds accordingly.
It’s also helpful to have a stitch marker to keep track of your rounds, especially when working in continuous spirals. A non-slip fabric or elastic band can be sewn on the back of the cover later to ensure it stays in place on the stool.
Once you have your supplies organized, make a small sample of the stitches you’ll use to ensure your tension is consistent. Crochet tension can vary depending on the yarn type and hook size, so testing beforehand will help your final cover fit perfectly.
Lastly, set up a comfortable workspace with good lighting. A cozy corner and a cup of tea can make the crocheting process even more relaxing. Having your materials ready and your mind at ease will set the stage for a beautiful and satisfying project.
Crocheting the Spiral Pattern
Now that you’re ready, let’s dive into the main part of the Crocheted Spiral Stool Cover – Step by Step Tutorial. The spiral pattern may look complex, but it’s surprisingly easy to make once you understand how the stitches flow in continuous rounds.
Begin by creating two magic rings using your chosen colors. In the first ring, crochet six single crochets with color A. In the second ring, crochet six single crochets with color B, and position them alternately around the first set of stitches. This method is what creates the foundation of your spiral pattern.
Next, continue crocheting in the round without joining the ends. Instead of closing each round with a slip stitch, you’ll keep crocheting in continuous spirals. As you move forward, the colors will naturally twist around each other, forming a seamless swirl design.
Increase your stitches gradually to maintain a flat circular shape. Usually, you’ll add six increases evenly spaced around each round. For example, round two will have 12 stitches, round three will have 18, and so on. Be sure to alternate colors as you go, working one stitch in color A and the next in color B.
As the spiral grows, you’ll begin to see the beautiful swirl forming. Continue adding rounds until the piece measures slightly larger than your stool’s diameter. This extra stretch ensures that the cover will fit snugly once placed over the stool seat.
If you prefer a thicker or textured look, you can switch to half-double or double crochet stitches after a few rounds. These stitches add height and variation to the pattern while maintaining the circular spiral effect.
Once you reach the desired size, complete your last round and cut both yarns, leaving long tails for securing. You’ve now finished crocheting the main body of your stool cover.
Assembling and Fitting the Stool Cover
The next step in the Crocheted Spiral Stool Cover – Step by Step Tutorial is assembling and fitting your finished crochet piece onto the stool. This stage is where your project truly comes to life.
Start by testing the fit of your spiral piece on the stool. Lay it flat and check if it covers the entire top surface comfortably. If it’s too tight, you can add one or two more rounds to increase the diameter slightly. If it’s too loose, gently pull out a round and adjust.
Once you’re happy with the fit, it’s time to create the edge that will hold the cover securely in place. You can crochet one or two rounds of single crochet stitches around the edge to give it a neat finish. If you want to make the cover removable and washable, you can also add a drawstring edge.
To make the drawstring, crochet a chain that’s long enough to go around the stool’s circumference. Thread this chain through every few stitches around the final edge, then pull it tight once the cover is placed on the stool. This will hold the cover firmly in position without slipping.
Another option is to sew an elastic band into the edge of the cover. This method is perfect for households where the stool is used frequently, as it keeps the cover snugly in place even with constant use.
After securing the cover, weave in all loose ends neatly with your yarn needle. Trim any excess yarn and make sure the surface looks clean and even. This small detail gives your finished piece a polished and professional appearance.
Finally, place your stool cover on the stool and admire your work. The spiral design adds a touch of artistry and warmth to any space, transforming an ordinary stool into a cozy, stylish piece of furniture.
Creative Variations and Design Tips
Once you’ve completed this Crocheted Spiral Stool Cover – Step by Step Tutorial, you can have fun experimenting with different designs and color combinations. The spiral pattern is incredibly versatile and offers endless opportunities for creativity.
Try making your spiral using three or even four colors instead of two. This adds more depth and a playful, colorful touch to your project. You can also alternate between solid and variegated yarns for an artistic effect.
For a modern look, consider using neutral shades such as cream, gray, and tan. These tones fit seamlessly into minimalist or Scandinavian-style décor. On the other hand, bold hues like turquoise, mustard, or coral bring a lively pop of color to your living space.
You can also experiment with different textures by using a mix of yarn types. Combine smooth cotton with soft chenille or shiny polyester for a unique feel. Just be sure to maintain consistent tension to keep the spiral pattern even.
If you want to take your design further, try adding a decorative border. A scalloped or picot edge can make your stool cover look more refined and add an extra touch of charm.
Lastly, don’t limit this pattern to stools only! You can use the same Crocheted Spiral design to make seat cushions, floor mats, or even pot holders. Once you understand the basics of this spiral construction, the possibilities are endless.
Crocheted Spiral Stool Cover
1. What type of yarn works best for a crocheted stool cover?
Cotton yarn is recommended because it’s durable and holds its shape. Acrylic yarn can also be used if you prefer a softer feel or more color options.
2. Can beginners follow this Crocheted Spiral Stool Cover tutorial?
Yes! This Step by Step Tutorial is beginner-friendly and uses basic stitches such as single crochet and simple increases.
3. How do I keep my stool cover from slipping?
You can add a drawstring, elastic band, or a non-slip fabric backing to help secure it in place.
4. How do I wash my crocheted stool cover?
It’s best to hand wash it gently in cool water with mild detergent. Avoid wringing or twisting to maintain its shape.
5. Can I make a matching set for my furniture?
Absolutely! You can use the same pattern to make matching covers for chairs, benches, or even floor cushions.
6. How long does it take to make a crocheted stool cover?
Depending on your speed and the size of the stool, it can take between four to six hours to complete one cover.
Conclusion
This Crocheted Spiral Stool Cover – Step by Step Tutorial shows how easy and enjoyable it is to transform a simple stool into a cozy and decorative piece of furniture. By following the detailed steps—from preparing materials and mastering the spiral stitch to assembling and adding creative touches—you can create a beautiful and functional handmade item for your home.
Crocheting your own stool cover not only enhances your space but also gives you a sense of accomplishment. Handmade décor brings warmth and character to every room, and each stitch carries a little piece of your creativity.
Now that you’ve learned how to make your own Crocheted Spiral Stool Cover, it’s time to grab your yarn and hook and get started. Don’t forget to share your experience and leave a sincere opinion or suggestion about this tutorial. Your feedback helps inspire others and keeps the crochet community growing with creativity and love.