
Crocheted star for decoration-Step by Step Tutorial is a delightful and creative way to add handmade beauty to various parts of your home. Whether you want a festive ornament, a charming wall hanging, or a special touch for gift wrapping, a crocheted star offers both simplicity and elegance. The appeal of this craft lies in its versatility: you can make stars in different sizes, colors, and styles. Using the term crocheted star for decoration-Step by Step Tutorial ensures that beginners and experienced crafters alike can easily follow along and create something meaningful and artistic. Handmade crafts like this star bring a cozy and personal feel to any environment.
When working on a crocheted star for decoration, you not only get the pleasure of crafting but also the satisfaction of producing something unique. Crocheting gives you the freedom to express your creativity, choose special yarn colors, and explore different stitch techniques. Each finished piece reflects the time and care you put into it. People often use crocheted stars during festive celebrations, holiday decorations, and special events. They are also great small gifts or embellishments for packaging. With this Step by Step Tutorial, you can easily learn how to make them yourself.
Before diving into the detailed Crocheted star for decoration-Step by Step Tutorial, it’s important to gather the right materials and have a clear understanding of the process. Crocheting is a mindful and relaxing activity, allowing your hands to create while your mind enjoys calm. The texture and shape of the star depend on the yarn type, hook size, and stitch tension. Even beginners can master this project because stars are typically made through simple increases and decreases that form the pointed shape. Now, let’s begin the journey to create your own beautiful crocheted star.
Materials Needed for the Crocheted Star
To start the crocheted star for decoration, you will need a few basic materials that are easy to find at craft or yarn shops. Choosing your yarn is an important part of the process, as different yarn weights give different textures. A lightweight yarn results in a delicate look, while thicker yarn makes a bold and cozy star. Most crafters prefer cotton or acrylic yarn due to their durability and color variety. Select the yarn color based on the decoration style you want.
A crochet hook that matches the yarn size will ensure that your stitches are even and consistent. If you are unsure, you can follow the hook recommendation found on the yarn label. Other tools you will need include scissors and a yarn needle. The yarn needle helps you weave in the loose ends once your star is completed, giving it a neat appearance. Some crafters also like to use a small amount of stuffing or fabric stabilizer if they want their stars to be slightly padded.
You may choose to use a stitch marker to help keep your place as you crochet. This is especially helpful for beginners. The stitch marker can be any small object such as a safety pin or clip. Having a comfortable workspace with good lighting can also make your crafting experience more enjoyable and precise. Some people enjoy crocheting in quiet moments, while others crochet while listening to music or watching their favorite show.
Choosing materials is the first step in expressing your creativity. The way your crocheted star looks greatly depends on your color palette. Using one solid color creates a classic and clean look. Using multiple colors can make the star look fun, festive, or whimsical. Yarn texture also affects the final result. Soft yarn provides a smoother finish, while textured yarn gives a rustic and unique appearance.
Once you have everything prepared, take a moment to feel comfortable with your tools. Hold your hook gently and practice a few simple stitches if you are new to crocheting. The foundation of your project begins with confidence and a relaxed hand. Getting familiar with the feel of the yarn will make the entire Crocheted star for decoration-Step by Step Tutorial easier to follow and more enjoyable to complete.
Having the right supplies ready before beginning saves time and helps ensure you stay focused on the creative process. Now that you know what materials to gather, you are ready to move on to learning the basic stitches used to create the shape of your crocheted star.
Understanding the Basic Stitches
Before starting the crocheted star for decoration, you need to be familiar with some basic crochet stitches. Most stars are made using chain stitches, single crochets, slip stitches, and sometimes double crochets. The chain stitch forms the base of your pattern. It’s simple to learn and is often where any crochet project begins. Take your time practicing this stitch until you can make it comfortably and evenly.
The single crochet stitch is very common and forms a tight, compact fabric. This stitch helps shape the star’s center and sides. When you work with single crochets in a circular motion, you create structure and firmness suitable for decorations. It is also a beginner-friendly stitch that is easy to master with practice.
You will also use the slip stitch to join rounds and create smooth edges. Slip stitches allow you to move your yarn to a new point without adding height to your work. They help maintain the symmetry of the star. This stitch is especially useful when you want to position your hook before forming the star points.
In some designs, the double crochet stitch is used to add height or texture. If your pattern includes double crochets, remember that they create taller stitches, so they help give length and flair to the star points. Practicing these stitches before starting the actual star guarantees a smooth crocheting process.
Crocheting in the round is another concept important to this tutorial. Most stars begin with a magic ring or chain circle to form the center. Working in the round means your project grows outward in a circular shape. Count your stitches as you go to keep the star even and symmetrical.
Understanding these basic stitches prepares you to follow the Crocheted star for decoration-Step by Step Tutorial with confidence. Having a good grasp of these fundamentals will make the crafting experience flow naturally and allow your creativity to shine through your design.
Step by Step Instructions to Create the Star
Begin your crocheted star with a foundation circle. You can either create a magic ring or chain several stitches and join them to form a small loop. This circle will be the center of your star. Start working single crochet stitches around the circle to build the base. Make sure the stitches are evenly spaced and not too tight, allowing your star to lay flat.
Next, begin forming the star points. This is usually done through a combination of chains and stitches that extend from the center. For each point, chain a certain number of stitches, then work back down the chain using single and double crochets. Each row returning to the center makes the shape appear pointed. Repeat this step around the circle, forming five or more points depending on your preferred star design.
As you create each point, be consistent in your stitch count. The uniformity of your points determines how symmetrical your star will look. If one point appears longer or shorter than the others, adjust your stitches accordingly. Crocheting requires patience, and small adjustments can make a big difference in the final shape.
After completing all the points, use a slip stitch to secure the end of the final point to the base of the star. This helps keep the star together and prevents the stitches from loosening. You may choose to block the star using gentle steam or pressing between cloth layers to make it perfectly flat and shaped.
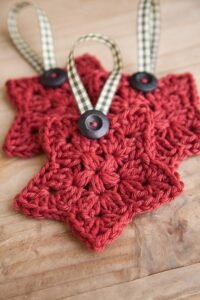
Weave in the yarn ends with a needle to make your star look neat and finished. Some crafters also add decorative touches at this stage. You can stitch beads, small buttons, or embroidery designs onto your star to give it personality. The final appearance of the star depends entirely on your style and creativity.
Your crocheted star is now ready to be displayed or gifted. Following the Crocheted star for decoration-Step by Step Tutorial, you can make several stars of different sizes and uses, creating a charming handmade collection.
Creative Uses for the Crocheted Star
One of the wonderful aspects of the crocheted star for decoration is its versatility. It can be used as a festive ornament during the holidays, especially Christmas. Hang your stars on the tree, along garlands, or on window frames. The handmade touch brings warmth and personality to seasonal décor.
Stars can also be used as wall art. You can attach several stars together using yarn or thread to form a hanging decoration. This makes a beautiful and cozy piece, especially for bedrooms and craft spaces. The soft texture of crocheted decorations adds comfort and charm to any wall.
If you enjoy gift wrapping, use your crocheted stars to embellish packages. Instead of using a store-bought bow, attach a handmade star to the ribbon. This makes your gift look thoughtful and personal. The recipient will appreciate the extra effort and may even keep the star as a keepsake.
Another popular use is making crocheted star coasters. By enlarging the pattern or using thicker yarn, you can turn your star into a practical and decorative coaster. These look lovely on coffee tables, desks, and dining spaces. They also make great handmade gifts.
Crocheted stars are also used in baby mobiles. The soft and gentle shapes create a calming visual for babies. You can mix stars of different colors and sizes to make the mobile visually interesting. Handmade décor like this gives any nursery a sweet and lovable feel.
No matter how you use your crocheted star, the joy of creating it remains the same. The Crocheted star for decoration-Step by Step Tutorial allows you to create something heartfelt, charming, and versatile.
FAQ
1. Is the crocheted star suitable for beginners?
Yes, this project is beginner-friendly, especially if you take time to learn the basic stitches first.
2. How long does it take to crochet a star?
Depending on your skill level and yarn choice, a star can take from 20 minutes to one hour.
3. Can I use any type of yarn?
You can use any yarn, but cotton or acrylic yarn works best for a neat and sturdy finish.
4. How do I keep my star from curling?
You can block the star by lightly pressing it with steam or flattening it under weight.
5. Can I make larger stars using the same tutorial?
Yes, simply increase stitch counts or use thicker yarn and a larger hook.
Conclusion
Creating a Crocheted star for decoration-Step by Step Tutorial is a rewarding and enjoyable crafting experience.
This guide helped you understand the materials needed, basic stitches, step-by-step assembly, and creative uses for your finished star.
Each handmade star has charm and meaning, reflecting your creativity and effort. If you enjoyed this tutorial, feel free to share your thoughts, leave a sincere opinion, and offer suggestions for future ideas. Your feedback helps inspire more beautiful handmade projects.