
Crocheted strawberry appliqué-Step by Step Tutorial is a delightful and charming project perfect for adding personality to various handmade items. Whether decorating bags, hats, blankets, potholders, or even clothing, a crocheted strawberry appliqué brings a sweet, cheerful touch to your craft creations. This tutorial is beginner-friendly and fun to follow, offering a creative and relaxing experience. The idea of learning the Crocheted strawberry appliqué-Step by Step Tutorial appeals to both new and experienced crocheters who enjoy smaller projects that offer instant satisfaction.
One of the most enjoyable aspects of this project is how little material it requires. You can use leftover yarn from larger projects, making it an excellent way to avoid waste while practicing your crochet skills. The colors typically used—red, green, and optionally white or yellow for the seeds—are common and widely available. Crafting a Crocheted strawberry appliqué also allows for endless customization. You can create strawberries of different sizes, shades, and textures, depending on your creative vision. The Crocheted strawberry appliqué-Step by Step Tutorial is adaptable, affordable, and highly versatile, which makes it a popular choice among crochet lovers.
This type of accessory is not only decorative but also meaningful. Handmade appliqués add a personal and thoughtful touch to gifts and home décor. For instance, adding a crocheted strawberry appliqué to a baby blanket or kitchen towel can transform a simple item into something unique and heartwarming. Crafting brings relaxation, mindfulness, and joy, making the process just as valuable as the finished product. Before diving deeper into the Crocheted strawberry appliqué-Step by Step Tutorial, let’s go through the materials, techniques, and tips that will help you create a beautiful and polished strawberry design.
Materials Needed
To begin the Crocheted strawberry appliqué-Step by Step Tutorial, gather your yarn and tools. Choose a soft but structured yarn, preferably cotton or acrylic, as these fibers provide good stitch definition. Red yarn is traditionally used for the strawberry body, and green yarn will form the leaf and stem. You may also choose white or yellow yarn for creating the tiny seed details for extra realism and charm.
Select a crochet hook that matches the weight of your yarn. Typically, a 2.5 mm to 4.0 mm hook works well for crocheted appliqués, depending on how tight or loose you want your stitches. Using a smaller hook results in a tighter and neater finish, which many crafters prefer when making appliqués meant to be sewn onto flat surfaces.
You will need scissors for trimming yarn ends and a yarn needle for weaving in the ends and attaching the appliqué to your chosen item. The needle is also helpful for adding decorative stitched details, such as embroidered seeds or outlining edges for texture and dimension.
Stitch markers are optional, but they can help keep count of rounds or shape rows more accurately. Although the strawberry appliqué is small, markers can be a helpful support while learning the shaping process. Keeping your workspace organized makes the experience smoother and more enjoyable.
If you want to add more decorative touches, you can use beads, sequins, or small embellishments, though be mindful of durability and washability if the appliqué will be attached to frequently used items. Simplicity is often best, especially for a classic strawberry look.
Finally, have patience and enjoy the process. Handmade crafts are not just about the final product; they are also about the calm and creativity experienced while working with your hands. This Crocheted strawberry appliqué-Step by Step Tutorial is meant to be enjoyable, relaxed, and rewarding.
Forming the Strawberry Shape
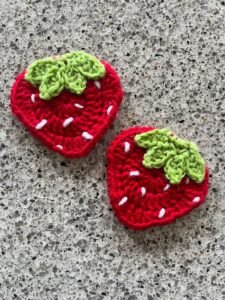
Begin by creating the strawberry body with red yarn. Start with a magic ring or chain two and work single crochets into the first stitch. This will form the rounded tip of the strawberry. Increasing stitches gradually will create the perfect curve and fullness for the shape. The strawberry should be slightly wider at the top and more tapered at the bottom.
Continue shaping the strawberry by working in rows or rounds, depending on your preference. Both methods produce beautiful results. The goal is to maintain a smooth, rounded surface without gaps between stitches. The shape comes to life as you slowly increase and decrease stitch count.
As you work, ensure your tension remains consistent to avoid uneven sides. Holding your yarn steadily and focusing on the motion of your hook can help keep the strawberry symmetrical. The beauty of the strawberry lies in its soft, curved outline.
Once the strawberry reaches the desired length, begin decreasing stitches to close the top. However, do not close it completely; a small opening should remain where the green leaves will be added. Cut the yarn and leave a tail long enough for sewing or weaving later.
If you want to add stuffing for extra volume, insert a small amount of fiberfill before closing the top shape. This step is optional, depending on whether you want a flat appliqué or a slightly padded one. Both look lovely, but padding adds a three-dimensional effect.
Set the strawberry body aside while you prepare the leafy crown. This next step brings the appliqué to life with detail and texture.
Creating the Leaf and Stem
Use green yarn to begin forming the leafy top. Chain a small number of stitches and work slip stitches, single crochets, and half double crochets to create tiny points that resemble real strawberry leaves. The leaf shapes should fan out naturally around the top of the strawberry.
Once the leaves are complete, position them on top of the strawberry body. Make sure the leaves appear centered and proportionate. Sew them securely using a yarn needle, ensuring that your stitches are discreet and neat.
To add a stem, chain a few stitches in green yarn and attach it to the center of the leafy crown. This slender detail gives the appliqué a charming, whimsical finish. You may leave the stem simple or thicken it by working additional rows.
At this point, you can add seed details using yellow or white yarn. Use a yarn needle to create small spaced stitches on the surface of the strawberry. Keep the stitches small and evenly distributed for a realistic look. You may choose to add fewer or more seeds depending on your style.
Ensure all loose ends are woven in securely. Neat finishing enhances the overall professional quality of your piece. Take a moment to admire your work—your Crocheted strawberry appliqué is now complete!
This small craft holds endless possibilities for personalization. Now let’s explore how to use your strawberry appliqué in creative and meaningful ways.
Creative Uses for Your Strawberry Appliqué
Attach the appliqué to bags and purses to add a cute and playful flair. Strawberries add a joyful hint of summer to accessories used year-round. Simply sew the appliqué onto your desired surface with even, firm stitches.
Decorate kitchen items such as pot holders, dish towels, and aprons. The bright pop of color adds warmth and charm to everyday household textiles, making them more inviting and personalized.
Sew the appliqué onto clothing such as cardigans, hats, or scarves. This small touch can transform a plain piece into something unique and stylish. Handmade embellishments make any garment feel special.
Use several appliqués together to create garlands, buntings, or decorative wall hangings. Stringing multiple strawberries in a row creates an adorable and eye-catching craft decoration perfect for summer or spring décor.
If you enjoy gift giving, include the appliqué as part of a handmade gift. It can be attached to gift wrap, card covers, or turned into a decorative tag. These small touches make gifts feel more meaningful and heartfelt.
Crocheted appliqués also work beautifully on baby items such as blankets, bibs, and hats. Strawberries add a sweet, soft, cheerful look that suits children’s accessories perfectly.
FAQ
1. Can beginners make a crocheted strawberry appliqué?
Yes, this project is suitable for beginners who are comfortable with basic stitches.
2. Which yarn is best for this appliqué?
Cotton yarn works well because it holds shape and gives clear stitch definition.
3. Do I need stuffing?
No, stuffing is optional; it simply adds dimension.
4. Can I make the strawberry bigger or smaller?
Yes, adjust the yarn weight and hook size to change the size.
5. How do I attach the appliqué to fabric?
Use a yarn needle and sew around the edges securely, keeping the stitches even.
Conclusion
This Crocheted strawberry appliqué-Step by Step Tutorial introduced how to create a charming and versatile strawberry embellishment using simple crochet techniques.
With just a few materials, you can craft something adorable, personal, and full of charm. Whether used to decorate accessories, home décor, or clothing, this appliqué adds a warm, handmade touch to everything it adorns.
I hope this tutorial was helpful and enjoyable. Please leave your sincere opinion and suggestions—I would love to know what you think and what you would like to learn next!