
The Crocheted Toilet Paper Holder-Step by Step Tutorial is a practical and creative guide designed for anyone who enjoys decorating their home with handmade pieces. This project blends functionality with charm, offering a beautiful way to organize bathroom essentials using only yarn and a crochet hook. Creating a crocheted toilet paper holder is also a wonderful opportunity to practice your crochet skills while producing something useful for daily life. Whether you are a beginner or an experienced crafter, this tutorial will help you complete a neat, sturdy, and visually appealing bathroom accessory.
Making a crocheted toilet paper holder allows you to personalize your bathroom décor in a unique way. Many people appreciate the convenience of having extra rolls stored within reach while keeping the space tidy and stylish. Throughout this Crocheted Toilet Paper Holder-Step by Step Tutorial, you will explore techniques that are both simple and adaptable, so you can customize the holder according to your preferred size, colors, and design style. This handmade piece not only improves organization but also adds a cozy touch that store-bought options often lack.
Before beginning this Crocheted Toilet Paper Holder-Step by Step Tutorial, it is important to prepare your materials and understand the structure you will create. A toilet paper holder typically consists of a long tube or pockets, depending on your chosen design. The goal is to achieve a shape that securely supports the rolls while maintaining flexibility and durability. A comfortable workspace, good lighting, and patience will make the crafting process smooth and enjoyable. As you progress through the detailed steps, remember that you can adapt this tutorial to match your taste and skill level, making each holder uniquely yours.
Materials You Need to Start the Project
To begin this Crocheted Toilet Paper Holder-Step by Step Tutorial, gather a few simple yet essential materials. The type of yarn you choose plays a major role in the final look and durability of your project. Cotton yarn is highly recommended because it offers a clean texture, easy stitch definition, and excellent durability, especially in humid environments like bathrooms.
Next, you will need a crochet hook that matches your yarn weight. Most crafters prefer using hook sizes ranging from 3.5 mm to 5 mm for projects like this. A slightly tighter stitch helps maintain the holder’s structure, ensuring that it does not stretch excessively when holding the toilet paper rolls. If you are unsure which hook size to use, testing a small swatch is always a good idea.
Scissors and a yarn needle are essential tools for trimming yarn ends and weaving them in securely. Clean finishing is important not only for appearance but also for the durability of your crocheted toilet paper holder. Weaving in the ends properly helps prevent unraveling and ensures long-lasting use.
You may also want to use stitch markers if you have trouble keeping track of rounds or pattern repetitions. Markers can be especially helpful for beginners following this Crocheted Toilet Paper Holder-Step by Step Tutorial, as they prevent mistakes and help maintain stitch consistency throughout the project.
Depending on the design you choose, you may need a dowel, plastic ring, or crocheted loop to create a hanger. This allows your toilet paper holder to be hung from a hook, towel rack, or door handle. These elements make your project functional and easy to use in any bathroom setup.
Once you have all your materials organized, you’re ready to move into the next steps of this Crocheted Toilet Paper Holder-Step by Step Tutorial and begin building the base of your holder with confidence.
How to Crochet the Base Structure
The base structure is the foundation of your Crocheted Toilet Paper Holder-Step by Step Tutorial and determines how many rolls your holder can support. Most designs begin with a simple foundation chain that sets the width of your tube or pocket. You can adjust the number of chains depending on the size of your toilet paper rolls and the desired fit.
After creating your foundation chain, you will work rows or rounds of simple stitches such as single crochet or half double crochet. These stitches create a dense and durable fabric that supports the weight of multiple rolls. Consistent tension is crucial at this stage, as uneven stitches can lead to a lopsided or stretched-out final piece.
As you continue stitching, the fabric will grow into a long rectangular or cylindrical shape. This is where you can decide how many rolls your crocheted toilet paper holder will store. Some people prefer a two-roll holder, while others make space for three or even four rolls. Adjust the length accordingly to suit your needs.
Once you reach the desired length, you can fold or join the fabric to form the tube or individual pockets. If you are creating pockets, you will fold the bottom section upward and stitch the sides closed, leaving room for each roll to slide in comfortably. For a tube-style holder, you simply join the edges to form a seamless cylinder.
Reinforcing the structure is also an important step. Adding a few rows of tighter stitches around the top and bottom edges can help the holder maintain its shape over time. This prevents sagging and ensures that the rolls remain neatly aligned inside the holder.
With the base structure complete, the next part of this Crocheted Toilet Paper Holder-Step by Step Tutorial will guide you through adding the hanger that allows your creation to be displayed conveniently in the bathroom.
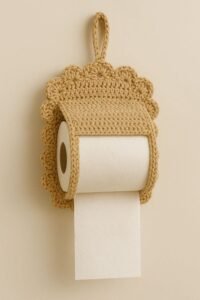
Adding the Hanger and Finishing Details
Now that the main body of your holder is ready, this part of the Crocheted Toilet Paper Holder-Step by Step Tutorial focuses on creating the hanger that allows the holder to be easily hung. A sturdy hanger is essential for the functionality of your project. Many crocheters choose to make a simple chain loop, which is strong, flexible, and easy to attach.
To create the hanger, attach yarn to the top center of your holder and crochet a chain long enough to form a loop. Once the chain reaches your preferred length, slip stitch it back onto the top edge. Make sure the loop is secure, as it will support the weight of the full holder. Some people prefer adding extra reinforcement by working a row of single crochet over the chain.
If you want a more structured hanger, you can use a wooden dowel or a plastic ring. To do this, crochet a small casing at the top of your holder, allowing the dowel or ring to slide into place. This provides additional stability and can enhance the overall appearance of your crocheted toilet paper holder.
Another way to elevate your design is by adding decorative borders. Many crafters enjoy using shell stitches, picots, or scalloped edges to give the holder a more elegant finish. This adds personality without compromising functionality. Decorative details also make your project look more polished and can match the style of your bathroom décor.
If you want even more customization, consider adding flowers, hearts, or leaves as appliqués. These small embellishments can be stitched onto the main body of your holder, turning it into a unique piece that reflects your personal style. Just ensure that any added decorations remain flat so they do not interfere with storage.
With the hanger and finishing touches in place, your Crocheted Toilet Paper Holder-Step by Step Tutorial is almost complete. Next, you will explore how to maintain, clean, and care for your handmade holder.
Caring for and Maintaining Your Crocheted Holder
Taking care of your handmade creation is the final part of this Crocheted Toilet Paper Holder-Step by Step Tutorial, and it ensures your project remains beautiful and durable over time. Since bathroom environments can be humid, choosing the right yarn and cleaning method is essential for long-lasting results.
Cotton yarn is typically very easy to clean. You can handwash your toilet paper holder with mild soap and cold water. If needed, gently reshape it while damp and allow it to air dry completely. This prevents mold, mildew, or unwanted odors from forming. Avoid using bleach or harsh chemicals, as these can weaken the fibers.
If your bathroom is especially humid, consider washing the holder more frequently. Consistent care will keep the stitches firm and the colors vibrant. Proper maintenance ensures your crocheted toilet paper holder remains a practical and hygienic accessory.
You can also reinforce loose stitches over time. If you notice any stretched areas, simply add a few more stitches around the borders or strengthen the hanger. Handmade items often benefit from small adjustments that help maintain structure with long-term use.
Another useful tip is to rotate your holder with others you may have made. This allows each one to rest between uses and prevents excessive wear. Many crocheters enjoy creating multiple designs to match seasonal décor or different bathroom styles.
By following these care instructions, your handmade toilet paper holder will remain in excellent condition for years. Now, let’s explore some common questions people ask about this Crocheted Toilet Paper Holder-Step by Step Tutorial.
FAQ – Frequently Asked Questions
1. Is this project suitable for beginners?
Yes, the crocheted toilet paper holder is beginner-friendly. It uses basic stitches and simple construction.
2. What type of yarn works best?
Cotton yarn is recommended because it’s durable, easy to clean, and holds shape well in humid environments.
3. How long does it take to complete the project?
On average, it takes 1 to 2 hours depending on your experience and the complexity of your design.
4. Can I customize the size?
Absolutely. You can adjust the length to hold more or fewer rolls simply by adding or reducing rows.
5. Can I add decorations to the holder?
Yes, you can add flowers, borders, and appliqués to match your bathroom décor and personal style.
6. Does the holder stretch over time?
It may stretch slightly with heavy use, but choosing cotton yarn and reinforcing edges helps prevent excessive stretching.
Conclusion
In this Crocheted Toilet Paper Holder-Step by Step Tutorial, you learned how to create a practical and decorative bathroom accessory using basic crochet techniques.
From choosing your materials to building the structure, adding a hanger, and finishing with personal touches, each step helps you refine your skills while producing something truly useful for your home.
I hope this tutorial inspires you to make your own beautiful holders. Please leave your sincere opinion and share suggestions so I can continue creating helpful and enjoyable guides for you!