
Learning how to make a festive decoration can be both rewarding and creative, and this Crocheted turkey-Step by Step Tutorial is the perfect project for crafters who love themed amigurumi. From Thanksgiving décor to year-round farmhouse displays, a crocheted turkey brings charm, color, and personality to any space. In this article, you will discover how easy it is to crochet a turkey using simple stitches and approachable techniques. Whether you are a beginner or an experienced maker, this guide provides clear instructions, helpful insights, and lots of room for creativity.
The popularity of handmade decorations continues to grow, especially those that reflect tradition and warmth. A Crocheted turkey-Step by Step Tutorial gives you a wonderful opportunity to practice shaping, assembling small parts, and bringing a character to life with yarn. Unlike basic crochet pieces, this project teaches you how to work with multiple colors, create detailed features like the tail feathers, and assemble different components into a cohesive figure. By mastering each part, you will feel more confident with future amigurumi projects.
Another reason many crafters enjoy this type of tutorial is the flexibility it allows. A crocheted turkey can be tiny and cute for keychains, medium-sized for table décor, or larger for centerpieces. Using this Crocheted turkey-Step by Step Tutorial, you can easily adjust yarn weight and hook size to achieve the exact look you want. The process is enjoyable, relaxing, and suitable for anyone who enjoys crafting with a personal touch. Before diving into the steps, let’s explore the materials and preparations needed to ensure your project is successful and satisfying.
Materials and Preparation for Your Crocheted Turkey
To begin this Crocheted turkey-Step by Step Tutorial, gathering the right materials is essential for achieving a sturdy and adorable finished piece. Start by choosing yarn in multiple colors, typically brown, beige, red, orange, and yellow. Acrylic yarn is an excellent choice because it is affordable, widely available, and holds shape well for amigurumi. Fine or medium-weight yarn works beautifully for small to medium-sized turkeys.
A crochet hook that matches your yarn weight is also necessary. For amigurumi, many crafters prefer using a slightly smaller hook than recommended to create tight stitches. This ensures that stuffing does not show through the fabric. Hook sizes between 2.0 mm and 4.0 mm are commonly used depending on the thickness of the yarn. Always check your tension before starting the full project.
You will also need stuffing material to shape your turkey. Polyester fiberfill is the most common option because it is lightweight, soft, and easy to mold. Make sure to add stuffing gradually as you assemble the body parts. Overstuffing can distort the shape, while understuffing may cause the figure to collapse or lose firmness over time.
A set of stitch markers can be extremely helpful when following this Crocheted turkey-Step by Step Tutorial, especially when working in continuous rounds. They prevent confusion and help you keep track of increases and decreases. If you don’t have stitch markers, a small piece of contrasting yarn works well as an alternative.
Safety eyes or embroidered eyes are essential elements for giving your turkey personality. Safety eyes provide a clean and polished look, while embroidered eyes are perfect for children’s toys because they eliminate choking hazards. Choose the style that matches your intended use and personal preference.
Finally, gather a yarn needle for sewing pieces together. Amigurumi requires assembly, and neatly joining parts like wings, tail feathers, and beak contributes to a polished final result. With all materials ready, you can confidently begin following each step of this Crocheted turkey-Step by Step Tutorial.
Crocheting the Body and Head of the Turkey
The first major step of this Crocheted turkey-Step by Step Tutorial is creating the body and head, which are usually crocheted in continuous rounds. Begin by making a magic ring and working single crochet increases to gradually expand the shape. Most amigurumi bodies follow a spherical or oval pattern, and increasing slowly helps maintain symmetry.
After forming the initial rounds, continue adding stitches until you reach the widest part of the body. Maintaining consistent stitch tension is important. Uneven tension can create bumps or holes that distract from the final look. Take your time and adjust your speed so that your stitches remain smooth and even throughout the project.
As you progress, begin decreasing to taper the top of the body. This helps shape the turkey’s form naturally. Before fully closing the body, remember to fill it with stuffing. Adding stuffing little by little ensures a smooth and firm texture. Overfilling may distort the shape, while underfilling can leave the body looking flat or wrinkled.
The head is usually made separately using a similar process but with fewer rounds because it is smaller. Start with a magic ring, increase to the necessary width, and then decrease slowly after stuffing. Make sure to position the stuffing carefully so the head maintains a round and expressive shape.
Once the head is finished, you can attach safety eyes or embroider them. This is the best moment to add facial details because the head is still easy to manipulate. Small touches like placing the eyes slightly apart or adding a tiny blush circle with embroidery floss help elevate your turkey’s charm.
After the head is complete, sew it securely to the body using your yarn needle. Ensure it is centered and firmly attached. A wobbly head can affect the balance and appearance of the finished piece. With the main structure ready, you can now continue with the wings and accessories in this Crocheted turkey-Step by Step Tutorial.
Creating the Wings, Beak, and Wattle
This stage of the Crocheted turkey-Step by Step Tutorial focuses on the smaller parts that bring your turkey to life. The wings are usually crocheted using small oval or teardrop shapes. These pieces require only a handful of rounds, making them beginner-friendly and quick to complete. Crochet two identical wings using the same yarn color as the body or a slightly lighter shade for contrast.
Once the wings are finished, gently flatten them so they lay neatly against the body. You may lightly stuff them if you want more volume, though many crafters prefer leaving them unstuffed for a more natural look. Position the wings symmetrically on each side of the body before sewing. Good alignment helps maintain a balanced and appealing silhouette.
The beak is typically made with a small triangle or cone shape using orange or yellow yarn. It is a tiny detail but one of the most expressive features of the turkey. Sew the beak firmly in place, slightly below the center of the face. Make sure it is symmetrical and proportional to the head size.
Next comes the wattle—the small red piece that hangs beside the beak. This detail is essential for making your turkey instantly recognizable. The wattle can be crocheted with a few single crochets or created as a simple chain loop. Once attached, it adds personality and a delightful pop of color to the character.
After attaching the wings, beak, and wattle, inspect the positioning of all facial features. Adjustments made at this point ensure that your turkey looks friendly and expressive. Take your time with this step, as precise finishing touches greatly enhance the final appearance.
With the body and face completed, you are now ready to create the most iconic part of this Crocheted turkey-Step by Step Tutorial—the tail feathers.
Making and Attaching the Tail Feathers
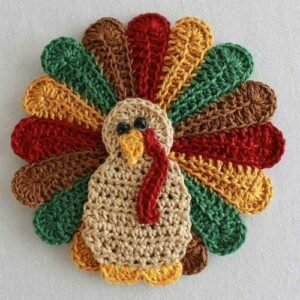
One of the most iconic parts of this Crocheted turkey-Step by Step Tutorial is the colorful tail. Each feather can be crocheted separately using yarn in different colors such as red, orange, yellow, and brown. Feathers are usually made using semi-circular or leaf-shaped patterns, and you can customize the size based on the style you want.
Begin by selecting your colors. Many crafters choose bright shades to create a bold and cheerful turkey. Crochet each feather using basic stitches, beginning with a chain and working upward to create a curved shape. Repeat this process several times until you have enough feathers for a full tail.
After crocheting the feathers, block them lightly if needed. Blocking helps them lay flat and gives them a polished finish. Simply pin the feathers to a foam board and lightly steam them, being cautious not to melt or distort the yarn. Once they dry, they will look crisp and professionally shaped.
To assemble the tail, arrange the feathers in a fan-like shape. Overlap them slightly for a natural, layered look. Use a needle and yarn to stitch them together securely. This base will make attaching the tail to the body much easier and more stable.
Position the assembled tail behind the turkey’s body, aligning it with the lower back. Sew it in place with strong, tight stitches. The tail is heavier than other parts, so secure stitching is essential. Make sure the turkey can stand or sit without tipping over.
Once attached, adjust the feathers gently with your fingers to spread them evenly. This finishing step enhances the personality and aesthetic beauty of your creation. At this point, your Crocheted turkey-Step by Step Tutorial is nearly complete, and your turkey should look vibrant and full of character.
Crocheted Turkey Tutorial
1. Is this crocheted turkey project suitable for beginners?
Yes, the project uses basic stitches and simple shaping, making it beginner-friendly.
2. Can I use different yarn weights?
Absolutely. Thicker yarn makes a larger turkey, while thinner yarn creates a small, delicate one.
3. How do I keep the stuffing from showing?
Use a smaller hook size than recommended to create tighter stitches.
4. Can children play with the finished turkey?
Yes, but avoid using safety eyes if it is intended for small children. Embroider eyes instead.
5. How long does this project take to complete?
Most crafters complete it in a few hours, depending on size and experience.
6. Can I customize the colors?
Yes, you can choose any color combination to suit your décor or personal taste.
Conclusion
This Crocheted turkey-Step by Step Tutorial has guided you through each part of creating a charming and colorful turkey, from shaping the body to assembling the expressive tail feathers.
You learned how to crochet the main structure, add details, personalize colors, and assemble the final piece with care.
Now you have a festive amigurumi that adds warmth and creativity to your home. If you enjoyed this tutorial, please leave your sincere opinion and share suggestions for future guides. Your feedback is always welcome!