
Making a Cross keychain made with recyclable can lid and crochet- Step by Step Tutorial is not only a creative craft idea but also an eco-friendly project that combines sustainability with beauty. Many people love making handmade gifts, and this DIY craft is perfect for beginners or experienced crafters who want to create something unique and meaningful. By reusing materials such as can lids, we help reduce waste while crafting a decorative piece that can be used for personal accessories, gifts, or even small business items.
In this article, we will explore every detail of how to create a Cross keychain made with recyclable can lid and crochet- Step by Step Tutorial using easy techniques and simple materials. You will learn how to prepare the lid, choose the right yarn, make the crochet design, and assemble the final piece. This tutorial is beginner-friendly but can also inspire experienced crafters to customize and enhance their designs.
Another great aspect of this Cross keychain made with recyclable can lid and crochet- Step by Step Tutorial is that it encourages creativity while being affordable. You can use leftover yarn from other projects and collect recyclable can lids at no cost, making it a budget-friendly craft idea. Plus, handmade keychains are always popular items in markets and fairs, so they can even become a small source of income if you decide to sell them.
Materials Needed for the Cross Keychain
Before starting the Cross keychain made with recyclable can lid and crochet- Step by Step Tutorial, it is important to gather all the necessary materials. Having everything ready will make the crafting process easier and more enjoyable from start to finish.
You will need one clean recyclable can lid for each keychain you plan to make. It is essential to wash the lids carefully to avoid sharp edges and ensure safety. In addition to the lids, you will need cotton yarn in your preferred color, as cotton works well for crochet and gives a neat finish.
A crochet hook suitable for the yarn thickness is also necessary. For most cotton yarns, a 2.5 mm or 3 mm hook works perfectly. Scissors, a yarn needle for finishing, and a keyring or small chain are also required to assemble the final keychain.
Many people also like to add small accessories such as beads, charms, or ribbons to decorate their Cross keychain made with recyclable can lid and crochet- Step by Step Tutorial. These extras are optional but can make your piece more personalized and unique.
Finally, keep a small piece of sandpaper nearby to smooth any rough edges on the can lid. This step is especially important for safety and ensures a clean, professional finish for your keychain.
When everything is ready, you can begin the fun part: crocheting and assembling the beautiful cross keychain.
Preparing the Can Lid
The first step in the Cross keychain made with recyclable can lid and crochet- Step by Step Tutorial is preparing the recyclable can lid. Safety always comes first when working with metal pieces, so handle them carefully to avoid any accidents.
Start by washing the can lid with warm water and dish soap to remove any residues. After washing, dry it thoroughly with a clean cloth or paper towel. Make sure there is no moisture before starting the crochet work, as it can damage the yarn over time.
If you notice sharp edges, use fine-grit sandpaper to smooth them. This step is important to prevent the yarn from snagging while crocheting and to make the keychain safe to handle.
Once the can lid is prepared, you can paint it if desired. Some people like to add a layer of acrylic paint or nail polish to give the metal a colorful touch before crocheting around it.
Let the paint dry completely if you decide to decorate the lid before proceeding with the crochet work. This allows you to have a creative base for your Cross keychain made with recyclable can lid and crochet- Step by Step Tutorial.
Now that the lid is clean, smooth, and possibly painted, you can move on to the crochet step to create the cross design around it.
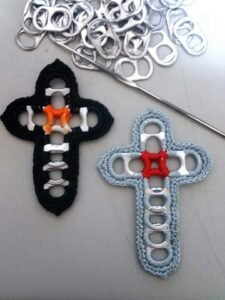
Crocheting the Cross Design
This is the most creative step in the Cross keychain made with recyclable can lid and crochet- Step by Step Tutorial. To begin, make a slipknot with the yarn and attach it firmly to the edge of the can lid using single crochet stitches.
Work around the entire edge of the lid with evenly spaced single crochet stitches. This will create a neat base for building the cross design on top. Make sure the stitches are tight enough to stay in place but not too tight to cause curling.
After completing the base round, chain a few stitches upward from the center of the lid to form the vertical part of the cross. Return with single crochet stitches along this chain to make it thicker and more visible.
Repeat the same process for the horizontal part of the cross by choosing the center point and chaining outward to both sides. This step creates the traditional cross shape within your crochet frame.
Some crafters like to add an extra round of single or double crochet stitches around the entire lid after forming the cross. This gives a decorative border that makes the keychain look more finished and elegant.
Once the cross design is complete, cut the yarn and weave in all loose ends using the yarn needle to secure the stitches and prevent unraveling.
Assembling the Keychain
The final part of the Cross keychain made with recyclable can lid and crochet- Step by Step Tutorial is assembling the keychain components. Start by attaching the keyring or chain to the top of the lid using a small metal jump ring or by crocheting a small loop at the top before finishing.
If you want to add beads or small charms, now is the perfect time to do it. You can attach them to the loop or chain for extra decoration.
Some people also like to add a layer of fabric or felt to the back of the can lid using hot glue. This makes the keychain look neat on both sides and hides the metal completely.
After all the parts are assembled, check the keychain carefully to ensure everything is secure and there are no loose pieces.
At this point, your Cross keychain made with recyclable can lid and crochet- Step by Step Tutorial is complete, and you can admire your work or give it as a thoughtful handmade gift.
You can repeat the process with different yarn colors, lid sizes, or decorative accessories to create a whole collection of eco-friendly crochet keychains.
FAQ About Cross Keychain Made with Recyclable Can Lid and Crochet
1. Can I use any type of can lid for this project?
Yes, you can use most metal can lids as long as they are clean and safe to handle. Avoid lids with extremely sharp edges that are hard to sand.
2. What type of yarn works best for crocheting around a can lid?
Cotton yarn is highly recommended because it is strong, durable, and holds its shape well.
3. How long does it take to make one keychain?
For beginners, it may take about 45 minutes to an hour. With practice, you can complete one in less than 30 minutes.
4. Do I need special tools for this project?
No special tools are needed beyond a crochet hook, scissors, a yarn needle, and basic keychain parts.
5. Can children make this craft?
Children can help with some parts, like choosing yarn colors or adding beads, but adults should handle the metal lid preparation for safety.
6. Is this project suitable for selling at craft fairs?
Yes, handmade keychains are popular and sell well, especially when they are eco-friendly and customizable.
Conclusion
In this article, we explored how to create a Cross keychain made with recyclable can lid and crochet- Step by Step Tutorial from start to finish. We covered material preparation, lid safety, crochet techniques, and assembly tips to ensure a professional result.
This project is fun, eco-friendly, and affordable, making it perfect for personal use or as a thoughtful handmade gift.
If you try this tutorial, please share your honest opinion and suggestions so we can continue improving and inspiring creative crafting ideas for everyone.