
Learning cute baby shoes – step by step tutorial is an exciting and heartwarming project for anyone who loves crafting. Whether you are making them for your own baby, as a thoughtful gift, or to sell at craft fairs, baby shoes are a small yet meaningful handmade item. Their charm lies not only in their adorable appearance but also in the love and care you put into creating them.
This cute baby shoes – step by step tutorial will guide you through the entire process, from selecting materials to adding those perfect finishing touches. Even if you are a beginner in crochet, knitting, or sewing, you’ll find that baby shoes are relatively quick to make compared to larger projects. The smaller size means you can experiment with patterns, colors, and textures without committing to weeks of work.
Following a cute baby shoes – step by step tutorial also allows you to personalize every detail. You can choose colors to match a baby’s outfit, add embellishments like ribbons or buttons, and even create seasonal designs for holidays and special occasions. Plus, handmade baby shoes often become treasured keepsakes that parents save for years.
Materials You Will Need
Before diving into the cute baby shoes – step by step tutorial, it’s essential to have the right materials on hand.
First, choose a soft, baby-friendly yarn or fabric. Cotton is an excellent choice because it’s gentle on the skin, breathable, and easy to wash. For sewing projects, opt for soft, high-quality cotton fabric or fleece.
Next, pick a matching crochet hook or knitting needles if you’re making the shoes from yarn. The recommended size will depend on your chosen yarn, but for baby shoes, smaller hooks or needles help create a snug, neat stitch.
You will also need sharp scissors for cutting yarn or fabric and a yarn needle for weaving in ends. For sewn shoes, a sewing machine or hand-sewing needle is required.
Optional items include buttons, bows, or small appliqués to add decoration. Always ensure that any embellishments are securely attached to prevent choking hazards.
Finally, have a printed or digital pattern ready to follow. This cute baby shoes – step by step tutorial will walk you through the basics, but having a pattern ensures consistent sizing.
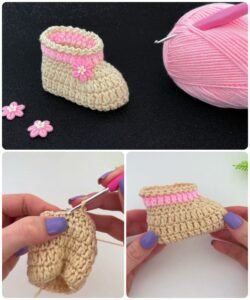
Creating the Shoe Sole
The first step in the cute baby shoes – step by step tutorial is to create the sole.
Start by following your pattern to chain the required number of stitches if crocheting. The sole is typically worked in an oval shape, using stitches like single crochet or half double crochet to create a flat and sturdy base.
If knitting, you will cast on the required stitches and knit in rows or rounds, depending on the design. Keep your tension even to ensure the sole lies flat.
For sewn shoes, cut the sole pieces from fabric, making sure to cut two identical pieces for each shoe. Interfacing can be added between the fabric layers for extra stability.
As you work, keep checking the size against the pattern measurements. Baby shoe soles are small, so accuracy matters to ensure a good fit.
Once the soles are completed, fasten off the yarn neatly or finish the edges of fabric soles to prevent fraying.
This base is the foundation of the shoe, so take your time to get it right before moving on.
Building the Shoe Body
The next stage of the cute baby shoes – step by step tutorial is shaping the body of the shoe.
In crochet, this usually involves working in rounds along the edge of the sole, gradually building up the sides using stitches like half double crochet or double crochet.
Knitted shoes may require picking up stitches along the sole’s edge and knitting upward, decreasing in certain areas to create shaping for the toe.
For sewn shoes, attach the upper fabric pieces to the sole, either with a sewing machine or by hand. Pin or clip the pieces in place first to ensure even attachment.
During this step, you can add decorative elements such as color changes, textured stitches, or small patterns like stripes.
Always make sure the shoe body is snug but not too tight, allowing room for the baby’s foot to move comfortably.
Work both shoes at the same time or in close succession to ensure they match in size and shape.
Adding Straps and Finishing Touches
One of the highlights of the cute baby shoes – step by step tutorial is adding the straps and decorative features.
For crochet or knit shoes, straps are usually made by chaining a certain length and attaching it to the sides, often with a button closure.
Sewn straps can be made from matching or contrasting fabric and attached securely at the sides. Velcro is also a good option for easy fastening.
At this stage, you can sew on buttons, bows, or appliqués, keeping in mind that all decorations must be baby-safe.
If desired, you can add a soft lining to the inside of the shoe for extra comfort. This is especially nice for winter shoes to keep tiny feet warm.
Double-check all seams and attachments to ensure durability, as baby shoes need to withstand movement and gentle washing.
Finally, give your shoes a gentle press with an iron (if fabric) or block them (if crochet/knit) to set the shape.
FAQ – Frequently Asked Questions
1. How long does it take to make a pair of baby shoes?
For crochet or knit shoes, it can take 2–4 hours depending on your skill level. Sewing can be even quicker once you’re familiar with the pattern.
2. What size should I make for newborns?
Most newborn shoes have a sole length of about 3.5 inches (9 cm), but always check the pattern for sizing.
3. Are handmade baby shoes safe?
Yes, as long as they fit properly, use soft, breathable materials, and have securely attached embellishments. Avoid anything that could be a choking hazard.
4. Can I machine wash baby shoes?
Cotton and acrylic yarn shoes are usually machine washable on a gentle cycle. Fabric shoes can also be machine washed if the fabric allows it.
5. What’s the best yarn for baby shoes?
Soft cotton or acrylic yarns are best because they are gentle on sensitive skin and easy to clean.
6. Can I sell baby shoes I make from this tutorial?
Yes, handmade baby shoes are popular at markets and online, but if you use a purchased pattern, check the designer’s rules for selling finished items.
Conclusion
By following this cute baby shoes – step by step tutorial, you’ve learned the process of creating adorable, comfortable, and safe footwear for little ones. From selecting the right materials to crafting the sole, shaping the body, and adding charming details, each step allows for creativity and personalization.
Handmade baby shoes aren’t just practical—they carry sentimental value and can become cherished keepsakes for families. Whether you’re making them for a newborn gift, a personal project, or to sell, the joy of creating something so small yet meaningful is truly rewarding.
I’d love to hear your feedback on this tutorial and see your creations. Share your thoughts, ideas, and suggestions to help inspire more handmade treasures for the tiniest feet.