
The Cute crocheted snowman-Step by Step Tutorial is a delightful project that brings warmth and charm to your winter crafting sessions. Whether you’re preparing holiday decorations, handmade gifts, or simply enjoying the relaxing rhythm of crochet, this pattern offers an enjoyable experience for all skill levels. With a combination of basic stitches, shaping techniques, and creative details, this tutorial guides you through every step of making an adorable snowman that will brighten any space. Because the project is simple yet detailed, it is perfect for both beginners wanting to learn more and experienced crafters seeking a fun seasonal design.
Starting the Cute crocheted snowman-Step by Step Tutorial brings an opportunity to explore soft textures and vivid winter colors. The project uses classic crochet methods to build each part of the snowman, from its rounded body to its charming accessories. One of the reasons this tutorial is so popular among holiday crafters is its versatility—your snowman can be made big or small, colorful or traditional, depending on your personal preferences. With basic shaping, stuffing, and finishing techniques, you can bring a friendly character to life using just a few materials and your creativity.
This project also serves as a wonderful introduction to amigurumi-style crochet. By following the Cute crocheted snowman-Step by Step Tutorial, crafters learn how to form spherical shapes, attach parts seamlessly, and add personality through simple details such as facial expressions and scarves. The tutorial encourages creativity while still offering clear structure, making it a rewarding experience no matter how many snowmen you choose to make. It’s a relaxing, joyful craft that pairs perfectly with wintertime traditions, warm drinks, and cozy moments.
Materials Needed to Crochet the Snowman
To begin the Cute crocheted snowman-Step by Step Tutorial, you will first need to gather a few basic materials. White yarn is essential for forming the snowman’s body, and it is typically recommended to use a soft, worsted-weight yarn for best results. This type of yarn creates clean, round shapes while still being easy to work with, making it ideal for amigurumi-style creations like this snowman.
You will also need a contrasting color—for example, black, orange, red, or blue—to make the snowman’s accessories. These small pops of color add charm and give your snowman a unique personality. Choosing yarn colors that match your holiday theme is a great way to customize the project and make it feel more personal.
A properly sized crochet hook is another essential tool. Most crafters use a hook between 3 mm and 4 mm for amigurumi, as smaller hooks help create tight stitches that prevent stuffing from showing through. Using the right hook ensures a neat finish and a well-shaped snowman, especially when working with smaller details.
You will also need fiberfill stuffing to give shape to the body, head, and accessories. Stuffing is important because it helps the snowman stand upright and maintain its volume. Adding the right amount ensures your finished piece feels soft yet sturdy, which is essential if you plan to gift it.
A tapestry needle is used to stitch the various parts together. This includes attaching the head, body, arms, and any decorative elements. It also helps with weaving in yarn tails so that your project looks clean and professional. A needle makes all the difference in the finishing touches.
Optional accessories may include small buttons, beads, or embroidered details. These additions bring personality to your snowman and can transform a simple crochet project into a charming winter figurine. Whether you keep the decorations simple or get creative, the materials allow you to customize your snowman to suit your preferred style.
Crocheting the Snowman Body and Head
The body and head are the foundation of the Cute crocheted snowman-Step by Step Tutorial, and they are typically made using classic amigurumi rounds. Start by forming a magic ring and working single crochet stitches in continuous spirals. This method allows you to shape the snowman smoothly without visible seams. Counting stitches carefully helps maintain the correct shape for both the head and body.
As you increase the number of stitches in each round, the snowman will gradually take on a spherical form. Keep your tension consistent so the surface looks even and professional. If this is your first time working with amigurumi techniques, take your time—smooth shaping becomes easier with practice. The body should be slightly larger than the head to create the traditional snowman silhouette.
Once the widest part is reached, begin decreasing the stitches to close the shape. Before completely closing the head or body, it’s important to add the stuffing. Adding small amounts at a time helps keep the snowman smooth and prevents lumps. This step is essential for achieving a polished and visually appealing final look.
The head is made in a similar way, starting with a magic ring and gradually increasing the stitch count. Keeping the head round and proportional is key to maintaining the cuteness of the snowman. After shaping and stuffing the head, make sure it is firm but not overstuffed, as too much filling can distort the stitches.
When both parts are completed, use your tapestry needle to sew the head to the body. This step in the Cute crocheted snowman-Step by Step Tutorial should be done with tight and secure stitches. Attaching the head firmly ensures that the snowman remains stable and the parts do not shift over time.
After the head and body are assembled, take a moment to adjust the stuffing if needed and smooth out the shape. Your snowman now has a solid base and is ready for details that will bring personality and charm to your creation.
Adding the Facial Features and Arms
The facial features are what bring your snowman to life in the Cute crocheted snowman-Step by Step Tutorial. Start by choosing the type of eyes you want—safety eyes, buttons, or embroidered eyes. Safety eyes are popular for their polished look, but embroidered eyes are great for young children’s toys since they are secure and soft. Position the eyes evenly on the head, spacing them to achieve a friendly expression.
Next, add the classic snowman carrot nose. This can be crocheted using a small piece of orange yarn shaped into a tiny cone. Alternatively, it can be embroidered directly onto the face. Both techniques create an adorable effect, and the choice depends on your comfort and skill level. The nose should sit centered between the eyes and slightly below them.
The snowman’s smile can be embroidered with black yarn, creating a gentle curve that adds charm and warmth. You can make a simple thin smile or add several small stitches to resemble traditional coal pieces. This customizable step allows you to express creativity while maintaining the snowman’s classic appearance.
For the arms, use brown yarn to create small stick-like shapes. These can be simple chains with a few branches or crocheted tubes for a fuller look. Once completed, sew the arms securely to the body. This step enhances the overall design and adds character to your snowman.
You may also choose to create small mittens or gloves if you want your snowman to look more festive. These tiny details give your creation a cheerful wintertime personality. Accessories like these can also help integrate your snowman into different holiday themes.
After adding the face and arms, your snowman will start to look lively and expressive. This part of the Cute crocheted snowman-Step by Step Tutorial is especially fun because it allows you to personalize the project and explore your creative style.
Decorating the Snowman with Accessories
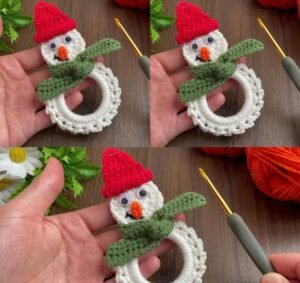
Accessories are the final touch of the Cute crocheted snowman-Step by Step Tutorial and help make your snowman truly unique. One of the most popular additions is a colorful scarf. Scarves are easy to crochet—simply make a long chain and work a few rows of single or half-double crochet stitches. Wrap the scarf around the snowman’s neck to add color and warmth.
You can also add a hat to complete the winter look. A small beanie or top hat can be crocheted in just a few rounds and adds a festive touch. Choose colors that match the rest of your décor or play with bold, cheerful tones to make your snowman stand out.
Buttons are another classic accessory. Whether crocheted or sewn on, buttons create the traditional snowman style. Place them neatly down the center of the body, choosing colors that complement your design. Buttons give your snowman personality and serve as simple yet effective decorations.
If you want to get more creative, add small decorative elements such as snowflakes, stars, or tiny Christmas ornaments. These can be attached to the snowman’s hat or scarf. They give your project a festive charm while also allowing you to practice making small crochet embellishments.
Some crafters like adding textured elements, such as fuzzy yarn trim on hats or scarves. These textures create contrast and make the snowman more visually appealing. Experimenting with different yarn types is a great way to elevate your project.
Once all accessories are added, examine your snowman to ensure everything is securely attached. These final touches bring the snowman to life and complete the overall design, making it perfect for gifting or decorating.
Frequently Asked Questions
1. Is this project suitable for beginners?
Yes, the Cute crocheted snowman-Step by Step Tutorial is beginner-friendly and uses simple stitches with easy shaping.
2. What type of yarn works best for this snowman?
Worsted-weight yarn is ideal because it creates solid shapes and is easy to crochet.
3. Can I make the snowman larger or smaller?
Yes, adjusting hook size or yarn thickness will easily change the snowman’s size.
4. How do I keep the stuffing from showing through?
Use tight stitches and the correct hook size to prevent gaps.
5. Are safety eyes necessary?
No, you can embroider the eyes if you prefer a completely soft and child-safe option.
6. Can I customize the accessories?
Absolutely—scarves, hats, buttons, and tiny decorations can be made in any style or color.
Conclusion
The Cute crocheted snowman-Step by Step Tutorial is a heartwarming and enjoyable project that teaches you how to create a festive companion for the winter season.
From shaping the body to adding expressive details and colorful accessories, each step helps you build confidence and creativity in your crochet journey.
Whether you display it at home or gift it to someone special, this handmade snowman brings joy and warmth. If you enjoyed this tutorial, please leave your sincere opinion and share your suggestions for future crochet projects.