
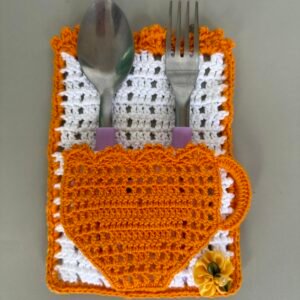
Easy and quick crocheted cutlery holder-Step by Step Tutorial projects have become increasingly popular among crafters who want to create beautiful and functional pieces for the home. This type of project is not only practical but also adds a charming handmade touch to special occasions, dinner tables, and gift sets. When you follow an Easy and quick crocheted cutlery holder-Step by Step Tutorial, you can create stunning designs in very little time, even if you are still developing your crochet skills. This article will guide you through a complete process, from preparation to finishing, making it accessible and enjoyable for all levels.
One of the most appealing aspects of making an easy and quick crocheted cutlery holder is how versatile and customizable it can be. Whether you prefer simple stitches or more decorative textures, you can adjust the size, style, and color choices to match any event or personal preference. These holders are perfect for festive dinners, everyday use, holiday gatherings, and handmade gifts. The detailed instructions in this Easy and quick crocheted cutlery holder-Step by Step Tutorial help ensure that your project comes out clean, structured, and visually appealing.
Before starting, it’s important to understand the basic materials and techniques involved. The Easy and quick crocheted cutlery holder-Step by Step Tutorial requires only a few essential items, making it an ideal project for those who enjoy practical and minimalist crafting. With simple stitches, quick assembly, and the flexibility to personalize your design, this tutorial will walk you through everything needed to create durable and eye-catching cutlery holders that elevate your table decor. Now, let’s begin preparing for this enjoyable and rewarding project.
Materials and Preparation
To begin the Easy and quick crocheted cutlery holder-Step by Step Tutorial, you first need to gather the proper materials. The most commonly recommended yarn types for this project are cotton or cotton blends. Cotton provides structure, durability, and a neat finished look, making it ideal for table accessories. You may choose colors that coordinate with seasonal themes or your existing table setup.
Your crochet hook size will depend on the thickness of your yarn. Most medium-weight yarns pair well with hook sizes between 4 mm and 5 mm. Using a slightly smaller hook can produce tighter stitches, which helps the easy and quick crocheted cutlery holder maintain its shape. Be sure to refer to your yarn label for guidance, but personal preference also plays an important role.
In addition to yarn and hooks, you will need accessories such as scissors, a yarn needle, and optional decorations like ribbons or buttons. These small items make the process smoother and add a decorative touch to the final piece. Having everything prepared before crocheting ensures a more enjoyable and efficient crafting experience.
Choosing the right colors can significantly enhance the look of your cutlery holder. Neutrals often suit modern table settings, while vibrant shades or themed colors are perfect for holidays and celebrations. Using colors intentionally is also beneficial for SEO purposes, since many people search for themed table decor tutorials such as Christmas red, Easter pastels, or rustic tones. This adds further relevance to your Easy and quick crocheted cutlery holder-Step by Step Tutorial.
Before beginning, take time to review the basic stitch instructions. Most easy and quick crocheted cutlery holder patterns use simple stitches such as single crochet, half double crochet, or double crochet. These stitches provide stability and structure. If you are new to crochet, practicing these stitches first will help ensure smooth progress during the tutorial.
Finally, measure the approximate size you want your cutlery holder to be. Traditional holders measure around 10–15 cm wide and 18–22 cm tall, but this can easily be adjusted. The ability to customize size is one of the greatest advantages of the Easy and quick crocheted cutlery holder-Step by Step Tutorial, allowing you to tailor each piece for different sets of cutlery, napkins, or decorative accents.
Step-by-Step Instructions
To begin creating your easy and quick crocheted cutlery holder, start with a foundation chain that matches the desired width of your holder. For a standard size, chaining between 20 and 24 stitches is common, though you may adjust the number depending on your gift or table setting needs. A sturdy foundation chain ensures your final item will be well-structured and hold its shape.
After completing the foundation chain, work your first row of stitches using single crochet or your chosen stitch. Maintaining consistent tension is essential, as it provides a clean appearance and prevents unwanted stretching. These first rows set the tone for the rest of your Easy and quick crocheted cutlery holder-Step by Step Tutorial, so take your time and keep the stitches even.
Continue building the height of the holder by crocheting additional rows. You may choose to create a flat rectangular piece that folds into a pocket later, or you can work in the round for a seamless finish. Working flat is easier for beginners and aligns perfectly with the idea of easy and quick crocheted cutlery holders. Counting stitches at the end of each row avoids mistakes and ensures symmetry.
Once you reach the desired height, it’s time to shape the pocket. If working flat, fold the bottom portion upward and seam the sides using slip stitches or a whipstitch. This forms the basic pocket that will hold your cutlery. If working in the round, you will skip this step, but still ensure the bottom edge is tight and reinforced.
Next, you can add a decorative top edge. Many crafters enjoy using shell stitches, picots, or simple slip-stitch borders to give the holder a refined finish. These details upgrade the visual appeal of your easy and quick crocheted cutlery holder and allow you to personalize the design further.
Finally, weave in any loose ends using a yarn needle. Make sure all seams are secure, the pocket is shaped correctly, and the stitches lie flat. This completes the core steps of the Easy and quick crocheted cutlery holder-Step by Step Tutorial, leaving your holder functional, neat, and ready for decoration.
Decoration and Customization Ideas
Decorating your easy and quick crocheted cutlery holder adds personality and visual charm. Adding small appliqués such as flowers, stars, hearts, or seasonal motifs can transform a simple design into something festive or elegant. You can crochet these embellishments separately and sew them onto the holder.
Ribbons are another beautiful option. Thread a ribbon through the top edge, tie a bow, or attach a small decorative loop. This gives the holder a polished finish and complements the handmade texture. The Easy and quick crocheted cutlery holder-Step by Step Tutorial allows complete creative freedom for embellishment.
Buttons can also add adorable detail. Whether functional or purely decorative, buttons bring color and interest. Choose shapes and colors that match your theme. Vintage-style buttons create a rustic look, while shiny buttons are perfect for festive occasions.
Embroidery on crochet is another creative way to personalize your holder. Using a contrasting color, you can add initials, simple flowers, or tiny patterns. Embroidered elements elevate your easy and quick crocheted cutlery holder, making it ideal for weddings, parties, and handmade gifts.
You can also use multiple colors in the body of the holder to create stripes or color-block sections. Changing colors every few rows is simple and adds visual appeal. This technique is beginner-friendly and enhances the variety in your Easy and quick crocheted cutlery holder-Step by Step Tutorial.
Finally, consider reinforcing the top edge with a decorative stitch for additional structure. This also gives a more finished, professional appearance. Even small details can make a big difference in the final look of your easy and quick crocheted cutlery holder.
Tips for Finishing and Maintaining Crocheted Cutlery Holders
To finish your easy and quick crocheted cutlery holder properly, ensure all ends are securely woven in. This prevents unraveling and enhances durability. Take your time with this step, as a clean finish reflects craftsmanship and care.
Blocking your holder can improve shape and smoothness. Lightly dampen the piece, arrange it into the desired shape, and let it dry completely. Blocking gives your Easy and quick crocheted cutlery holder-Step by Step Tutorial a polished touch.
If you plan to make multiple holders—for parties, events, or holiday settings—store them flat to maintain their structure. Avoid stacking heavy items on top, as this may stretch the stitches over time.
When washing your holders, handle them gently. Most cotton yarns can be washed by hand in cool water. This keeps the stitches tight and preserves the fabric quality. Proper washing extends the life of your easy and quick crocheted cutlery holder.
If you enjoy gifting your creations, consider making matching sets with coordinated colors or motifs. These sets can include napkin rings or table mats that complement the tutorial. Doing so adds value and beauty to your handmade pieces.
Finally, practice will always help you refine your technique. Experiment with new stitches, colors, and finishes. The Easy and quick crocheted cutlery holder-Step by Step Tutorial is only the beginning—your creativity will take your designs even further.
About Crocheted Cutlery Holders
1. Are crocheted cutlery holders suitable for beginners?
Yes. Most designs are simple and follow straightforward steps, especially those described in an Easy and quick crocheted cutlery holder-Step by Step Tutorial.
2. What type of yarn is best?
Cotton yarn is ideal because it provides structure, durability, and an attractive finish.
3. Can I make them in different sizes?
Absolutely. Adjust the foundation chain and the number of rows to create any size you want.
4. How long does it take to make one holder?
Depending on your speed and experience, most holders can be made in 30 minutes to 1 hour.
5. Can I wash crocheted cutlery holders?
Yes, but handwashing is recommended to maintain the shape and stitch quality.
6. Can I customize the design?
Yes. You can add appliqués, embroidery, ribbons, buttons, or decorative stitches.
Conclusion
This Easy and quick crocheted cutlery holder-Step by Step Tutorial provides all the guidance you need to create beautiful, practical, and fully customizable cutlery holders.
By choosing the right materials, following simple instructions, and adding personal decorative touches, you can craft handmade pieces that elevate your dining experience and impress your guests.
If you enjoyed this tutorial, please leave your honest opinion and share suggestions for future topics.