
Easy Crochet Bag Ideal for Beginners!- Step by Step Tutorial is the perfect starting point for anyone who wants to create something practical, stylish, and handmade. Crochet bags have become incredibly popular because they combine fashion with functionality, and making one yourself adds a personal touch that store-bought items simply can’t match. The best part is that you don’t need to be an expert in crochet to make a beautiful bag that you can proudly use or gift to someone special.
For beginners, a simple crochet bag project offers the chance to learn basic stitches, practice consistency, and experiment with colors and textures. It’s an enjoyable and relaxing hobby that also results in a useful accessory. With a little patience and creativity, you can make a unique bag that reflects your personal style while improving your crochet skills at the same time.
In this Easy Crochet Bag Ideal for Beginners!- Step by Step Tutorial, we’ll guide you through every stage of the process, from choosing materials to finishing the bag with professional-looking details. The goal is to make it easy for anyone—even those who have never crocheted before—to create something beautiful and practical.
Materials Needed for the Easy Crochet Bag
Before we start the Easy Crochet Bag Ideal for Beginners!- Step by Step Tutorial, it’s important to gather all the necessary materials. Having everything ready will make the process smoother and more enjoyable, especially if this is your first time crocheting.
The main material is yarn. For beginners, a medium-weight cotton yarn is ideal because it’s easy to work with, holds its shape well, and is durable enough for a bag. Cotton yarn also comes in a wide variety of colors, so you can choose something simple or go for a bright, cheerful look.
You’ll also need a crochet hook. The size of the hook will depend on the thickness of your yarn, but for most medium-weight yarns, a 4mm or 5mm hook works well. The right hook size helps you achieve even stitches, which is essential for a neat, professional finish.
Other materials include scissors for cutting the yarn and a yarn needle for weaving in ends and sewing any parts together. If you want to add handles, you can use matching yarn to crochet them or buy ready-made handles from craft stores for a polished look.
A stitch marker can also be very helpful, especially for beginners. It keeps track of the start and end of your rounds, ensuring you don’t lose count while working on your project.
Lastly, consider adding a lining to your bag. Fabric lining gives the bag extra strength and prevents items from poking through the stitches. This step is optional, but it can make a big difference in the durability and overall appearance of your finished bag.
Step-by-Step Instructions to Make the Easy Crochet Bag
Now that you have your materials ready, let’s dive into the Easy Crochet Bag Ideal for Beginners!- Step by Step Tutorial. This step-by-step process will help you create a simple yet stylish bag that you’ll love to use.
Start by creating a slipknot and chaining the desired number of stitches for the base of your bag. The length of this chain will determine how wide your bag will be, so plan accordingly.
Once the base chain is ready, work single crochet stitches along the chain to create the first row. At the end of the row, chain one and turn your work. Continue crocheting row after row until the base reaches the desired width.
Next, begin crocheting around the entire edge of the base to start forming the sides of the bag. This is where your bag will start to take shape. Working in the round will make it seamless and stronger.
As you build up the sides, you can switch to different stitches if you want to add texture or decorative patterns. However, sticking to simple stitches like single or half-double crochet keeps things beginner-friendly and fast.
Continue crocheting until the bag reaches your preferred height. Remember, the taller the bag, the more items it can hold, so adjust this step to match your needs.
When you’re done with the main body, fasten off the yarn neatly, leaving a long tail for sewing if needed. Make sure to weave in all loose ends for a clean finish before moving on to the next step.
Adding Handles and Finishing Touches
The Easy Crochet Bag Ideal for Beginners!- Step by Step Tutorial wouldn’t be complete without handles. Handles make your bag practical and comfortable to carry, and there are many ways to add them depending on your style preference.
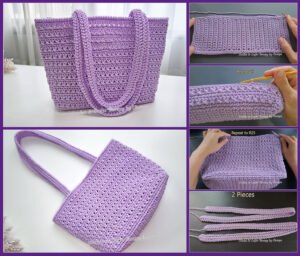
One simple option is to crochet two long chains and attach them securely to each side of the bag. For extra strength, work several rows of single crochet over the chains to make the handles thicker and more durable.
If you want a more polished look, you can purchase wooden or metal handles from craft stores. These handles often come with small holes or loops for easy attachment, giving your bag a professional finish.
Another option is to create a crossbody strap by crocheting a long, sturdy chain and attaching it diagonally across the bag. This is perfect if you want a hands-free style for everyday use.
Adding lining is an optional step but highly recommended. Cut a piece of fabric slightly larger than the bag’s interior, fold the edges to prevent fraying, and sew it neatly inside. A lining not only strengthens the bag but also adds a touch of elegance.
Finally, consider adding decorative elements like buttons, tassels, or beads. These little details can transform a simple crochet bag into a stylish accessory that reflects your personal taste.
Tips for Beginners and Common Mistakes to Avoid
Even though this Easy Crochet Bag Ideal for Beginners!- Step by Step Tutorial is simple, beginners sometimes make common mistakes that can affect the final result. Knowing these in advance will help you avoid frustration.
One frequent mistake is using the wrong hook size. A hook that’s too big can make the stitches loose and the bag floppy, while a hook that’s too small can make the fabric too stiff. Always match the hook size to your yarn weight for the best results.
Another issue is uneven tension. Beginners often start with tight stitches and gradually loosen up, which can make the bag look uneven. Practice keeping a consistent tension throughout the project for a neat finish.
Skipping stitches by accident is also common, especially when working in rounds. Using stitch markers helps you keep track and prevents accidental gaps in your work.
Some people forget to weave in the ends securely, which can cause the bag to unravel over time. Always take a few minutes to tuck in loose ends neatly for a durable, professional-looking result.
Choosing colors randomly can sometimes lead to designs that don’t match well. Planning your color scheme before starting ensures a cohesive and attractive final product.
Lastly, beginners often rush through the project. Take your time to count stitches, follow the steps carefully, and enjoy the process—crochet is as much about relaxation as it is about the final result.
FAQ About Easy Crochet Bag Ideal for Beginners!- Step by Step Tutorial
Q1: How long does it take to make this bag?
A: For beginners, it usually takes two to three evenings to complete the bag, depending on the size and your crochet speed.
Q2: What type of yarn is best for a crochet bag?
A: Cotton yarn is ideal because it’s sturdy, holds its shape, and is available in many colors.
Q3: Can I make this bag without lining?
A: Yes, the bag will work without lining, but adding fabric inside makes it stronger and prevents stretching.
Q4: How do I clean a crochet bag?
A: Hand wash it gently in cold water and lay it flat to dry. Avoid using a washing machine to maintain its shape.
Q5: Is this project suitable for complete beginners?
A: Absolutely! The stitches used are basic, and the instructions are simple enough for anyone to follow.
Q6: Can I sell bags made from this tutorial?
A: Yes, handmade crochet bags are popular and can be sold at craft fairs or online.
Conclusion
This Easy Crochet Bag Ideal for Beginners!- Step by Step Tutorial has shown you everything you need to create a beautiful, practical, and handmade accessory. From gathering materials to crocheting the base, adding handles, and finishing with decorative details, you now have all the steps to complete your first crochet bag successfully.
Crochet is a relaxing and rewarding hobby, and making your own bag allows you to combine creativity with practicality. Whether you keep it for yourself or give it as a gift, this project is perfect for anyone wanting to learn and create something useful.
We would love to hear your honest opinion about this tutorial. Please share your thoughts, suggestions, or experiences so we can continue creating helpful guides for all crochet lovers.
