
If you’re looking for a fun, quick, and creative crochet project, this Easy crochet chain keychain pattern-Step by Step Tutorial is perfect for you. Not only is it beginner-friendly, but it’s also a great way to use up leftover yarn while creating something cute and functional. Whether you’re making a little gift for a friend or adding a personal touch to your bag or keys, this project will inspire you to pick up your crochet hook and start crafting right away.
The beauty of this easy crochet chain keychain pattern lies in its simplicity. You only need a small amount of yarn, a crochet hook, and a keyring to get started. The process involves making a basic crochet chain, which is one of the first stitches every crocheter learns. From there, you can experiment with different yarn textures, colors, and even add small charms or beads to make your keychain unique. The result is a handmade accessory that combines style, practicality, and personality.
Another great thing about this step by step tutorial is that it’s perfect for people of all skill levels. If you’re a beginner, you’ll learn the fundamentals of crocheting chains while creating a useful item. For experienced crocheters, it’s a great way to relax and make a quick project between larger ones. You can even make several of these keychains to sell at craft fairs, give as gifts, or use as party favors. Let’s explore each step in detail so you can create your own crochet chain keychain easily and beautifully.
Materials Needed for the Easy Crochet Chain Keychain Pattern
Before you start this Easy crochet chain keychain pattern-Step by Step Tutorial, make sure you have all the materials ready. Having your tools and yarn organized will make the process smoother and more enjoyable. You’ll only need a few basic crochet supplies for this simple yet adorable project.
First, you’ll need yarn. The best choice for this type of project is cotton yarn because it’s durable, soft, and holds its shape well. You can use any color you like, from bright and bold hues to neutral or pastel tones, depending on your personal style. Cotton also resists wear and tear, which is perfect for something that will be handled daily like a keychain.
Next, you’ll need a crochet hook. A size 3.5 mm to 4.0 mm hook usually works well for medium-weight yarn, but you can adjust the size depending on your yarn thickness and desired chain texture. Make sure the hook feels comfortable in your hand, as this will make crocheting easier and more enjoyable.
You’ll also need a keyring or lobster clasp to attach your crochet chain. These can be found at craft stores or online in a variety of styles and finishes, including gold, silver, or antique bronze. This small detail can elevate your finished piece and match your personal aesthetic.
Lastly, have scissors and a yarn needle on hand. The scissors are for trimming the yarn, and the yarn needle will help you weave in the ends neatly so that your keychain looks tidy and professional. Once you have all these materials gathered, you’re ready to start the fun part—crocheting!
How to Crochet the Chain for the Keychain
Now that you have your materials, let’s start the actual crocheting process in this Easy crochet chain keychain pattern-Step by Step Tutorial. The first step is to make a slip knot, which will secure your yarn to the hook. To do this, loop the yarn around your fingers and pull a small section through to create an adjustable knot on your hook. This will serve as your starting point.
Once you have the slip knot, it’s time to make the chain. Yarn over (wrap the yarn over the hook) and pull through the loop. Each time you do this, you’ll create a new chain stitch. Continue this process until your chain reaches the desired length. For a standard keychain, about 25–35 chain stitches is ideal, but you can adjust based on your preference.
Keep your tension even as you work. If your chain is too tight, it may twist or curl, making it harder to attach to the keyring. If it’s too loose, it might look uneven. The key is to find a balance where the stitches look uniform and smooth. Practicing a few chains before starting your final one can help you achieve consistent tension.
When your chain is complete, fasten off by cutting the yarn about two inches from the end and pulling it through the final loop. This will secure your stitches and prevent unraveling. Now you have a beautifully made crochet chain that will form the base of your keychain.
If you want to add more texture or thickness, you can crochet a second row by turning your work and single crocheting into each chain stitch. This gives your keychain a sturdier feel and a more polished appearance. Experimenting with this step can add personality and creativity to your finished item.
Assembling and Decorating Your Crochet Keychain
This next stage of the Easy crochet chain keychain pattern-Step by Step Tutorial focuses on turning your crochet chain into a beautiful accessory. Once your chain is ready, it’s time to attach it to your keyring or clasp. Thread the end of your chain through the keyring loop and fold it in half. Use your yarn needle and a piece of matching yarn to sew the ends together securely. Make sure the stitches are tight so the chain doesn’t come loose during use.
You can add decorative elements to your keychain to make it unique. Some crafters like to add small crochet flowers, tassels, or beads to the ends. If you enjoy working with charms, you can attach a metal or wooden charm that matches your style. This personal touch makes your handmade keychain stand out and adds a special flair.
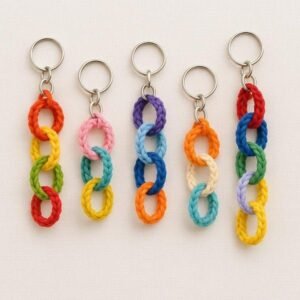
Consider mixing colors for a fun twist. You can create striped chains by alternating yarn colors every few stitches or using variegated yarn for a multi-tone look. Another option is to make multiple chains in different colors and braid them together for a more dynamic design.
Once your decoration is complete, use your yarn needle to weave in any loose ends. This step gives your project a neat finish and ensures it’s durable for everyday use. A well-finished keychain not only looks better but also lasts longer.
After finishing your crochet chain keychain, take a moment to admire your work. You’ve created something handmade, functional, and stylish using simple crochet techniques. With a little creativity, you can make several of these for friends or family as thoughtful, handmade gifts.
Tips for Beginners and Creative Variations
This Easy crochet chain keychain pattern-Step by Step Tutorial is beginner-friendly, but it also allows room for creativity. If you’re just starting out, practice making chains with different yarn types to see how they behave. Some yarns are slippery and require a tighter tension, while others are fluffy and work best with looser stitches.
Don’t be afraid to experiment with hook sizes. A smaller hook will create tighter, more compact stitches, while a larger hook will result in looser and chunkier chains. Both can look beautiful—it all depends on the effect you’re aiming for.
If you’d like to make your keychain more decorative, you can use simple embellishments such as buttons or embroidered initials. These details make your crochet creation one-of-a-kind and more personal.
You can also crochet miniature versions of popular items like hearts, stars, or flowers and attach them to your chain. These small additions can make your project even more adorable and thematic, especially for holidays or special occasions.
Another fun idea is to create matching sets. Make one keychain for yourself and a similar one for a loved one using coordinating colors. This can make a sweet friendship or couple’s gift that’s both meaningful and handmade.
Finally, remember that practice makes perfect. The more you crochet, the better your tension, speed, and technique will become. Even a simple project like this easy crochet chain keychain helps you strengthen your crochet skills while creating something practical.
FAQ about Easy Crochet Chain Keychain Pattern-Step by Step Tutorial
1. What kind of yarn is best for a crochet keychain?
Cotton yarn is highly recommended because it’s durable, easy to handle, and holds its shape well. It’s also available in a wide variety of colors.
2. Can beginners make this project?
Yes! This project is ideal for beginners since it mainly uses the basic crochet chain stitch. It’s a great way to learn crochet basics while making something useful.
3. How long does it take to complete a crochet chain keychain?
Typically, it takes around 15–30 minutes, depending on your crochet speed and design complexity.
4. Can I wash my crochet keychain?
Yes, if you use cotton yarn, your keychain can be hand-washed gently with mild soap and air-dried to maintain its shape.
5. How can I make the keychain sturdier?
You can add an extra row of single crochet stitches or double the yarn while chaining to make it thicker and more durable.
6. Is it possible to sell crochet keychains?
Absolutely! Handmade crochet keychains are popular at craft fairs and online marketplaces. Just ensure neat finishing and good presentation.
Conclusion
In this Easy crochet chain keychain pattern-Step by Step Tutorial, we explored how to make a simple yet stylish crochet keychain using basic materials and easy techniques.
This project is a perfect choice for beginners who want to practice chaining and for experienced crocheters seeking a relaxing, quick craft. You learned how to prepare materials, crochet the chain, assemble the keychain, and add creative decorations.
Now that you’ve seen how effortless and fun it is to create a crochet chain keychain, it’s time to try it yourself! We hope this tutorial inspired you to start crafting your own handmade accessories. Don’t forget to share your opinions, ideas, and suggestions about this tutorial—we’d love to hear your thoughts and see how your creations turned out!