
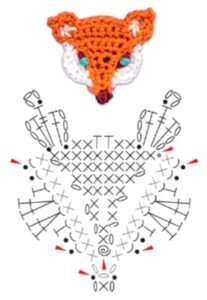
Easy crochet fox for beginners-Step by Step Tutorial is a wonderful project for anyone who loves handmade crafts and wants to start exploring the world of amigurumi. Crochet animals have become increasingly popular because they are charming, customizable, and fun to make. This tutorial focuses on the fox, a beloved woodland creature that looks adorable in yarn form. Whether you want to create a toy, a keychain, or a small decoration, this step-by-step guide will teach you everything you need to know. By using simple stitches and beginner-friendly techniques, you can complete your fox with confidence and enjoy the process from start to finish.
In this article, the Easy crochet fox for beginners-Step by Step Tutorial will help you learn not only how to crochet the main parts of the fox but also how to assemble and personalize your project. The key to success in amigurumi is understanding how to work in rounds, how to maintain even tension, and how to sew the pieces together neatly. This tutorial explains each step in detail so that even someone picking up a crochet hook for the first time can follow along. The result is a soft, charming fox that can be gifted, used as décor, or added to your crochet collection.
Before diving into the detailed techniques, it’s helpful to understand why a crochet fox is such a great project for beginners. The shape of the fox—round head, tapered body, small ears, and simple tail—makes it easy to build using basic amigurumi construction. This Easy crochet fox for beginners-Step by Step Tutorial uses simple stitches like single crochet, increases, and decreases. These foundational skills will not only help you create this project but also prepare you for many other amigurumi patterns in the future. With patience and a bit of practice, you will feel proud of the adorable fox you create.
Materials You Need to Get Started
When following the Easy crochet fox for beginners-Step by Step Tutorial, choosing the right materials will make the entire experience more enjoyable. You will need medium-weight yarn in the traditional fox colors: orange, white, and black. Acrylic yarn is often the easiest for beginners because it is soft, affordable, and easy to unravel if you make mistakes. Cotton yarn is another great option if you prefer a firmer texture.
A 3.0 mm or 3.5 mm crochet hook is usually recommended for amigurumi because it creates tight stitches that keep the stuffing from showing. Using a hook slightly smaller than the one recommended on the yarn label helps you maintain the shape of your fox. This is especially important when working with small details like ears and tails, which should stay firm and compact.
Stuffing material, such as polyester fiberfill, is essential for giving your fox its shape. It allows you to control how soft or firm the toy becomes, depending on your preference. Beginners often enjoy working with fiberfill because it spreads easily and adapts well to crocheted pieces. During this Easy crochet fox for beginners-Step by Step Tutorial, you will learn how to distribute stuffing evenly to keep the fox proportional.
You will also need basic tools like scissors, a tapestry needle, and stitch markers. Stitch markers are extremely useful in amigurumi because they help track the beginning of each round. This prevents mistakes and ensures that your fox has a consistent shape. A tapestry needle is used to sew the pieces together securely, helping each part stay in place after assembly.
Safety eyes are optional but highly recommended if you are not making the fox for a small child. They add personality and charm, making the fox look lively and expressive. If the toy is intended for infants or toddlers, consider embroidering the eyes for safety. This Easy crochet fox for beginners-Step by Step Tutorial encourages using whatever option fits your needs best.
Finally, you may want to prepare a small amount of brown or dark yarn for details like the nose or tail tip. These finishing touches make your fox unique and give it a polished look. With all materials ready, you are prepared to begin the tutorial with confidence.
Step-by-Step Guide to Crocheting the Fox Body
The first part of the Easy crochet fox for beginners-Step by Step Tutorial focuses on making the body, which is usually crocheted in a continuous spiral. Begin by making a magic ring and working several single crochets into it. This creates a tight center that will form the bottom of the fox’s body. The magic ring technique may take a little practice, but it gives the best results and prevents any holes at the base.
After forming the ring, you will increase each round gradually to expand the body. Increasing is simply adding two single crochets in one stitch, which helps shape the fox. As you follow the pattern, you will see the body take on a rounded form, similar to an egg shape. This simple shaping technique is key to creating smooth curves, which is what makes amigurumi so appealing.
Once the body reaches the desired width, the next step in this Easy crochet fox for beginners-Step by Step Tutorial is working even rounds. These rounds maintain the size of the fox and help elongate the body. Beginners often find this part relaxing because the repetition of stitches helps build confidence and rhythm. Keep your tension consistent to avoid lumps or irregularities.
When the body has reached the correct height, you will begin decreasing. Decreases help taper the top of the body, preparing it for the attachment of the head. It’s important to stuff the piece firmly as you go. The fox should feel soft but not floppy. Overstuffing can distort the shape, while understuffing can make the fox collapse. The tutorial encourages stuffing gradually and evenly.
Once the decreases are complete, finish off the body and leave a long tail of yarn. This tail will be used later to sew the head onto the body. The body should now resemble a small plush shape that will form the foundation of your fox. With this part complete, you are ready to move on to the head.
The head follows many of the same steps, using rounds of increases and decreases. The main difference is that the head is usually more spherical, giving your fox an adorable, rounded face.
Creating the Head, Ears, Tail, and Details
The head is one of the most important parts of the Easy crochet fox for beginners-Step by Step Tutorial, as it gives the fox its personality. Begin with a magic ring and increase the stitches until you form a round sphere. After reaching the widest point, continue with several even rounds. This allows the head to gain volume and softness. Beginners often enjoy this part because the shape becomes clearly recognizable.
Before closing the head completely, insert the safety eyes if you are using them. Spacing them evenly is essential for achieving a cute appearance. When the eyes are correctly placed, stuff the head firmly with fiberfill. A well-stuffed head keeps its shape and supports the ears and facial features.
The ears are usually made by crocheting small triangular pieces. In this Easy crochet fox for beginners-Step by Step Tutorial, the ears are simple and beginner-friendly. They involve crocheting small rounds, followed by shaping them into triangles through strategic increases and decreases. Once complete, they can be sewn to the top of the head. Make sure both ears align symmetrically for a polished look.
The tail is an easy and enjoyable piece to create. Using orange and white yarn, crochet a tapered tube shape. The tail should be flexible but firm enough to hold its shape. Adding a white tip gives the fox its iconic look. This characteristic detail is one of the reasons beginner amigurumi makers love this project.
For the nose, embroider a tiny triangular shape using black yarn. This adds charm and expression to your fox’s face. If you prefer, you can also embroider a small smile to give your fox even more personality. These embroidered details are essential finishing touches in the Easy crochet fox for beginners-Step by Step Tutorial.
With all the parts complete, the next step is sewing them together. Take your time during assembly, as neat stitching ensures your fox looks professional and well-made.
Assembling Your Crochet Fox
Assembly is the final stage in the Easy crochet fox for beginners-Step by Step Tutorial, and it’s where your project truly comes to life. Begin by sewing the head onto the body. Use the yarn tail you left earlier and make sure the head is centered. Stitch around the base of the head carefully, tightening the seam as you go for stability.
Next, sew the ears onto the top of the head. Adjust them until they sit evenly. Ears play a big role in the fox’s expression, so take time to place them correctly. A small tilt can make the fox look playful, shy, or curious depending on your preference.
Attach the tail to the lower back of the body. The tail should angle upward slightly, giving the fox a lively and balanced appearance. Proper placement of the tail enhances the overall structure of the amigurumi and adds charm.
If you have created small arms or legs, sew them next. These pieces are optional in many beginner patterns, but they add extra character. Avoid overstuffing small limbs, as they should look soft and slightly flexible.
Once everything is attached, check for loose ends and weave them in securely. This step prevents unraveling and gives your fox a clean finish. The final result is a cute, handmade fox that reflects your effort and creativity.
You can now display your fox, give it as a gift, or use it as inspiration for future amigurumi projects. The goal of this Easy crochet fox for beginners-Step by Step Tutorial is to help you build confidence and enjoy the art of crochet.
FAQ
Is this project suitable for complete beginners?
Yes, the tutorial is designed with beginners in mind and uses only basic stitches.
How long does it take to make the crochet fox?
Most beginners finish it in 3 to 6 hours, depending on experience.
What type of yarn is best?
Medium-weight acrylic or cotton yarn works best for this project.
Can I make the fox in different colors?
Absolutely! You can use any colors you like for a personalized touch.
Do I need safety eyes?
No, you can embroider the eyes if you prefer, especially for young children.
Can I sell the foxes I make?
Yes, handmade crocheted items are commonly sold at craft fairs and small shops.
Conclusion
This Easy crochet fox for beginners-Step by Step Tutorial has guided you through choosing materials, crocheting each part, assembling your fox, and adding personal touches.
By following these steps, you can create an adorable handmade toy and develop valuable amigurumi skills.
I hope you enjoyed this tutorial and feel inspired to keep creating. Please leave your sincere opinion and suggestions so I can continue improving my content for you.