
Creating an Easy crochet granny square bag – Step by Step Tutorial is a fun and rewarding project for crafters of all skill levels. This easy crochet granny square bag combines timeless granny square designs with practical functionality, resulting in a stylish accessory that is perfect for everyday use. Whether you are a beginner or an experienced crocheter, this tutorial provides a clear and detailed guide to making your own unique bag.
The beauty of an easy crochet granny square bag lies in its versatility. You can choose different color combinations, yarn types, and granny square patterns to create a bag that reflects your personal style. This project not only enhances your crochet skills but also provides a functional accessory that can be used for shopping, carrying books, or as a casual fashion statement.
Crocheting a bag using granny squares is also an excellent way to practice basic crochet stitches and techniques. Each square is an opportunity to refine your skills while creating a cohesive and visually appealing design. Following this Easy crochet granny square bag – Step by Step Tutorial, you’ll gain confidence in combining multiple squares into a finished bag with professional-looking results.
Materials and Tools Needed
To begin your Easy crochet granny square bag – Step by Step Tutorial, gather all necessary materials. High-quality cotton or acrylic yarn is recommended for durability and ease of stitching. Choose colors that complement each other to enhance the visual appeal of your bag.
You will also need a crochet hook suitable for the yarn weight. A size recommended on your yarn label typically works best. Ensure your hook allows for even tension and smooth stitching.
Additional tools include scissors, a yarn needle for weaving ends, and stitch markers if needed. These small items help keep your project organized and make assembly easier.
Optional embellishments such as buttons, tassels, or beads can be added for extra personalization. These decorative touches elevate the bag’s appearance and make it truly unique.
A comfortable workspace with adequate lighting is important to reduce eye strain and make the crocheting process enjoyable. Keep all your tools and yarn organized for efficiency.
Finally, prepare your pattern reference, either printed or digital, so you can follow along step by step without interruption. This ensures a smooth and seamless crafting experience.
Creating the Granny Squares
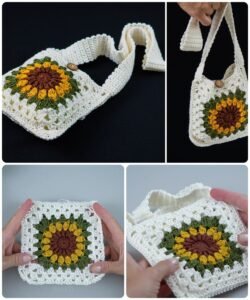
The first step in your Easy crochet granny square bag – Step by Step Tutorial is making the granny squares. Each square forms the building block of your bag, so consistency in size and tension is important.
Start by creating a magic ring or chain loop, then work in rounds to form the classic granny square pattern. Use double crochet stitches and chain spaces to achieve the traditional openwork look.
Continue adding rounds until your squares reach the desired size. Typically, 4-5 inches per square works well for a medium-sized bag, but you can adjust the size according to your preference.
Make enough squares to cover the front, back, and sides of the bag. Planning the total number of squares in advance ensures that your color pattern is balanced and visually appealing.
Weave in all yarn ends neatly to prevent unraveling. Proper finishing at this stage ensures that the squares are ready for assembly.
Finally, block your granny squares if desired. Blocking helps even out stitches and ensures each square is uniform, which results in a polished finished bag.
Assembling the Bag
After preparing the granny squares, the next step in the Easy crochet granny square bag – Step by Step Tutorial is assembling the bag. Arrange the squares according to your chosen color pattern before joining them.
Join the squares using your preferred method, such as slip stitch, single crochet, or whip stitch. Ensure the seams are neat and secure for durability.
Attach the front, back, and side panels to form the bag’s body. Pin or clip the squares in place to maintain alignment while stitching.
Add a base to the bag if desired. A solid crochet panel or a granny square arrangement can provide additional structure and stability.
Reinforce all seams with additional stitching if necessary. This step ensures your easy crochet granny square bag can withstand daily use without coming apart.
Finally, check the alignment and fit of all components before moving on to the finishing touches. A well-assembled bag provides both functionality and aesthetic appeal.
Finishing Touches
The final stage of the Easy crochet granny square bag – Step by Step Tutorial involves adding finishing touches. Crochet or attach handles that complement the bag’s size and style.
Consider lining the bag with fabric for extra durability and a polished interior. Sew the lining securely to prevent shifting during use.
Optional embellishments like buttons, tassels, or appliqués can enhance the bag’s appearance. Add these elements thoughtfully to maintain balance and style.
Weave in all loose ends and trim any excess yarn for a clean finish. This ensures your bag is ready for immediate use.
Press lightly with an iron if desired, being careful with the yarn type. Proper care of the finished bag helps maintain its shape and appearance.
Finally, inspect your easy crochet granny square bag to ensure all seams are secure and embellishments are firmly attached. This final review ensures a high-quality finished product.
FAQ About Easy Crochet Granny Square Bags
Q: Can beginners make an easy crochet granny square bag?
A: Yes, this Step by Step Tutorial is designed to be accessible for beginners while providing clear guidance on each stage.
Q: What type of yarn is best for this project?
A: Cotton or acrylic yarn works well due to its durability, stitch definition, and ease of handling.
Q: How many granny squares do I need for a medium-sized bag?
A: Typically, 12-16 squares are sufficient, depending on the size of each square and the bag dimensions.
Q: Can I personalize the bag with colors or patterns?
A: Absolutely. Mixing colors, adding stripes, or alternating patterns makes your bag unique.
Q: Should I line the bag?
A: Lining is optional but recommended for added structure and durability, especially for carrying heavier items.
Q: How do I join granny squares neatly?
A: Slip stitch, whip stitch, or single crochet joining methods work well. Ensure consistent tension and alignment for a polished finish.
Conclusion
Making an Easy crochet granny square bag – Step by Step Tutorial is a fun and satisfying project that combines creativity with practicality.
By following each step carefully—from creating granny squares, assembling the bag, to adding finishing touches—you can craft a beautiful and functional accessory suitable for daily use or gifting. This tutorial empowers both beginners and experienced crocheters to explore their creativity while developing valuable crochet skills.
Share your experience, offer feedback, and suggest ideas to inspire others to make their own easy crochet granny square bag.